How to Delete Icons on Android Phone Home Screen?
Jul 12, 2024 • Filed to: Manage Device Data • Proven solutions
The home screen is undeniably the most important element of the smartphone’s interface design. Why so? Simply because it serves as the main gateway toward the functions and features of the mobile device. Users generally access the home screen to open certain mobile apps or run a particular program. That’s why it comes as no surprise that this navigation display is filled with numerous icons and various widgets. Does your home screen look like this, too? Don’t worry. It’s totally fine. For sure, other users have the same setup as well.
Sure. You can stuff your home screen with apps and other overlay. Modern Android smartphones give more freedom to users when it comes to this kind of customization. However, it is highly advisable to keep your home screen nice and tidy all the time to prevent unnecessary inconvenience. Among the many things you can do is delete duplicate icons on your Android home screen navigation. How so? Well, there are many tutorials out there on how to delete an app icon on Android smartphones. Just choose the best technique that works perfectly in your current situation.
In this article, we will talk about the organization of home screen setups on mobile devices. We will also provide a few effective tutorials on how to delete icons on Android phone home screen. Continue reading below to learn more.
Part 1. How to Organize Your Smartphone Home Screen?
As mentioned earlier, the home screen of your mobile device serves a very important purpose. It acts as the starting point whenever you use your smartphone for various tasks and activities. Thus, it will surely be of great help to you if your home screen is arranged properly. Don’t worry. There are absolutely many ways to do that. Check out the tips listed below and read the items very well. Try to incorporate them into your existing navigation setup.
1. Choose a great wallpaper.
Users have absolute freedom when it comes to wallpaper customization for their home screens. You can choose whatever pictures or illustrations you want. However, take note that wallpapers must provide both aesthetic and functional value to your overall home screen setup. Choose a wallpaper that doesn’t create distractions or confusion. If the design doesn’t blend well with your apps, you have two options. You can change it or delete the icon on your Android home screen.
2. Don’t fill the home screen with unnecessary widgets.
There are numerous widgets you can add to your home screen. For instance, you may use a calendar widget if you wish to easily keep tabs on your daily schedule. Another thing, you may activate the music widget in case you want to play songs in just a snap. Yes. Widgets are there to offer convenience to us. However, don’t overcrowd your home screen with too many widgets. One or two home screen widgets are already enough, depending on the actual size of your Android smartphone. If your home screen still looks congested, then try to delete icons on your Android phone forefront navigation.
3. Categorize the icons into specific folders.
Do you need to add ten or more app icons to your home screen for easy navigation? If so, it’s best to categorize them into specific folders. Don’t worry. It is very simple. Start by creating and labeling several folders on your home screen. Afterward, classify the apps on your mobile device and then assign them to their respective folders. If you mistakenly move a particular app to the wrong folder, just delete the icon on your Android home screen. Yes. It’s just as easy as that. No need to make things complicated over this matter.
4. Resize the app icons properly.
Let’s say you cannot fit the app icons properly. They are too big for your home screen. Is there any effective solution to fix this problem? The short answer is absolutely yes. You can resize the app icons according to your preferences. Yes. Most Android smartphones nowadays allow this kind of modification. If it still doesn’t work, the best way you can do is delete the icon on your Android home screen. Don’t worry. It’s a piece of cake. There are many guides online that can assist you in this regard.
5. Move the icons you frequently use to the Favorites Tray.
The Favorites Tray at the bottom part of your home screen is a dedicated space for apps you frequently use. Basically, it stays within the home screen display even if you move the pages back and forth. Therefore, you can easily access certain apps inside the tray without the need to go from one page to another. Have you already calibrated your Favorite Tray settings? If not, then delete the icon on your Android home screen and move it there. One way or another, it will surely make your home screen navigation a lot more convenient.
6. Keep the unused apps inside the drawer.
One thing is for certain: You don’t need to move all your apps to the home screen. You can keep some of them inside the drawer, especially if you’re not using these apps regularly. Don’t worry. It is not that hard to put your home screen in order. If you don’t need the app, then delete the icon on your Android home screen and replace it with others. It’s just as simple as that.
7. Don’t remove the search widget from your home screen.
You can easily locate certain files or programs on your mobile device by means of the search widget. Through this feature, all you need to do is enter a specific keyword and then browse the suggested results. In a minute or two, you’ll surely find whatever you’re looking for. That’s why you should not remove the search widget from your home screen. What if you need more space? Well, then, delete duplicate icons on your Android home screen. That’s the best option to keep the search widget around your home screen.
Part 2. How to Delete Icons on Android Phone Home Screen?
There is no denying that the easiest way to organize your home screen is to keep it minimal and simple. How so? It’s very simple. Delete unnecessary icons on your Android phone home screen. Don’t worry. It’s a piece of cake. Do you want to know how? If so, check out the list of tutorials provided below. Read the instructions and follow the indicated steps properly.
Method 1: Remove the home screen shortcuts.
In actuality, you have the option to delete the app icon directly from your Android home screen. All it takes is just a few taps on your mobile device to complete this customization. Do you want to try it on your end? If so, here’s a short guide for you.
- Step 1: Unlock your Android smartphone and then access your home screen.
- Step 2: Find the specific icon you want to remove from your home screen.
- Step 3: Tap and hold the icon and then drag it toward the Remove option. Immediately, the icon will vanish from the home screen.
![]()
NOTE: If you wish to reverse the deletion, simply click Undo on the small pop-up notification at the bottom section of your screen.
Method 2: Uninstall the mobile application.
Another method you can try is to uninstall the mobile application. Of course, its corresponding icon will be gone from your home screen if you uninstall the actual app. Do you want to try this technique and get rid of the app once and for all? If so, here’s the guide on how to delete an icon on Android home screen by uninstalling the app.
- Step 1: Go to the Settings app on your mobile device.
- Step 2: Click Apps.
![]()
- Step 3: Browse the list and find the app you want to uninstall. Click on it afterward.
- Step 4: Click Uninstall.
![]()
- Step 5: Lastly, click OK to confirm your request.
![]()
Method 3: Move the icon to another home screen page.
If you don’t want to see an icon on your main home page, then move it to another. Yes. It’s just as simple as that. No need to make things complicated on your end. Do you want to know how to do it in easy steps? If so, check out the tutorial below on how to delete an icon on your Android smartphone through this method.
- Step 1: Unlock your Android smartphone and then access your home screen.
- Step 2: Find the icon you want to move to another home screen page. Right after, tap and hold it for a while.
- Step 3: Drag it to the left or to the right section of your home screen. Wait for the page to flip automatically.
![]()
- Step 4: Move the icon to your preferred position and then release it afterward.
Part 3. How to Recovery Data From the Deleted Icons?
Let’s say you successfully delete an icon on your Android home screen. That’s great. Unfortunately, the app data of the deleted icon gets eradicated by mistake. Is there an effective way to restore them? Luckily, there is. Dr.Fone - Data Recovery (Android) can absolutely help you with that. It has a powerful data recovery feature that can bring the deleted files back to your mobile device. Do you want to try it now? If so, check out the guide provided below.

Dr.Fone - Data Recovery (Android)
Recover Deleted Files from Android Without Root
- Recover data from Android devices.
- Supports to recover Contacts, Messages, Call history, Video, Photo, Audio, WhatsApp message & attachments, documents, etc.
- Supports 6000+ Android phones and tablets from brands like Samsung, HTC, Motorola, LG, Sony, Google.
- Highest retrieval rate in the industry.
- Step 1: Launch the Dr.Fone on your desktop afterward. Once if the main dashboard fully loads up and becomes visible on your computer screen, connect your Android smartphone using a data cable. Follow the on-screen instructions and perform the indicated steps in the right order to make sure that the connection between the two devices is stable enough to facilitate the succeeding operations.
- Step 2: Navigate to the left-side panel and then click Toolbox. On the main dashboard, click Data Recovery.
- Step 3: Since you’re trying to restore data from your Android smartphone, click Android.
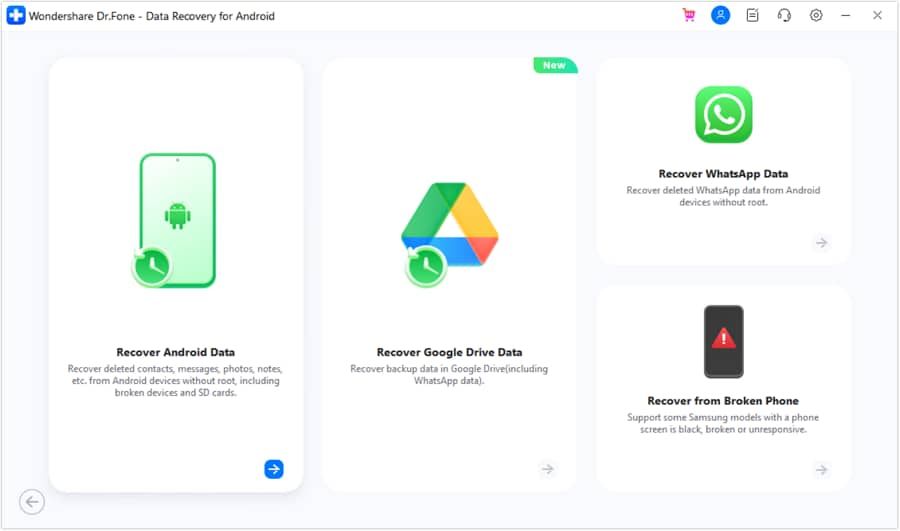
- Step 4: After that, click Recover Android Data.
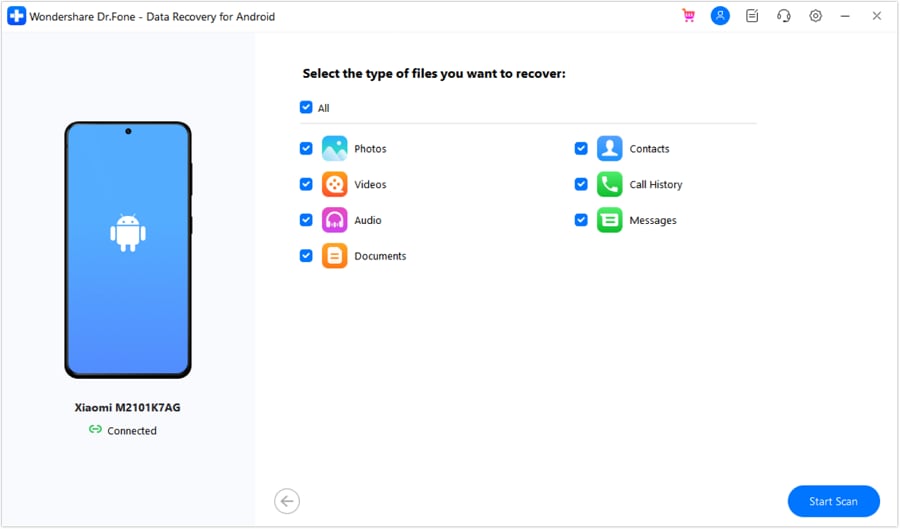
- Step 5: Tick the box next to the specific type of files you want to recover from the deleted icon. You can select as many as you want. After that, click Start Scan to proceed.
- Step 6: Wait while Wondershare Dr.Fone is scanning your mobile device. Refrain from using your smartphone and computer while the process is ongoing to avoid unwanted delays and unnecessary interruptions.
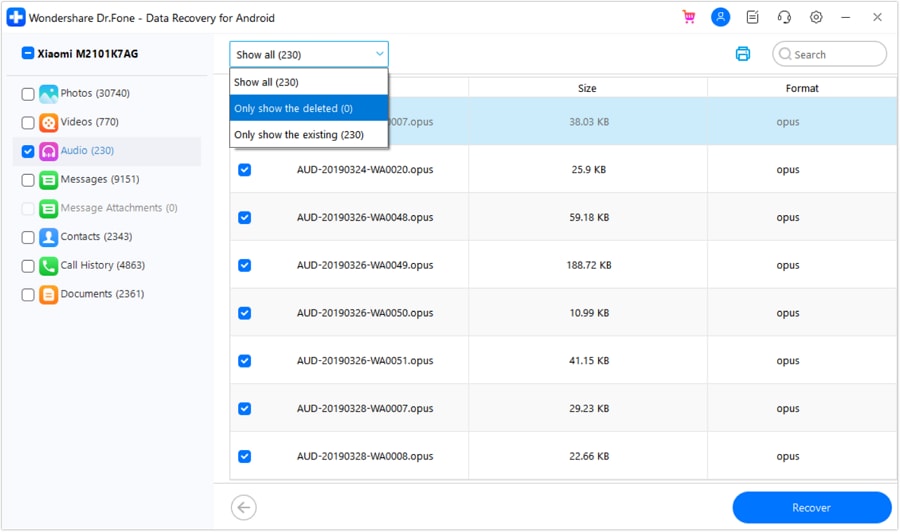
- Step 7: After a few minutes, the files that can still be recovered from your mobile device will be displayed on your computer screen. Browse the list and select them individually. Once you’re done, it’s time to commence the actual data recovery process. Click Recover.
- Step 8: Choose a specific location on your computer where you want to restore the deleted data. After that, click Recover to continue.
- Step 9: Once the data recovery is completed, transfer the restored files back to your mobile device.
BONUS TIP: Back Up Your Android Smartphone Always
Most of the time, no problem occurs when you delete an app icon on your Android home screen. It’s just any other mobile procedure that does not bring complications. However, we cannot still rule out the possibility of data loss because it’s very common nowadays. Anything unexpected can suddenly happen in a blink of an eye. Hence, it’s best to be prepared in case something undesirable gets in your way. Back up your Android smartphone regularly. One way or another, it will help you a lot at times you of trouble and difficulties. Don’t worry. Wondershare Dr.Fone has made it easier for everyone. Do you want to try it now? Here’s a short guide for you.
- Step 1: Run the newly installed Wondershare Dr.Fone on your computer desktop. Once it fully loads up, connect your Android smartphone using a data cable.
- Step 2: Access the left-side panel and then click My Backup. After that, head over to the main dashboard and then click Back Up Now.
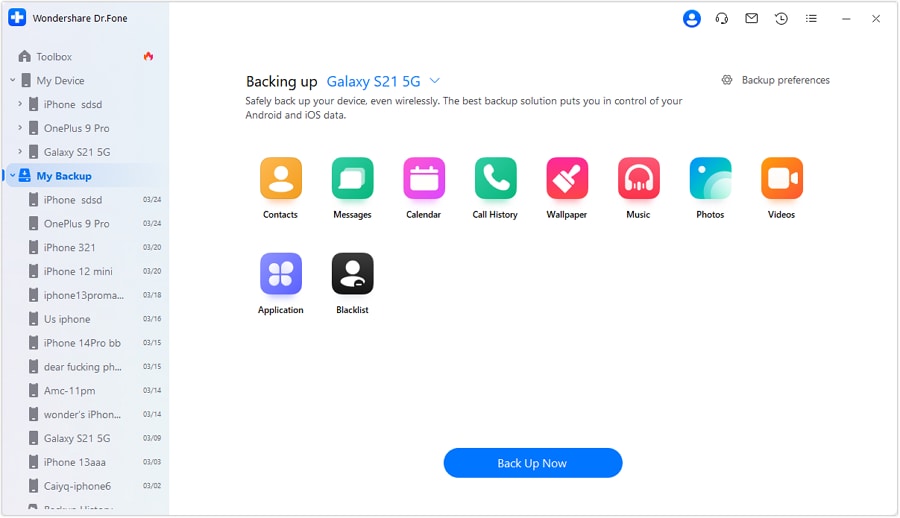
- Step 3: To back up certain file types, follow the on-screen guide and perform the indicated steps accordingly. Once you’re done, click OK to continue.
- Step 4: Immediately, Wondershare Dr.Fone will start the backup process. Refrain from using your smartphone and computer while it is currently ongoing to avoid unwanted delays and unnecessary disruptions.
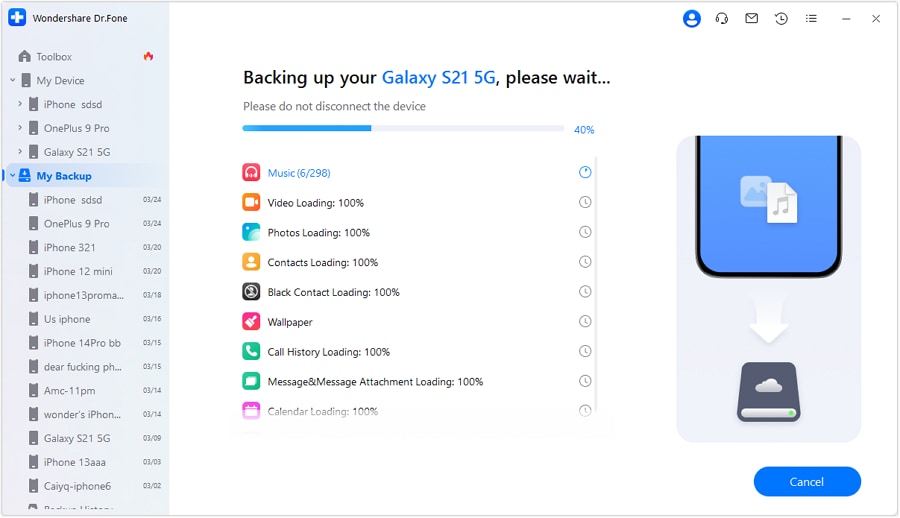
- Step 5: Once completed, review the backup files afterward. Simply click Open in Folder or View Backups.
Conclusion
If your Android smartphone offers numerous customization tools for the home screen, don’t hesitate to take advantage of it. Keep it nice and tidy all the time to prevent any form of inconvenience on your end. Refer to the tips provided above. Incorporate them into the current organization setup of your home screen. Moreover, delete duplicate icons on your Android home screen. It will only distract or confuse you whenever you use your mobile device. Follow the abovementioned tutorials on how to delete an icon on the Android home screen. If you need more assistance, download Dr.Fone - Data Recovery (Android) on your computer. It has powerful file backup and data recovery situation that can absolutely help you in this kind of situation.
Android Manage
- Android to iTunes/iCloud
- Android to Mac
- 1. Transfer Data from Android to Mac
- 2. Transfer Videos from Android to Mac
- 3. Transfer Files from Android to Mac
- 4. Connect Android with Mac
- 5. Transfer Photos from Android to Mac
- 6. Sync Android with Mac OS X
- Android to PC
- 1. Transfer Files Using USB Cable
- 2. Share Apps for Android to PC
- 3. Transfer Photos to Windows 10
- 4. Transfer Contacts to PC
- 5. Transfer Photos from Android
- 6. Transfer Files from Android to PC
- 7. Backup and Transfer SMS
- 8. Transfer Photos from Android to PC
- 9. Transfer Videos from Phone to Computer
- 10. Best MoboRobo Alternative to Manage and Transfer Data
- iCloud to Android
- 1. Tips to Sync Data to Android
- 2. Set Up iCloud Account on Android
- 3. Transfer iCloud Contacts
- 4. Transfer iCloud Photos to Android
- iTunes to Android
- 1. Transfer iTunes Audio Books
- 2. Sync iTunes Music with Google Play
- 3. Copy iTunes Playlists to Hard Drive
- 4. Transfer Music from iTunes
- Mac to Android
- 1. Transfer Files from Mac to Android
- 2. Send Files from Mac to Android
- 3. Transfer Music from Mac
- 4. Transfer Photos from Mac
- PC to Android
- 1. Transfer Files to Android Wi-Fi
- 2. Transfer Pictures from Computer
- 3. Transfer Files from PC to Android
- 4. Transfer data from Acer device
- Manage Tips
- ● Manage/transfer/recover data
- ● Unlock screen/activate/FRP lock
- ● Fix most iOS and Android issues
- Manage Now Manage Now Manage Now


Daisy Raines
staff Editor