
How to Recover Deleted Photos from iPhone
(iPhone 15/14/13/X/8 Included)
Jul 12, 2024 • Filed to: Data Recovery Solutions • Proven solutions
We have all done it, haven't we? Accidentally deleted photos from our iPhone, iPad, or iPod Touch and then desperately want to find out how to recover deleted photos on iPhone. Don't panic. We will help you get deleted photos back on the iPhone. It's not that hard. With the right iPhone recovery software, we can recover deleted iPhone photos with a few clicks, including the photos you transfer from your best 360 camera.

It is such a sinking feeling when your memories are lost.
What is Dr.Fone - Data Recovery?
Dr.Fone - Data Recovery (iOS) provides you with three ways to recover deleted photos on iPhone:
- Retrieve photos directly from iPhone,
- Recover your pictures from iTunes backup
- Retrieve your photographs from iCloud backup.
Other important things you should know:
1. If you need to recover important files directly from your iPhone, don't use your iPhone before you get these files back in case of any data overwritten. If the deleted data has been overwritten, there is no way to recover them from your iPhone.
2. If you need to recover deleted photos from iPhone, iPad, or iPod Touch, which is running iOS 15 or later, we might give you very good news. The first thing you should do is tap the 'Photos' app, go to the 'Recently Deleted' folder, and check whether the lost photos are there. If your precious memories are there, you can get deleted photos back on your iPhone, which you thought were lost. If the photos are not there, read on!

Dr.Fone - Data Recovery (iOS)
World's 1st iPhone and iPad data recovery software
- Provide three ways to recover iPhone data.
- Scan iOS devices to recover photos, videos, contacts, messages, notes, etc.
- Extract and preview all content in iCloud/iTunes backup files.
- Selectively restore what you want from iCloud/iTunes backup to your device or computer.
- Compatible with the latest iPhone models.
Solution One: How to Recover Deleted Photos from iPhone?
If you need to recover photos on iPhone 13/12/11, you can use Dr.Fone - Data Recovery (iOS) to scan your iPhone directly.
The steps to recover data from iPhone with Dr.Fone can be as easy as ABC. If you have backed up the data to iTunes before, things will be much easier. If you have not backup data before, it won't be easy to recover all data from iPhone directly, especially for the media content.
Media Contents: Camera Roll (video & photo), Photo Stream, Photo Library, Message attachment, WhatsApp attachment, Voice memo, Voicemail, App photos/video (like iMovie, photos, Flickr, etc.)
- Step 1. Download and install Dr.Fone.
- Step 2. Then run Dr.Fone and connect your iPhone to the computer, go to 'Toolbox' > 'Data Recovery' > 'iOS' > 'Recover Data from device'.
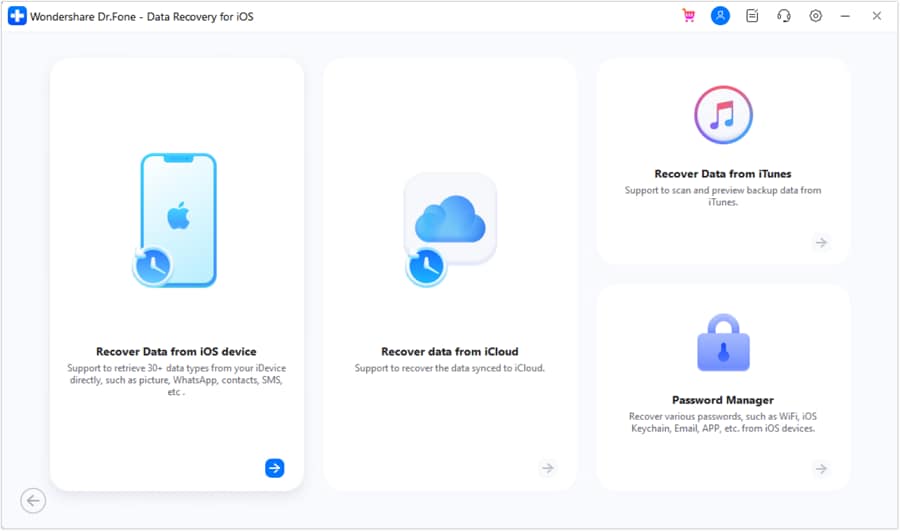
- Step 3. When the program detects your iPhone, select the file types, you would like to recover and click on 'Start Scan' to carry on the process.
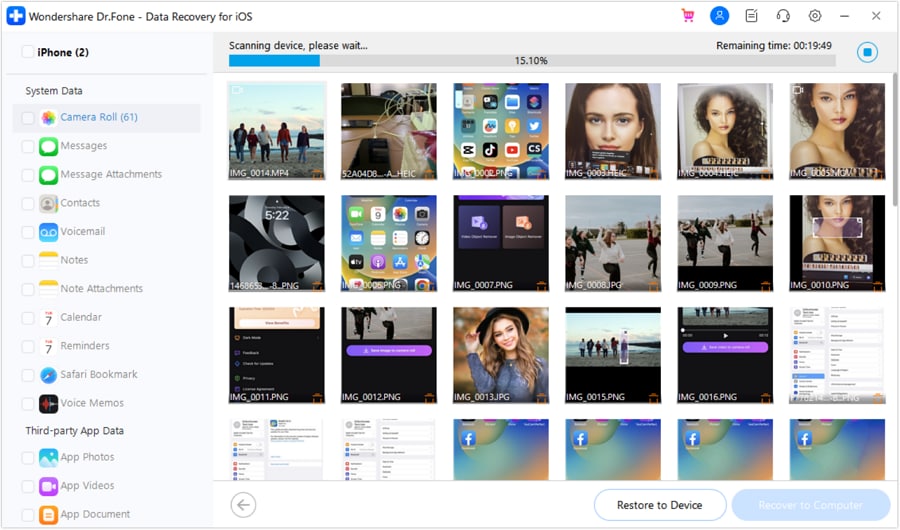
- Step 4. When the scan stops, you can preview and check all data available to recover the scan result.
- Step 5. To recover photos, you can preview every item in the categories of Camera Roll, Photo Stream, and App Photos.
- Step 6. Preview them one by one, and tick the item you want. Then click on the Recover button to save them on your computer with one click.
Could it be any easier? Follow the below video, as easy as ABC, Or you can view more Wondershare Video Community.
Try Dr.Fone Recover Try Dr.Fone Recover
Quite similar, but you might also try the following.
Solution Two: How to Recover Deleted Photos by Extracting iTunes Backup?
If we cannot find the photos directly from the iPhone, we can still try to use Dr.Fone to extract the data from iTunes backup files.
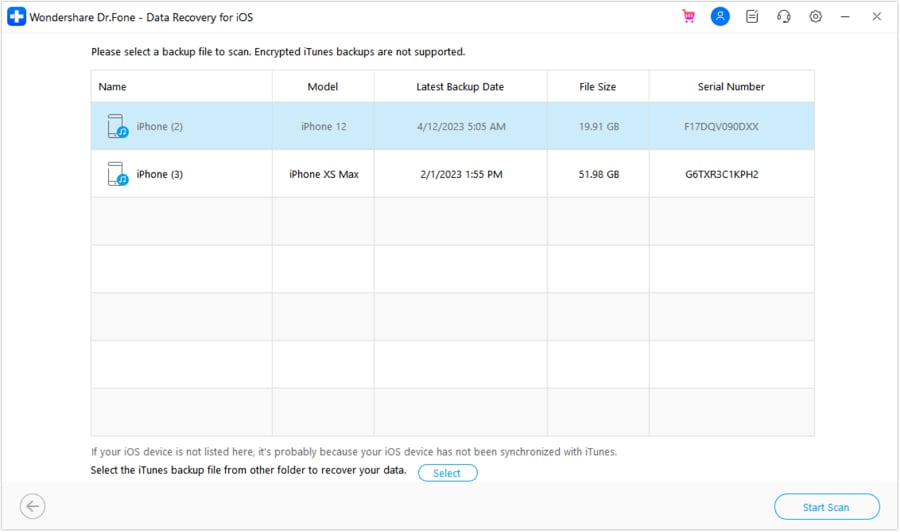
- Step 1. All that we are describing is shown in the screenshot below. After running the Dr.Fone program, connect your iPhone to the computer. This time chooses 'Recover from iTunes Backup File' from the left column.
- Step 2. The program will detect all iTunes backup files existing on your computer. Choose the backup for your iPhone and click on the 'Start Scan.' It should take as little as 2 minutes.
It is always good to have choices, isn't it?
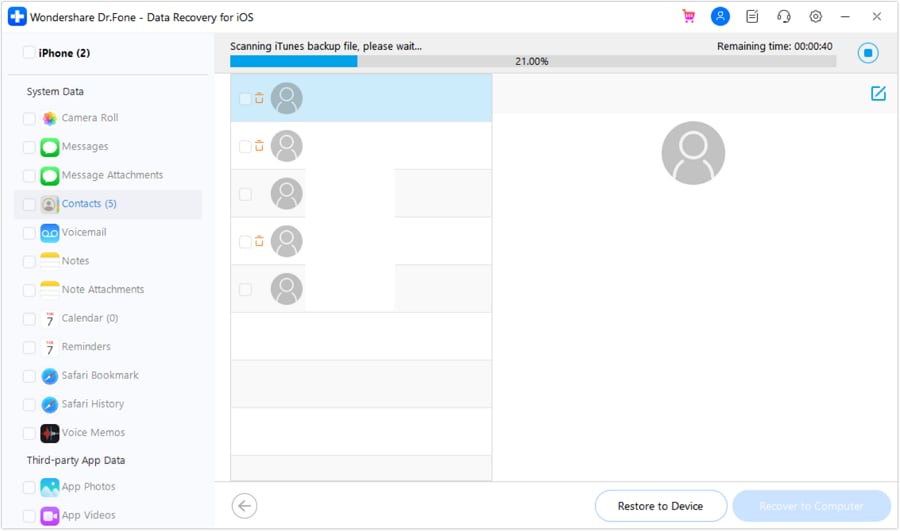
- Step 3. There should now be a big smile on your face. There, shown in clear details, are all your memories, ready to be restored.
- Step 4. Just put a checkmark against which ones you chose to recover, then click on the 'Recover to Computer button.
Smiles all around.
Solution Three: How to Recover iPhone Photos from iCloud Backup?
- Step 1. This time, from the left side of Dr.Fone, you should select 'Recover from iCloud Backup File'. You should enter your Apple ID and password.
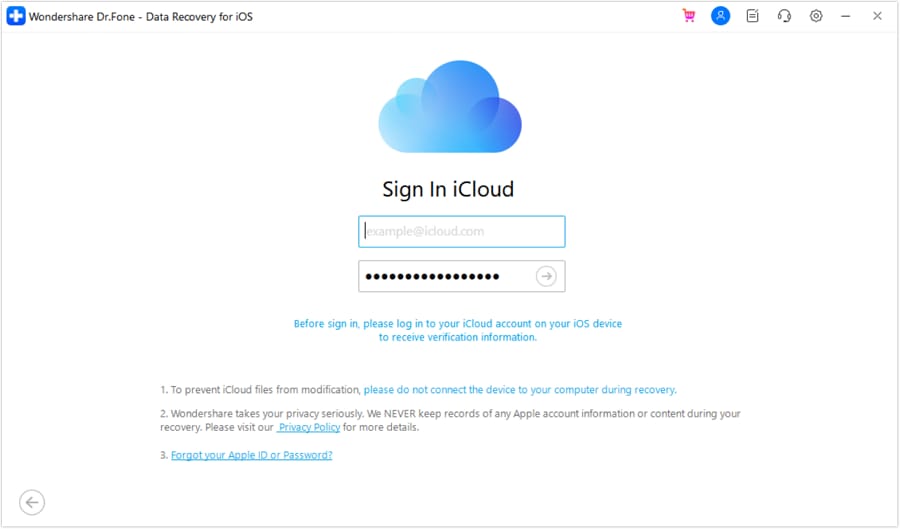
- Step 2. After that, the program will automatically find all backup files existing in your iCloud account.
- Step 3. Select the one you want to recover iPhone photos from to download them to your computer. This will take longer, depending on the size of the iCloud backup and your internet connection. Please be patient.
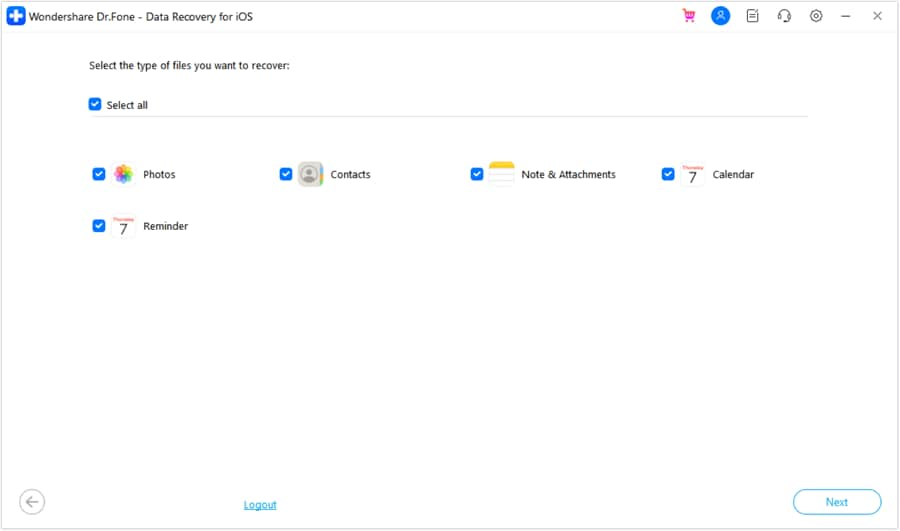
For this method, you will need to sign in to iCloud.
Good idea to have your username and password ready.
- Step 4. Once the download of the iCloud backup has been completed, you can review the content contained in your iCloud backup.
- Step 5. For the photographs, you can look at 'Photos & Videos.' Preview them one by one and check the items you want.
- Step 6. Then click on the 'Recover to Computer button to save your photographs to your computer.
Happy memories.
Precious information.
Conclusion
All of these methods work well. You will soon be seeing all those smiling faces again. And you can also print these precious photos via an iPhone photo printer. Then you will get a physical backup.
Tips: Wondershare Dr.Fone is a tool that helps you keep your important data safe. It can back up all the important information on your iPhone, like photos, music, videos, contacts, and more and is compatible with over 8000 Android devices. The backup process is easy and only takes a few clicks. You can also restore your backup to any device you want, and choose which data you want to restore. This is a great way to make sure you never lose your important information!
iPhone Contacts
- Back up iPhone Contacts
- Manage iPhone Contacts
- 1. Export Contacts from iPhone
- 2. Manage iPhone Contacts
- 3. Find and Merge Contacts on iPhone
- 4. Share Contacts on iPhone
- 5. Get iPhone Contacts from iTunes
- 6. Export iPhone Contacts to CSV
- 7. How to Export iPhone Contacts to a VCF|vCards
- 8. Delete Contacts from iPhone
- 9. Full Guide on Managing iPhone Contacts
- 10. Print Contacts from iPhone
- 11. View iPhone Contacts on Computer
- 12. Edit/Delete/Merge Contact on PC
- Recover iPhone Contacts
- 1. Recover Deleted Contacts on iPhone
- 2. Recover iPhone Deleted Text Message
- 3. Recover iPhone Deleted iMessages
- 4. Recover iPhone Deleted Photos
- 5. Recover Permanently Deleted Data
- 6. FonePaw VS Dr.Fone
- 7. See Blocked Messages on iPhone
- 8. Recover Data from Dead iPhone
- 10. Recover iPhone Deleted Text Message
- 11. Recover Contacts Without Backup
- Transfer Contacts from iPhone
- 1. Sync iPhone Contacts to Outlook
- 2. Transfer Contact without iCloud
- 3. Transfer from iPhone to iPhone
- 4. Transfer Contact With/Without iTunes
- 5. Transfer Contact from iPhone to Android
- 6. Sync Contacts from iPhone to iPad
- 7. Export from iPhone to Excel
- 8. Transfer Contact from iPhone to PC
- 9. Copy Contacts from iPhone to SIM
- Transfer Contacts to iPhone
- 1. Android to iPhone Transfer Apps
- 2. Transfer from Android to iPhone
- 3. Transfer from Android to iPhone XS
- 4. Transfer from Huawei to iPhone
- 5. Transfer from Sony Xperia to iPhone
- 6. Transfer from Samsung to iPhone
- 7. Import Contact from Excel to iPhone
- 8. Import Contact from Gmail to iPhone
- 9. Import Contacts to iPhone
- 10. Sync Outlook Contacts to iPhone
- 11. Transfer Contact from PC to iPhone
- iPhone Contacts TiPs
(iPhone 15/14/13/X/8 Included)


Selena Lee
chief Editor