5 Ways to Transfer Music from iPod to iPad
Jul 12, 2024 • Filed to: Data Transfer Solutions • Proven solutions
While transferring from iPod to iPad the hardest part is transferring music from iPod to iPad which is really not an easy and time taking process while doing it with iTunes. we are going to present this guide in front of you to solve this problem today. This guide will help you to transfer music from iPod to iPad in a manual way and by using other third-party software that allows you to transfer music from iPod to iPad without using iTunes and enables you to do all types of operations with your iOS and Android devices without any issue.
- Part 1: Transfer Music from iPod to iPad with Easiest Way
- Part 2: Transfer Music from iPod to iPad via iTunes
- Part 3: Sync Music from iPod to iPad through Apple Music Sync
- Part 4: Sync Music from iPod to iPad through iTunes Store Sync
- Part 5: Transfer Music from iPod to iPad via AirDrop
- Part 6: Comparison of the 5 Ways
Part 1: Transfer Music from iPod to iPad with Easiest Way
Regarding simplicity and user-friendly solutions, Wondershare Dr.Fone proves to be a game-changer. This tool stands at the top when it comes to data management for Apple devices. Dr.Fone offers a comprehensive suite of tools to manage, recover, and transfer data. With Wondershare Dr.Fone, you can efficiently manage your data through tasks such as importing, exporting, and deleting files.
The intuitive interface of Dr.Fone facilitates the smooth drag-and-drop of files into any preferred iOS app. This ensures a swift and user-friendly experience. Furthermore, the software empowers users to directly transfer iCloud data to an iOS device or a computer. Revel in the convenience of effortlessly syncing songs across your iPhone, iPad, iPod touch, and iTunes.
Key Features of Wondershare Dr.Fone
- Wondershare Dr.Fone also facilitates the transfer of various data types between iOS devices and computers.
- This tool allows the organization of photos, videos, contacts, and various data retrieved from iCloud backups.
- It enables smooth synchronization of your iCloud data with any iOS device or computer.
Steps to Transfer Music from iPod to iPad with Phone Manager Feature
Use the following step-by-step instructions to transfer music from iPod to iPad in a few minutes:
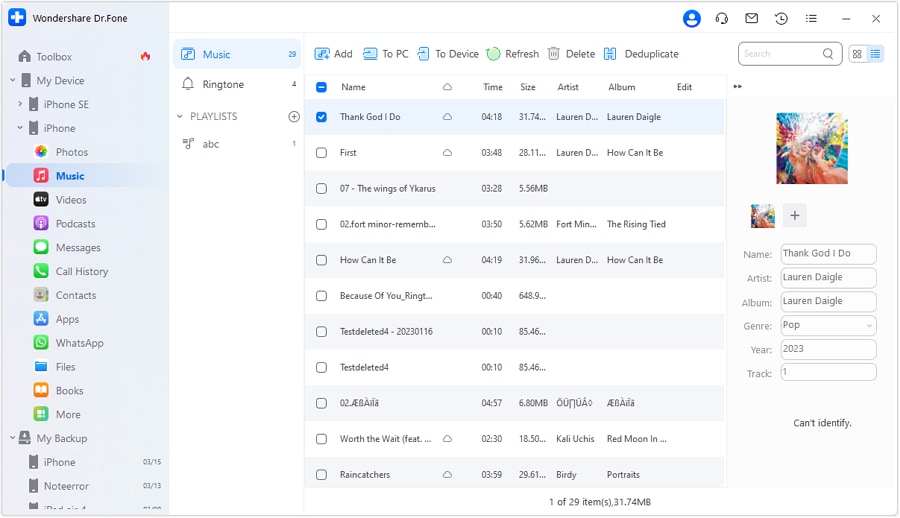
Step 1. Access the Music Tab in Wondershare Dr.Fone
Connect your iPod and iPad to your computer and launch the latest version of Wondershare Dr.Fone. Your Apple devices will be detected by it automatically and will load all the data present on it. You will have to access the “Music” tab from the left panel by expanding the “iPod” device.

Step 2. Select and Complete the Music Transfer Process
All the music files will be categorized as you did on your iPod. Choose the music files you want to move to your iPad and select your iPad by tapping on the “To Device” option from the top. Wondershare Dr.Fone will safely transfer all your selected music files without damaging the data.
Steps to Transfer Music from iPod to iPad with Phone Transfer Tool
Dr.Fone - Phone Transfer can also help you to transfer music from iPod to iPad with one click. Use the following step-by-step instructions to transfer music from iPod to iPad in a few minutes:
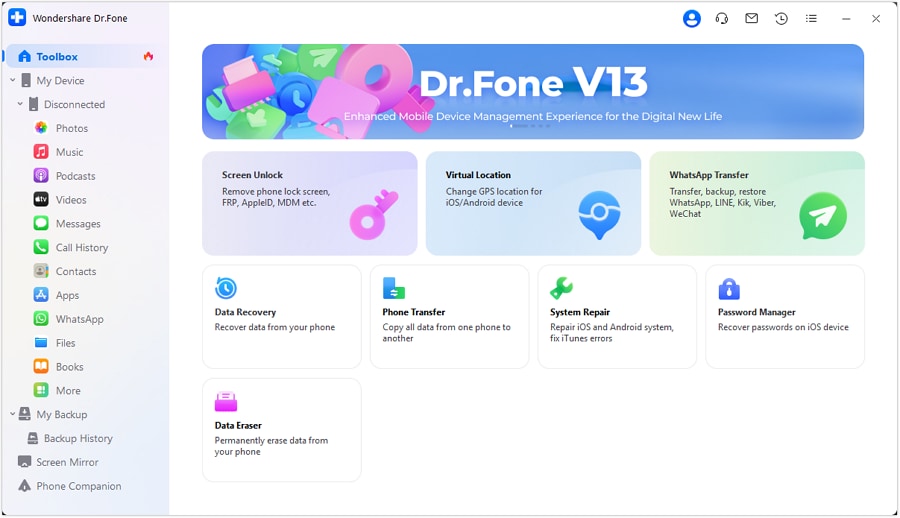
Step 1. Access Phone Transfer in Wondershare Dr.Fone
Connect both iPod and iPad after launching Wondershare Dr.Fone on your computer. Now, click "Toolbox" from the left panel to access the main menu, where you need to tap "Phone Transfer." The next step is to ensure that Wondershare Dr.Fone has assigned the devices the correct positions.
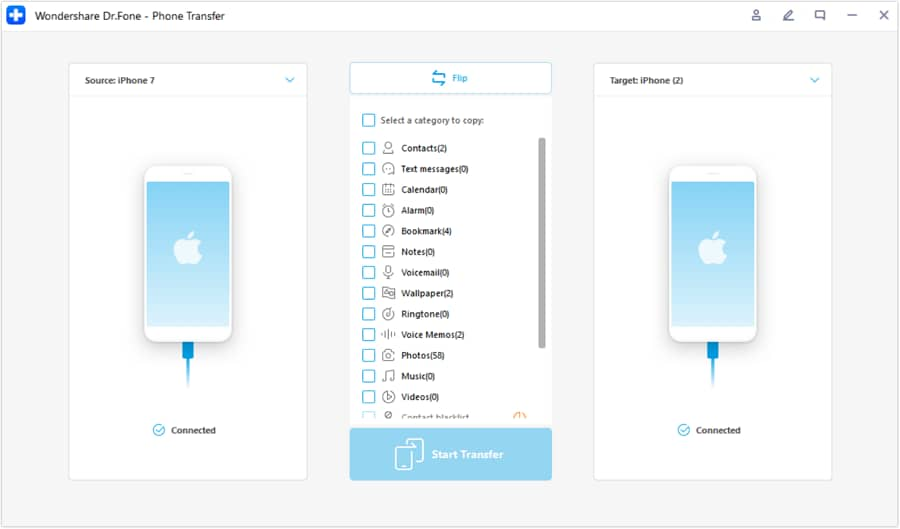
Step 2. Commence and Complete the Music Transfer Process
Your iPod should be at the "Source" position, while the iPad needs to be at the "Destination" position. You can use "Flip" to change the positions if these are wrongly assigned. Now select music and any other data you want to transfer and tap “Start Transfer” to kickstart the process.
Part 2: Transfer Music from iPod to iPad via iTunes
iTunes is a reliable option for those who prefer to stick with Apple's official software. It is a great avenue for transferring music between iOS devices. As iTunes has evolved, its core function of managing and syncing media has remained steadfast. The following comprehensive guide outlines the steps for transferring music from your iPod to your iPad using iTunes:
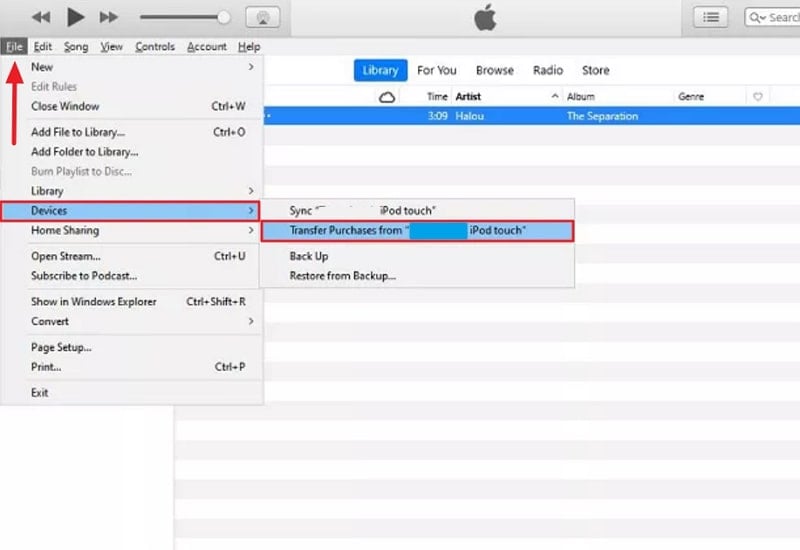
Step 1. Launch the latest version of iTunes and connect your iPod to the computer. In iTunes, click "File," followed by tapping "Devices," and finally, click "Transfer Purchases from [Your iPod's Name]."
Step 2. Once the transfer is complete, safely eject and disconnect your iPod from the computer. Now connect your iPad to the computer, and once iTunes detects it, move to the "Songs" tab in "Music."
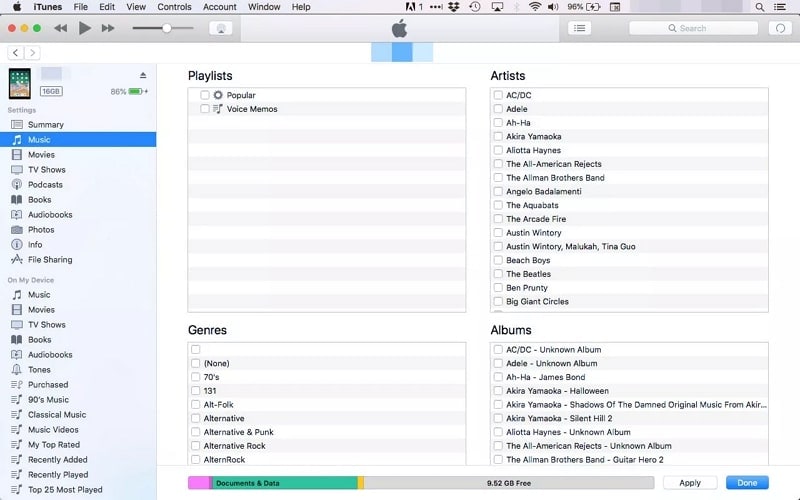
Step 3. Here, you can view the music tracks you've moved from your iPod. Simply choose the songs you wish to transfer, then right-click on them. Opt for "Add to Device" from the menu that appears and designate your iPad as the target device to commence the transfer.
Part 3: Sync Music from iPod to iPad through Apple Music Sync
Apple is consistently broadening its ecosystem, introducing an increasing array of services. The inclusion of Apple Music serves as a means to organize and synchronize music across numerous devices seamlessly. For those subscribed to Apple Music, harnessing its synchronization capabilities enables effortless music transfer from an iPod to an iPad. The following is a step-by-step guide on accomplishing this through Apple Music Sync:
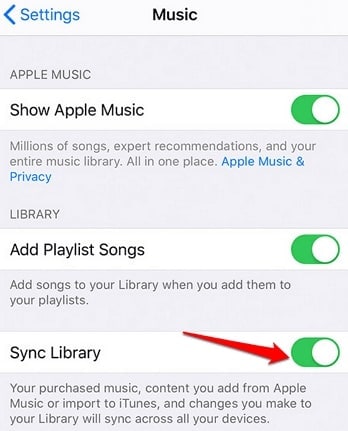
Instructions. The first requirement for this method to work is that you are logged in using the same Apple account on both devices. After that, move to your iPod and open its Settings. Here, access the "Music" tab and go on to toggle on "Sync Library."
Keep in mind that this option will be visible exclusively to Apple Music subscribers. Wait for the completion of the syncing process, after which you'll be able to enjoy these songs on your iPad.
Part 4: Sync Music from iPod to iPad through iTunes Store Sync
Do you prefer a straightforward method without relying on external tools? Using the iTunes Store Sync feature provides an uncomplicated way to transfer your music from an iPod to an iPad. It does that directly through the iTunes Store. Follow these steps to sync your music between the two devices effortlessly:
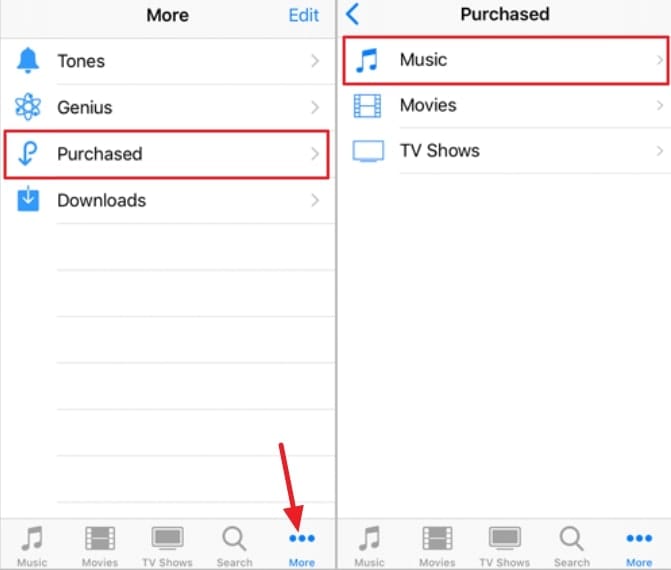
Step 1. Log into your iPad using the same Apple ID as the one logged in iPod. Afterward, open the iTunes Store and tap the three dots near the lower right corner. From the context menu, choose "Purchased" and follow it by selecting "Music."
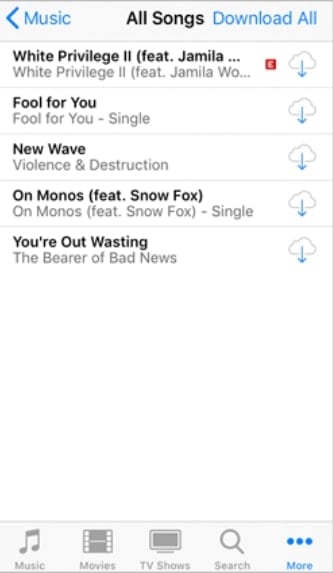
Step 2. On the following screen, tap "Not on This iPad," and you will come across all the required songs. You can now download them on your iPad and enjoy them.
Part 5: Transfer Music from iPod to iPad via AirDrop
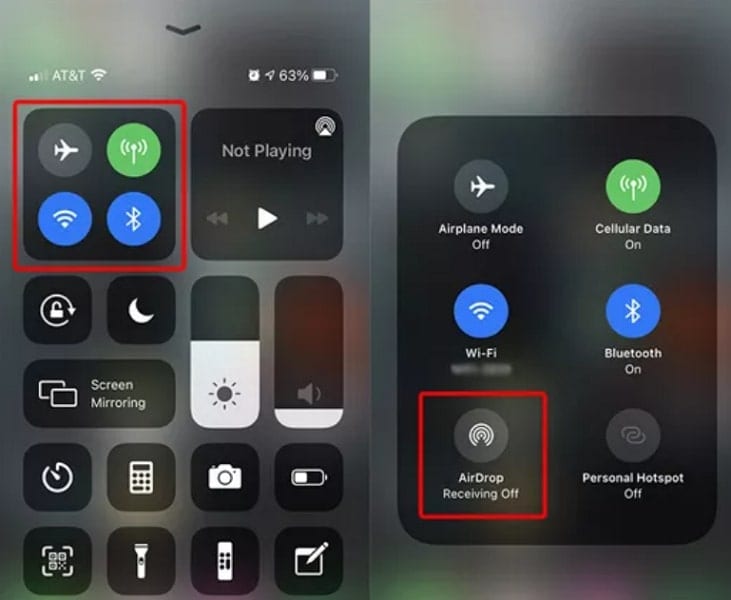
For a wireless and effortless music transfer between your iPod and iPad, Apple's AirDrop is best. It proves itself to be a quick and convenient option. AirDrop employs both Bluetooth and Wi-Fi technologies for transferring files among compatible devices. Below is a detailed guide outlining the steps to transfer music from your iPod to your iPad using AirDrop:
Step 1. After enabling AirDrop, Wi-Fi, and Bluetooth on both devices, move to your iPod. Afterward, go to “Music” in “Settings” and select the file you want to transfer.
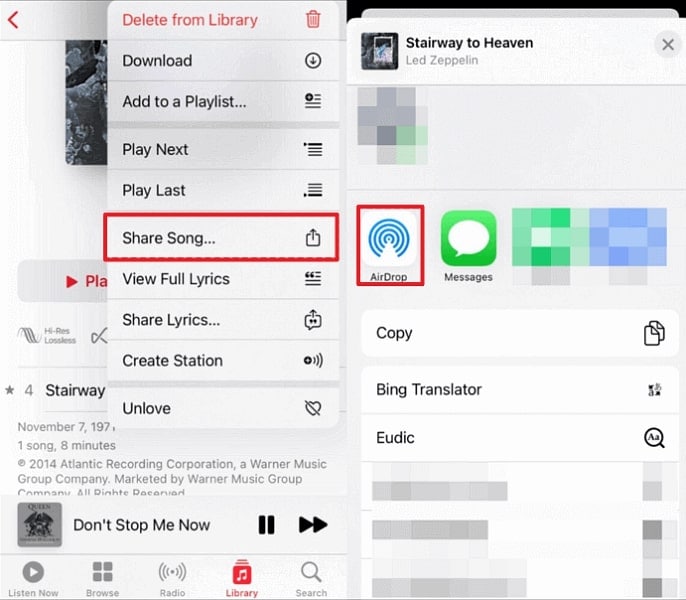
Step 2. Once selected, tap the "Share" icon and choose "AirDrop" as the method. Now select your iPad from the available devices to send the music track. On the iPad, tap "Accept" for incoming AirDrop to complete the process.
Part 6: Comparison of the 5 Ways
Below is a detailed comparison table highlighting the key aspects of each method for transferring music from iPod to iPad:
| Method | Ease of Use | Required Software | Internet Connection | Wireless/ Wired | Data Types Supported | Additional Notes |
| Wondershare Dr.Fone | Very Easy | Wondershare Dr.Fone Software | Required for initial download | Wired (USB connection) | Music, Contacts, Photos, Videos, etc. | Offers a user-friendly interface, supports various data types, and is suitable for those seeking a third-party solution. |
| iTunes | Moderate | iTunes Software | Required for initial setup | Wired (USB connection) | Music, Videos, Photos, Apps, etc. | Official Apple software supports various media types, useful for those accustomed to iTunes functionality. |
| Apple Music Sync | Very Easy | Apple Music Subscription | Required for synchronization | Wireless | Music | Ideal for Apple Music subscribers, it supports wireless synchronization and seamless transfer through iCloud. |
| iTunes Store Sync | Easy | iTunes Store Account | Required for downloading purchased music | Wireless | Purchased Music | Direct method through iTunes Store, ideal for users who purchase music from the iTunes Store. |
| AirDrop | Very Easy | AirDrop (Built-in iOS feature) | Required for device discovery | Wireless | Photos, Videos, Music, Contacts, etc. | Quick and wireless, it is suitable for users who prioritize convenience and have compatible devices. |
Conclusion
In conclusion, the transition from an iPod to an iPad is a common journey for users seeking more functionality and versatility. However, navigating this shift with your cherished music collection requires careful consideration. This article discussed many ways, From traditional routes like iTunes to the wireless conveniences of AirDrop. Yet the comprehensive functionalities of Wondershare Dr.Fone make it the best choice.
We highly recommend considering Wondershare Dr.Fone for its comprehensive data transfer capabilities and efficient Phone Transfer or Phone Manager feature. It simplifies the process of transferring not only music but also contacts, photos, videos, and more between your iOS devices.
Other Popular Articles From Wondershare
iPod Transfer
- Transfer from iPod
- 1. Transfer Your Photos from iPod
- 2. Transfer Music to Computer
- 3. Transfer Music to Computer or Mac
- 4. Transfer Music from iPod Classic
- 5. Transfer Music from iPod (Touch)
- 6. Transfer Music from Formatted iPod
- 7. Transfer Music from iPod to Mac
- 8. Sync iPod to New Computer
- 9. Transfer Music Without Losing Data
- 10. Transfer Pod to iTunes or Computer
- 11.Transfer Music to Hard Drive
- 12.Transfer iPod Music to MP3 Player
- 13.Transfer Music to USB Flash Drive
- 14.Transfer Music from Android to iPod
- 15.Upload iPod Music to Google Music
- 16.Transfer Music from iPod to iPad
- 17.Transfer Music to Samsung Galaxy
- Transfer to iPod
- 1. Transfer Music from iPod to iTunes
- 2. Transfer Music from iPod Classic
- 3. Transfer Music from iPod Nano
- 4. Transfer Music from iPod shuffle
- 5.Transfer Music from iTunes
- 6. Put music on iPod shuffle
- 7. Transfer Audiobooks to iPod
- 8. Transfer MP3 to iPod
- 9. Transfer Music From Window
- 10. Add Videos to iPod nano
- 11.Transfer Music from Hard Drive
- 12.Transfer Music from iMac
- 13.Transfer Music from Computer
- 14.Transfer Photos from Computer
- 15.Transfer Music from iPad
- 16.Transfer Music from iPod
- 17.Transfer Music from iPhone
- iPod Useful Tips
- ● Manage/transfer/recover data
- ● Unlock screen/activate/FRP lock
- ● Fix most iOS and Android issues
- Start Transfer Start Transfer Start Transfer


Alice MJ
staff Editor