5 Best Ways to Transfer Photos from iPad to PC
Sep 07, 2024 • Filed to: Manage Device Data • Proven solutions
iPad is the most popular tablet all over the world. Millions of users are enjoying music, playing games, and reading books with it. The tablet brings users a wide range of choices for their daily life, and they can take advantage of the tablet for different uses.
Thanks to the large screen of the iPad, you can enjoy pictures you have taken with the iPad camera. However, the storage space of the iPad is limited, and you may have to delete photos regularly to free up the storage space, which will cause the loss of precious photos on your iPad. Therefore, a great idea is to transfer pictures from iPad to PC. This allows you to back up your important photos on your PC and free up some valuable space on your iPad in the process. There are several ways on how to do this. The most enticing method is using Dr.Fone - Phone Manager (iOS). We will also introduce you to transferring photos via iTunes and Photo Transfer App, as well as Google Drive and e-mail, which have certain limits when it comes to filing sizes for transfer.
Part 1. Transfer Photos from iPad to PC without iTunes
There are many pieces of software out there with high quality that can offer you the option to transfer pictures from iPhone/iPad to PC, while you will want an extraordinary program that provides you a lot of features and enables you to perform all the actions you might want with one tool. This is why Dr.Fone - Phone Manager (iOS) is highly recommended, which gives you the option to manage all the files on your iPad with ease. The following guide will show you how to transfer photos from iPad to PC.

Dr.Fone - Phone Manager (iOS)
Transfer MP3 to iPhone/iPad/iPod without iTunes
- Transfer, manage, export/import your music, photos, videos, contacts, SMS, Apps, etc.
- Backup your music, photos, videos, contacts, SMS, Apps, etc. to computer and restore them easily.
- Transfer music, photos, videos, contacts, messages, etc from one smartphone to another.
- Transfer media files between iOS devices and iTunes.
- Fully compatible with iOS 7, iOS 8, iOS 9, iOS 10, iOS 11, iOS 12, iOS 13 and iPod.
Step-by-Step Instruction for Transferring Photos from Your iPad to Desktop
Step 1. Connect iPad to Computer
Start Dr.Fone on your computer and select "Phone Manager". Then connect iPad to computer with the USB cable, and the program will automatically detect your device.

Step 2. Transfer Photos to PC
Choose Photos category at the top middle of the software window, and the albums will show up in the left sidebar. Select the photos you need and click the Export button, then choose Export to PC in the drop-down menu. Choose a target on your computer to save the photos and click Save to start transferring photos from iPad to computer.

Part 2. Transfer Photos from iPad to PC with iTunes
Speaking of the photos you take with the iPad camera, you can easily transfer them to the computer with the USB cable. The following guide will show you how to do that.
Step 1. Connect your iPad to the computer with the USB cable, and the AutoPlay window will pop up.
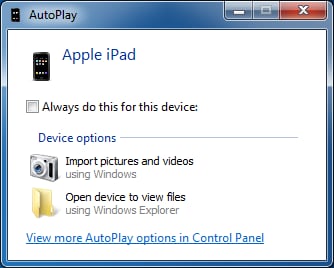
Step 2. Click Import pictures and videos in the pop-up dialog, and then the program will import photos and videos into your computer. You can find imported photos when the process finishes.
Part 3. Transfer Photos from iPad to PC Using the Photo Transfer App
Another interesting answer to how do I transfer photos from iPad to PC is moving all the iPad photos via Photo Transfer App. Before starting with the process, you need to make sure you have installed the Photo Transfer App on both your iPad and your computer. Also, your PC and your iPad must be connected to the same Wi-Fi network, otherwise, the process won't work.
Step 1. Open Photo Transfer App on your iPad. Click Send.
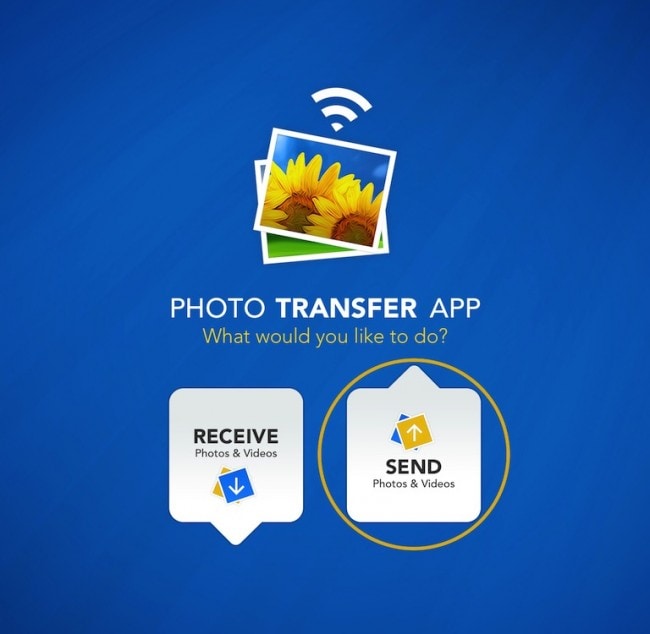
Step 2. Select the target location, in this case, is the Windows computer.
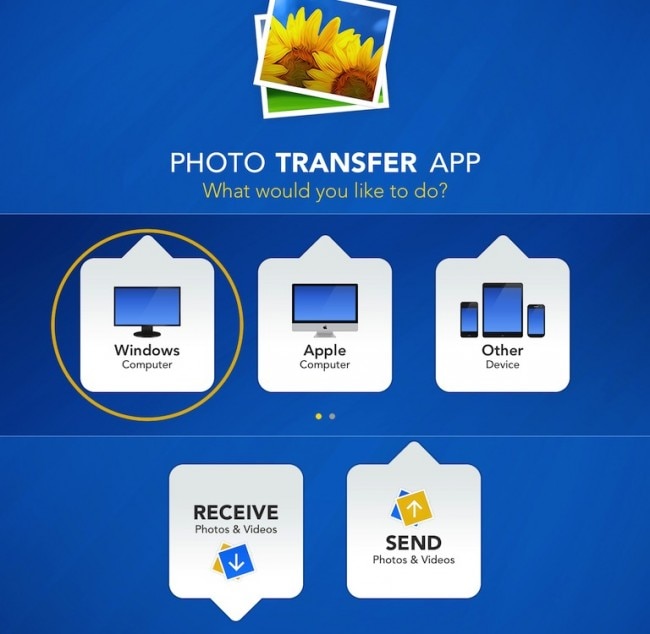
Step 3. Use Select to choose the photos you want to transfer to your iPad.
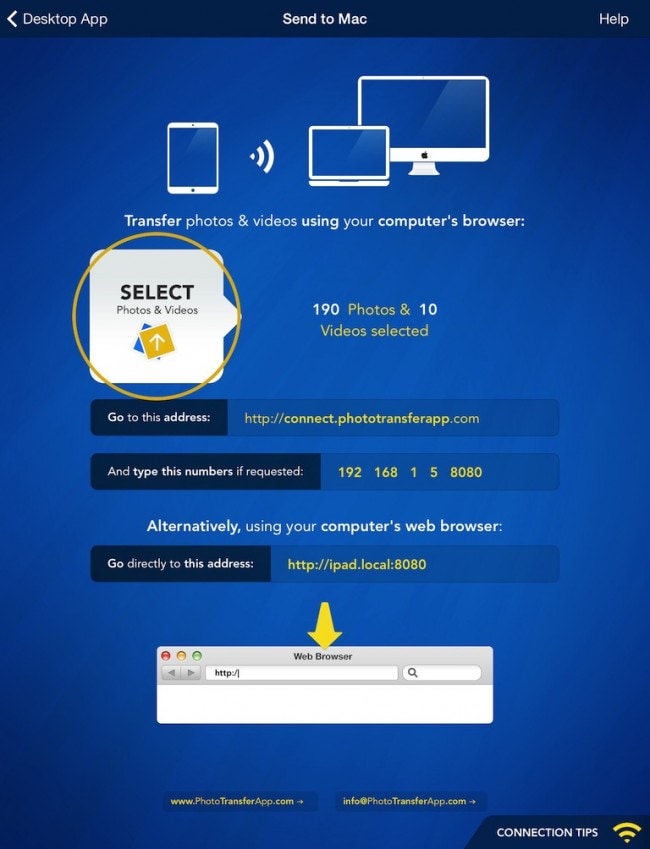
Step 4. Run your Photo Transfer App on PC and download the files. Alternatively, you can use your web browser to connect to your iPad using the address given by the app and download the pictures from there.
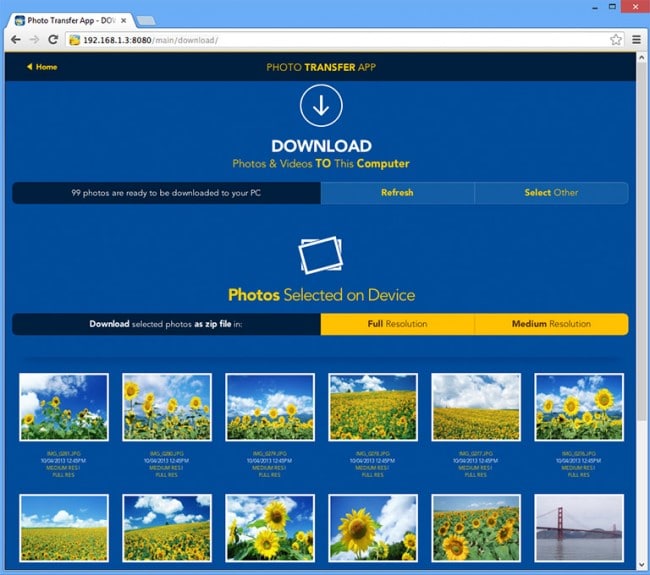
With the Photo Transfer App, how to transfer pictures from iPad to PC won't be a problem anymore.
Part 4. Transfer Photos from iPad to PC Using Google Drive
Google Drive is extremely handy cloud storage, which offers you 15 GB for free to keep any type of files you want. As you can see, there is a limit when it comes to the file size you can transfer, but it is pretty big. So it shouldn't be a problem for you to transfer all the desired photos to your computer by Google Drive.
Before starting this step-by-step instruction, make sure of two things - the first one is that you have registered a Google account (you probably have it already), and the other is that you have Google Drive app installed on your iPad. The app is free and you can download it from your App Store.
2. How to transfer photos from iPad to PC using Google Drive
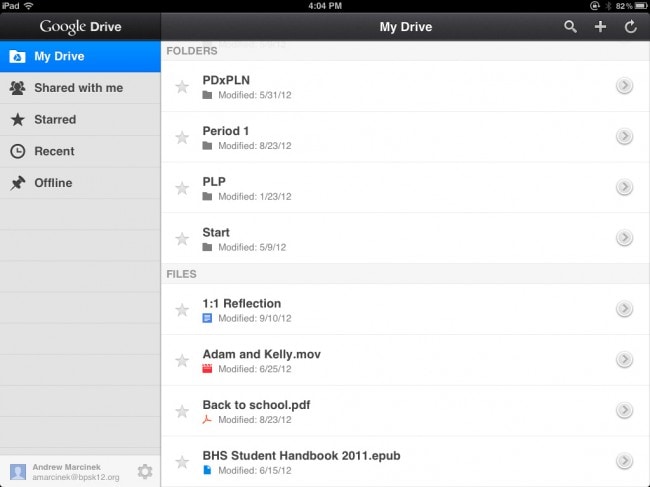
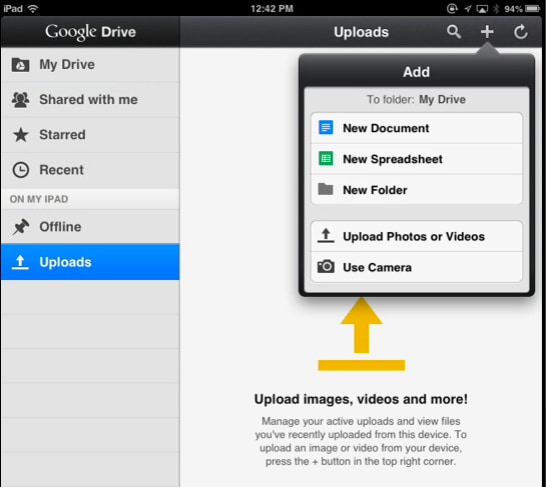
Step 1. Start the Google Drive app on your iPad. Then you will notice a "+" button in the upper right corner.
Step 2. Next, pick Upload Photos or Videos, and then choose Camera roll. Here you will have the option of choosing the photos you want to upload.
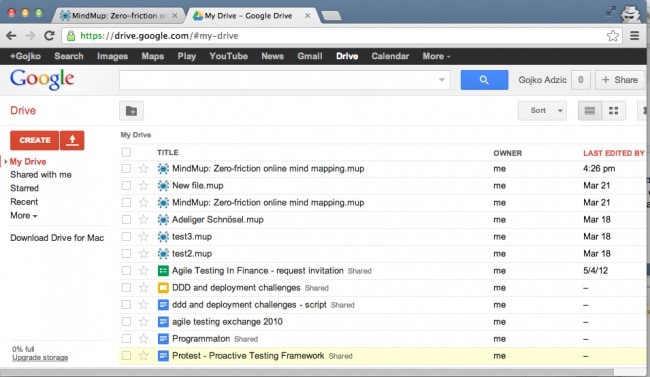
Step 3. Go to your computer and use a web browser software to access your Google Drive and find your file.
Recommend: If you are using multiple cloud drives, such as Google Drive, Dropbox, OneDrive, and Box to save your files. We introduce you Wondershare InClowdz to migrate, sync, and manage all your cloud drive files in one place.

Wondershare InClowdz
Migrate, Sync, Manage Clouds Files in One Place
- Migrate cloud files such as photos, music, documents from one drive to another, like Dropbox to Google Drive.
- Backup your music, photos, videos in one could drive to another to keep files safe.
- Sync clouds files such as music, photos, videos, etc. from one cloud drive to another.
- Manage all cloud drives such as Google Drive, Dropbox, OneDrive, box, and Amazon S3 in one place.
Part 5. Transfer Photos from iPad to PC Using Email
If you are not keen on using any kind of software, you can transfer your photos to the PC by sending it via your mail account. This method means that you need to send a mail to yourself with the photos attached in it, but since the majority of mail servers come with strict restrictions when it comes to attachment size, this option is good only if you are transferring a couple of photos, otherwise, you should go for some of the previous methods we have recommended.
Let's take a look at how to transfer photos from iPad to PC by using Email.
Step 1. Enter Camera Roll on your iPad and then select the photos you wish to transfer. Once you select them, find the Share button and tap it.

Step 2. Among the following options, choose the option to share via mail.
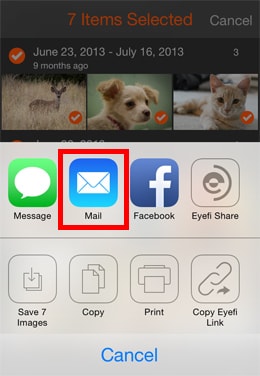
Step 3. Choose the desired e-mail address you want to send the files to. You can choose your email to get these photos.

When you get the photos in your mailbox, you can save these photos to your computer. Now we have done with all the five methods to transfer photos from iPad to computer, and we hope that these methods can bring you a little help when you want to save the photos in your PC.
More related articles:
iPad Tips & Tricks
- Make Use of iPad
- iPad Tips and Tricks
- Smart Keyboard Folio VS. Magic Keyboard
- iPad Photo Transfer
- Transfer Music from iPad to iTunes
- Transfer Purchased Items from iPad to iTunes
- Delete iPad Duplicate Photos
- Download Music on iPad
- Use iPad as External Drive
- Transfer Data to iPad
- Transfer Photos from Computer to iPad
- Transfer MP4 to iPad
- Transfer Files from PC to iPad
- Transfer Photos from Mac to iPad
- Transfer Apps from iPad to iPad/iPhone
- Transfer Videos to iPad without iTunes
- Transfer Notes from iPhone to iPad
- Sync iPhone to iPad
- Transfer Photos from Android to iPad
- Transfer iPad Data to PC/Mac
- Transfer Photos from iPad to Mac
- Transfer Photos from iPad to PC
- Transfer Books from iPad to Computer
- Transfer Apps from iPad to Computer
- Transfer Music from iPad to Computer
- Transfer PDF from iPad to PC
- Transfer Notes from iPad to Computer
- Transfer Files from iPad to PC
- Transfer Videos from iPad to Mac
- Transfer Videos from iPad to PC
- Sync iPad to New Computer
- Transfer iPad Data to External Storage


James Davis
staff Editor