How to Delete Browsing History on iPad Permanently?
Jul 12, 2024 • Filed to: Data Wipe Solutions • Proven solutions
Apple has launched its tablet line up from 3rd April 2010. From that time, we have observed a lot of Apple iPad line ups like iPad 1, iPad 2, iPad 3, iPad 4, iPad mini, iPad Air, iPad Air 2 and the latest one iPad Pro. These devices always give its users a premium look, feel and an ultra fast OS. Apple is popular for its quality product, brilliant performance and customer satisfaction and the iPad is no exception. This tablet is eye-catching as well as very light as compared to other tablets in the same category.
The best part is that all Apple devices run with their own iOS versions. Today, through this article we will learn how to delete history on iPad without any hassle. It becomes important to clear history from iPad specially when you want privacy from someone else looking through your history.
Let us move to the first method of how to clear history on iPad.
Part 1: How to delete browsing history using Settings?
The easiest method to clear history on iPad is using the Setting function. So let us go through the process of how to delete history on iPad step by step.
Step 1 - Go to “settings” of your iPad
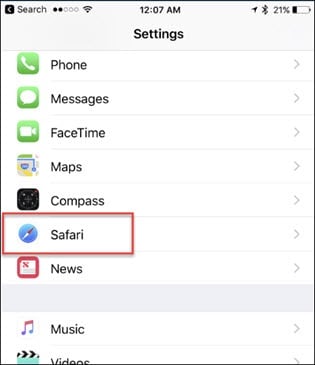
Step 2 - Now, go to “Safari” at the bottom of your iPad. And tap on that icon.
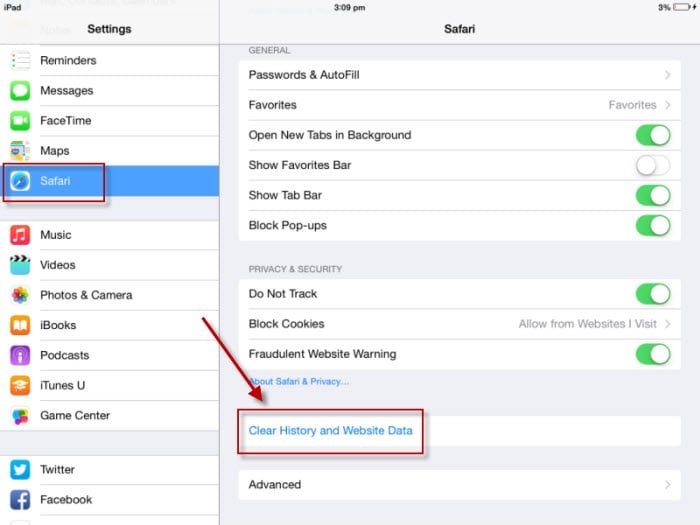
Step 3 - Now you can see “Clear History and Website Data” option. Click on that to clear the history. You will be asked again to confirm the step.
Step 4 - Confirm again by clicking on “Clear History and Data” written in red color. This will remind you that this process will clear all browsing history, cookies and data.
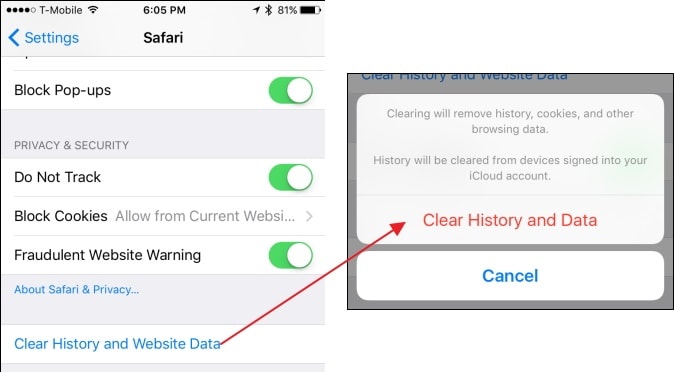
Note: If you can’t see the “Clear History and Data” option, then no history is available to delete or you are using a different browser for surfing the internet like Google Chrome.
In this process you don’t have to open the browser even to delete it's entire history. This is the most convenient way to delete the history of browser.
The second process to clear history on iPad is by using the Safari Browser.
Part 2: How to delete browsing history using Safari?
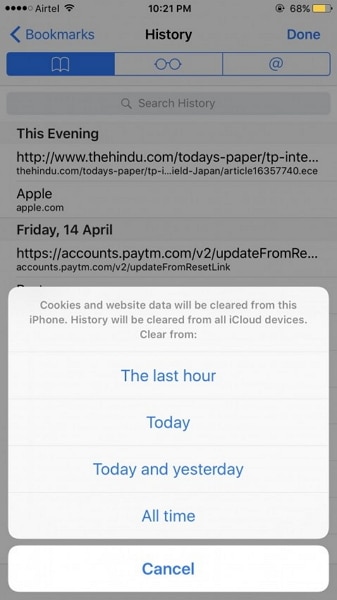
Users can also delete their browsing data by using the Safari browser. This process allows the user to delete the browsing data by time duration also like “the last hour”, “today”, “today and yesterday” or “all history”. Users have control over the deletion of history.
For this step, please follow the steps below –
Step 1 - Open “Safari Browser” on your iPad.
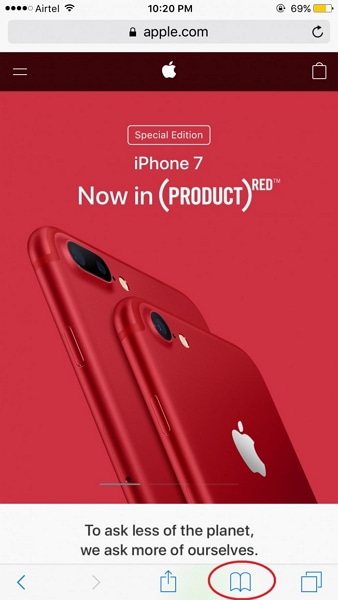
Step 2 - Now tap on the “Bookmark” icon to go to the “History” tab. Here you can find all the history of your browser.
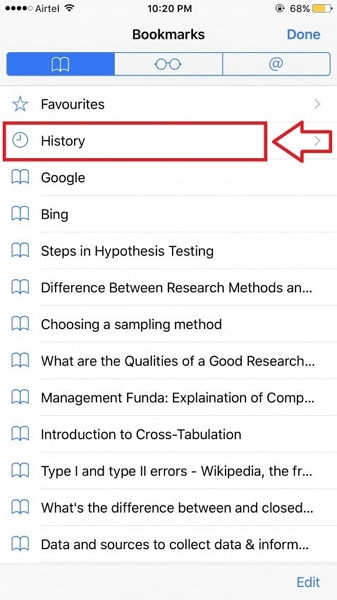
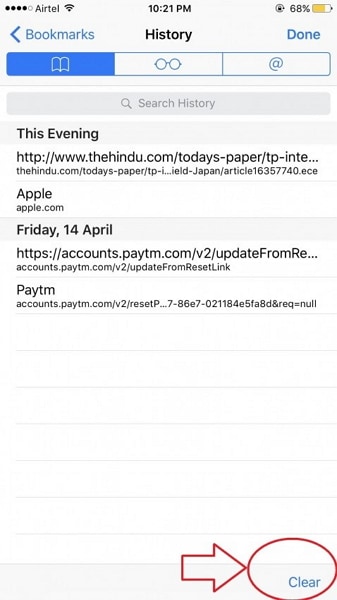
Step 3 - After that, click on “Clear” option at the right bottom of the page.
Step 4 - Now, you will be asked to confirm between the option of deletion history of “last hour”, “today”, “today and Yesterday” and “All time”. Click to confirm as per your requirement .
Step 5 - After your confirmation, all the history for that particular duration will be deleted.
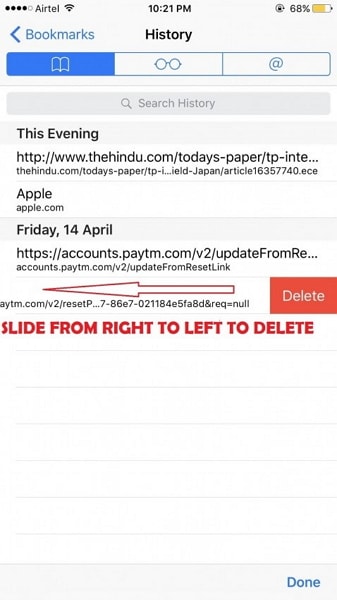
Note: Users can also delete the history one by one by selecting each. In that case, they will have to follow the steps below after Step 2.
Simply, slide the history you want to delete from right to left and you can find the “delete” option and tap on that option to clear history on iPad individually.
By this process, user can delete all the browsing data as well as their own choice of history. So, user has full control over the deletion and also it’s very easy to use but yes time consuming if you have loads to delete.
Part 3: How to delete Google search history on iPad?
In this part, we will learn the easy process to clear history for iPad related specifically to Google. Google is the most common search engine in any platform. For any information, we use Google to get the answer. So, there must be a lot of search history in your Google search bar. This process will show you how you can delete the Google search history from your iPad.
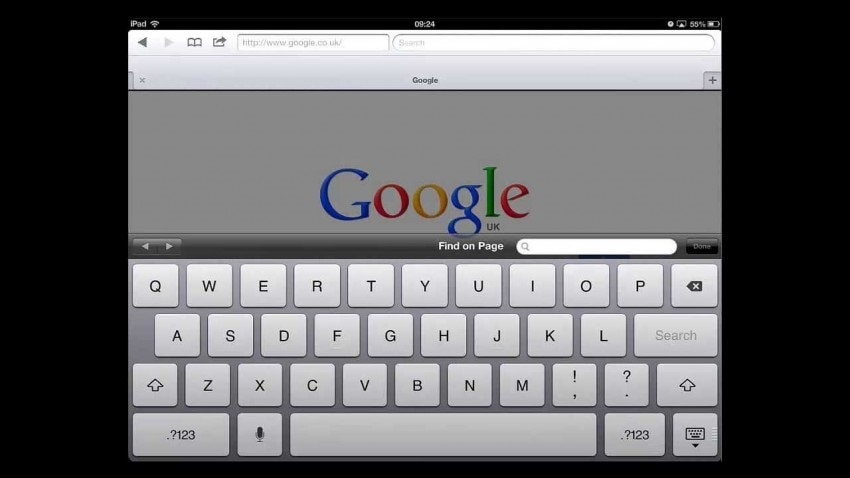
Step 1 - Go to Settings and then go to “Safari”
Step 2 - Now click on “Clear History” and then “Clear Cookies and Data” to delete all the search history from Google.
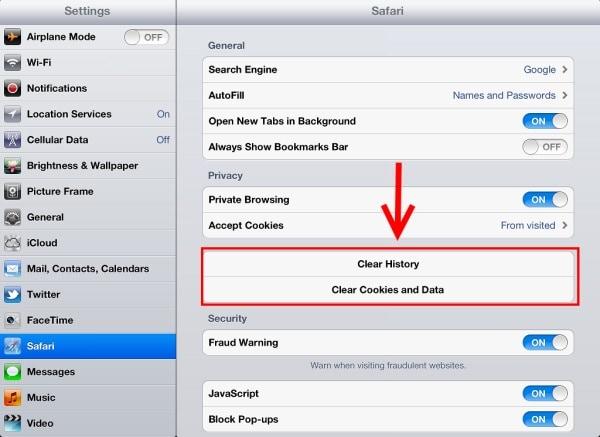
That's it!, Wasn't that easy?
Part 4: How to completely clear Safari bookmarks
In this section, to clear history on iPad pertaining to Safari bookmarks, we would like to introduce you Dr.Fone - Data Eraser (iOS) which works as a charm in terms of deletion of any private data from your iOS devices like iPhone or iPad.
Using this process user can delete their personal data completely and permanently and nobody will ever be able to recover it. Also, this toolkit supports all iOS 11 devices.

Dr.Fone - Data Eraser
Easily Wipe Your Personal Data from Your Device
- Simple, click-through, process.
- You select which data you want to erase.
- Your data is permanently deleted.
- Nobody can ever recover and view your private data.
Let us have a look at the step by step procedure.
Step 1 - Download and install the toolkit from the Dr.Fone official website. This tool is free to try and available for Windows PC and MAC also.
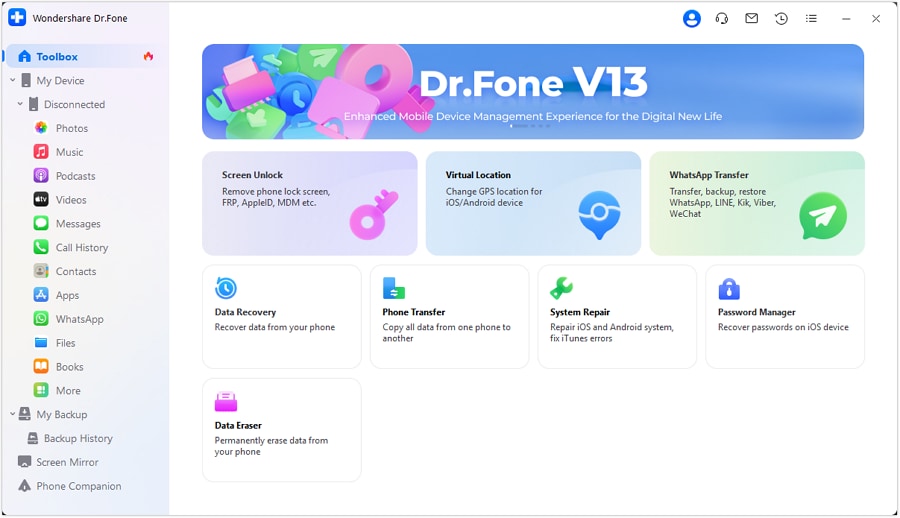
After installing, you should see the below window. Choose “Data Eraser” from the options provided.
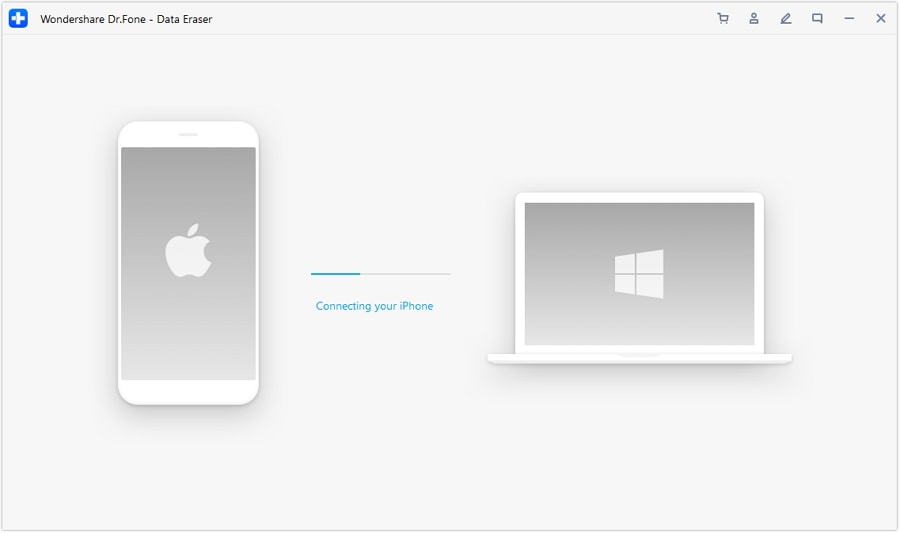
Step 2 - Now, connect your iOS device with a USB cable with your PC / Mac. The tool will recognize your device automatically and show you the below notification.
Step 3 - then, Click on "Erase Private Data" > "Start Scan" to let the application scan your device for your private data. This may take a while to scan completely. Please be patient and let the scan finish
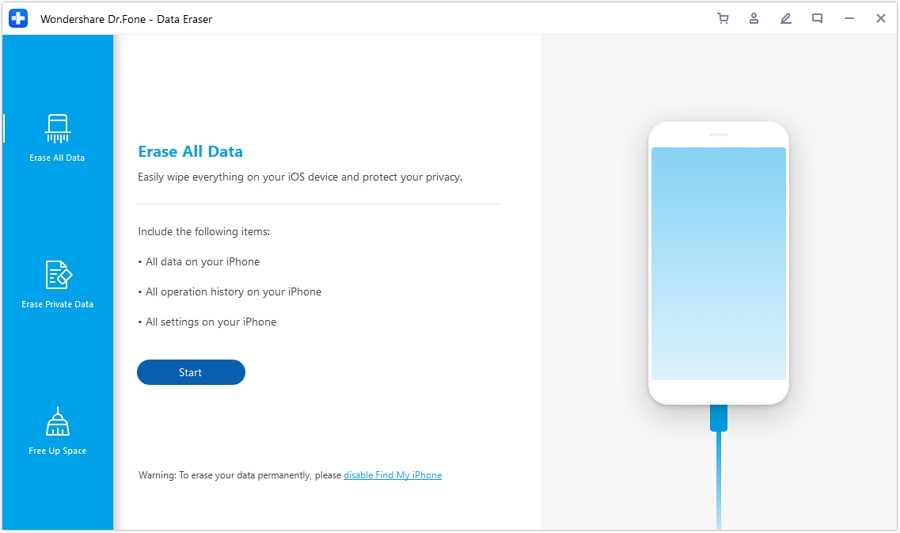
Step 4 - Now you can view all your private data available on your iPad. Its listed like your file type as –
- 1. Photos
- 2. Messages
- 3. Message attachments
- 4. Contacts
- 5. Call history
- 6. Notes
- 7. Calendar
- 8. Reminders
- 9. Safari Bookmarks.
Now, select “Safari Bookmarks” to delete all your bookmarks from the device and type “delete” in the box given to confirm your deletion process.
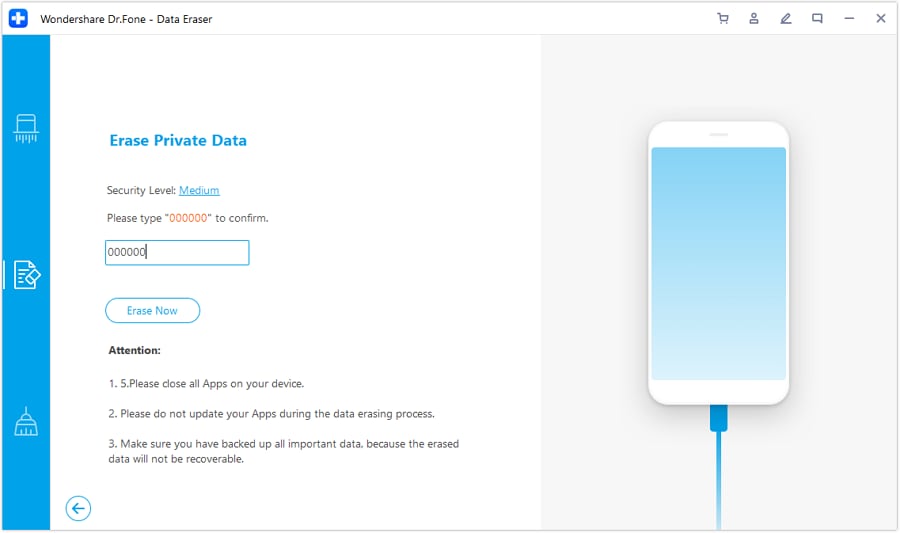
Now, this erasing process starts and you can wait till this process completes. This can take a few minutes to complete. So, sit back and enjoy the tool.

On completion of the process, you can see the Confirmation as below so that you can understand that the erase process is successful.

This Dr.Fone - Data Eraser tool erases Safari Bookmarks and other data from iPad. If you're willing to erase Apple ID when you forgot Apple ID password, you can give a try to Dr.Fone - Screen Unlock (iOS).
So, as you can see this iOS Private data eraser toolkit is the most convenient tool available the market to use. Its user friendly interface and easy to use application makes it so popular throughout the world. It can delete all your private data from any of your iOS device without keeping any traces. So, use this toolkit and forget those bulky and hectic process to delete.
iPad Tips
- iPad Manage
- 1. Download Movies on iPad
- 2. Download Music on iPad
- 3. Delete Duplicate Photos on iPad
- 4. Use iPad as An External Hard Drive
- 5. Delete Device Management on iPad
- 6. iPad Remote Management Software
- 7. Send Text Messages from iPad
- 8. Download WhatsApp on iPad
- 9. Change Weather Location on iPad
- iPad Backup
- 1. Ways to Restore iPad Without iTunes
- 2. Restore iPhone from iPad Backup
- 3. Backup iPhone/iPad in DFU Mode
- iPad Erase
- 1. Clear iPad data effectively
- 2. Delete Bookmarks on iPhone/iPad
- 3. Delete Browsing History on iPad
- 4. Ways to Delete Movies from iPad
- 5. Clear Cookies on iPad
- 6. Permanently Delete Emails from iPad
- 7. Wipe your iPad and Erase Everything
- 8. Clear System Data on iPad Storage
- iPad Mirror
- 1. Screen Recorders for iPad
- 2. Mirror iPad to Fire TV Stick
- 3. Screen Share Mac to iPad
- 4. Screen Mirror iPad Display
- 5. Share iPad Screen with PC
- 6. Screen Mirroring iPhone to iPad
- 7. iPad Mirror to PC without Lagging
- 8. Mirror iPad to Mac without Lagging
- iPad Recover
- 1. Recover Deleted Files on iPad
- 2. Recover Data from Broken iPad
- 3. Recover Deleted Safari Bookmarks
- 4. Recover Deleted Notes from iPad
- iPad Reset
- 1. Hard Reset/Factory Reset iPad 2
- 2. Reset iPad Air / Air 2
- 3. 5 Tactics to Reset Your iPad Mini
- 4. Factory Reset Your iPad Air/Pro
- 5. Factory Reset Your iPad 2023
- 6. Reset iPad, iPad Pro, and iPad Mini
- 7. Reset iPad Network Settings
- 8. Factory Reset iPad without Password
- iPad Tricks
- 1. Block People in Facebook on iPad
- 2. 25+ Cool Tips and Tricks on iPad
- 3. Play PC Games on iPad
- 4. Detect Spyware on iPhone
- 5. iPad Mini Jelly Scroll Issue
- 6. Fix Apple Keyboard Trackpad
- 7. iCloud Unlock without Passcode
- 8. Restore iPad from DFU Mode
- 9. Bypass Activation Lock on iPad
- 10. Photo Transfer Apps for iPad
- 11. Remove MDM from iPad Like a Pro
- 12. Reset iPad without Password
- ● Manage/transfer/recover data
- ● Unlock screen/activate/FRP lock
- ● Fix most iOS and Android issues
- Manage Now Manage Now Manage Now Manage Now


James Davis
staff Editor