How to Upload Camera Roll to iCloud: An Ultimate Guide
Jul 12, 2024 • Filed to: Manage Device Data • Proven solutions
I want to free up memory on my iPad by moving photos from the camera roll to iCloud. How do I go about doing this, and will I be able to retrieve these photos readily when I want to see them on my iPad again? Thank you for any assistance.
By default, iOS users get 5GB of free storage on iCloud. If you wish, you can upgrade your account as well. Nevertheless, iCloud provides seamless access to your data remotely. It is also used by plenty of users to take a backup of their data. If you also wish to access your photos remotely, then you should learn how to upload a camera roll to iCloud. Don’t worry! We are here to help you. In this informative guide, we will provide different ways to save camera roll to iCloud. Let’s get it started with!
- Part 1: iCloud Photo Library
- Part 2: How to Upload Camera Roll to iCloud
- Part 3: The best tool to manage your Camera Roll and iCloud photos
iCloud Photo Library
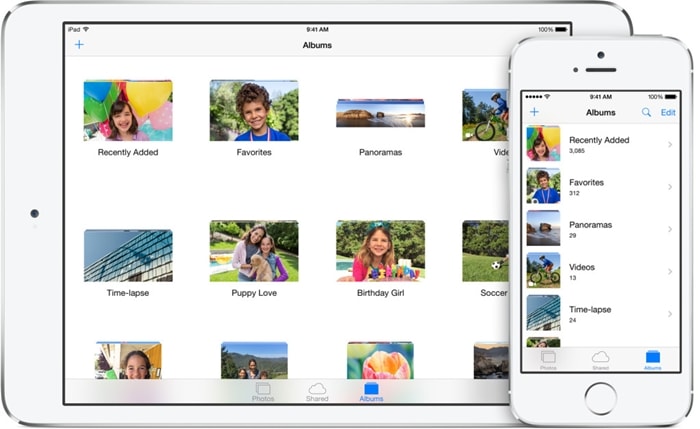
iCloud Photo Library automatically keeps every photo and video you take in iCloud, so you can access your library from any device, anytime you want. Any changes you make to your collection on one device, change on your other devices too. Your photos and videos stay organized into Moments, Collections, and Years. And all of your Memories are updated everywhere. That way, you can quickly find the moment you're looking for.
Before we proceed and provide a stepwise tutorial on how to upload camera roll to iCloud, it is important to cover the basics. Lots of users are confused between camera roll and iCloud photo library. In a nutshell, the camera roll contains photos (and videos) that are stored on your device. It consumes the storage of your phone/tablet. On the other hand, photos on the iCloud photo library are stored on the cloud.
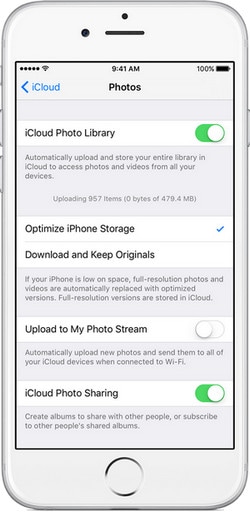
iCloud Photo Library
iCloud Photo Library keeps all of your photos and videos in their original, high-resolution version. You can save space on your device when you turn on Optimize Storage.
- Uses your iCloud storage.
- As long as you have enough space in iCloud, you can store as many photos and videos as you like.
- Stored in the original format at full resolution.
- You can turn on Optimize Storage and save space on your device.
- Edits are stored in iCloud and stay up to date on your Apple devices.
What file types upload to iCloud
- JPEG, RAW, PNG, GIF, TIFF, and MP4, as well as special formats you capture with your iPhone, like slo-mo, time-lapse, 4K videos, and Live Photos.
Since by default, users only get 5 GB of free space on the cloud, we recommend uploading only selective data on your iCloud photo library. Additionally, to upload any kind of content from your phone to iCloud, you need to take the assistance of a stable internet connection.
Needless to say, as the inbuilt storage of your phone is larger than that of iCloud, you can save more photos to your camera roll as compared to your iCloud photo library. Though, it comes with an added advantage. If your phone gets corrupted, then you might end up losing your data (including your camera roll content). This is not the case with the iCloud photo library.
Therefore, if you wish to take a backup of your photos and videos, then you can save the camera roll to iCloud. This will also be beneficial for you if you wish to move your content from one device to another. If you want to restore your pictures, then you can just log-in to your iCloud account on any iOS device and simply restore your data.
How to Upload Camera Roll to iCloud
Now when you know the added features of the iCloud photo library, you should also know how to upload camera roll to iCloud. In this way, you would be able to access your photos on the go. It is an extremely simple process and won’t consume your time. All you got to do is follow these steps.
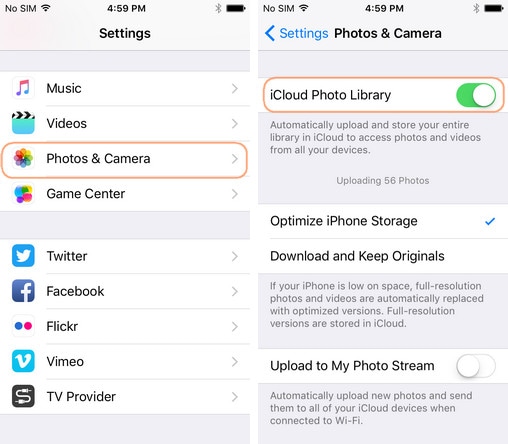
Firstly, go to your phone’s Settings and visit the “Photos & Camera Roll” option. You will get a wide range of options to manage your camera roll here. Just turn on the feature of the “iCloud Photo Library”. From here, you can decide if you wish to optimize the photo storage or keep the originals. Give it some time as your phone will save the camera roll to iCloud.
Furthermore, you can check if your phone is in sync with iCloud or not. To do it, visit Settings > Settings > [your name] > iCloud. If you’re using iOS 10.2 or earlier, tap Settings > iCloud. And choose the option of “iCloud Backup”. From here, you need to turn on the feature of “iCloud Backup”.
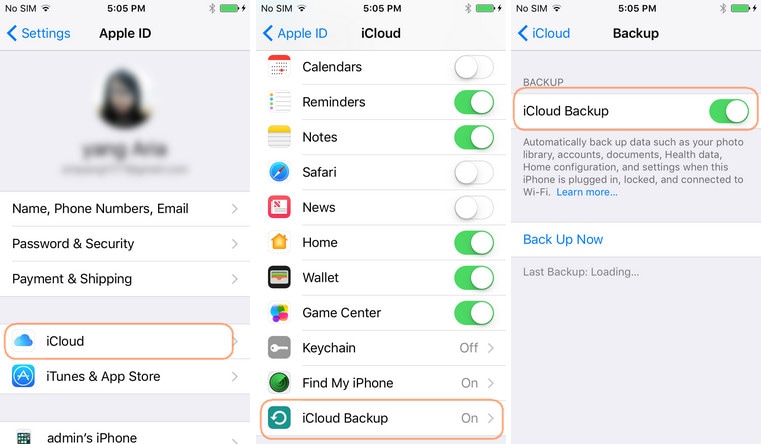
That’s it! The content from your camera roll will start uploading on the iCloud Photo Library. You can always visit its dedicated iCloud website to upgrade your account or manage your data.
The best tool to manage your Camera Roll and iCloud photos
Most of the time, users find it pretty hard to manage their camera roll or iCloud photo library. Since you only get a limited amount of storage on iCloud, it is always recommended to manage it promptly. You can always take the assistance of a third-party application like Dr.Fone - Phone Manager (iOS) by Wondershare to manage your device’s storage.
It is a must-have phone management tool that comes with plenty of added features. With it, you can take a comprehensive backup of your data and can later restore it without much trouble. Additionally, you can use the tool to transfer your data from one device to another on the go.
It has an easy to use interface and runs on both, Mac as well as Windows. Dr.Fone - Phone Manager (iOS) is compatible with almost every major version of iOS (including iOS 13). It has an added toolbox that can be used to create customized ringtones, build iTunes library, perform phone-to-phone transfer, and plenty of other tasks.

Dr.Fone - Phone Manager (iOS)
Transfer Photos from Computer to iPod/iPhone/iPad without iTunes
- Transfer, manage, export/import your music, photos, videos, contacts, SMS, Apps, etc.
- Back up your music, photos, videos, contacts, SMS, Apps, etc., to the computer and restore them easily.
- Transfer music, photos, videos, contacts, messages, etc., from one smartphone to another.
- Transfer media files between iOS devices and iTunes.
- Fully compatible with iOS 7 to iOS 13 and iPod.
Transfer, Edit and Delete Photos on Camera Roll
As stated, you can easily use Dr.Fone - Phone Manager (iOS) by Wondershare to manage your device’s storage. With it, you can simply transfer photos from your system to camera roll. You can follow these steps if you wish to manage your phone with Dr.Fone - Phone Manager (iOS) and share your photos from PC to camera roll. Later, you can save the camera roll to iCloud by following the instructions mentioned above.
How to Transfer Photos from PC to Camera Roll
Step 1 To start with, install and launch Dr.Fone - Phone Manager (iOS) on your system and at the same time, and then connect your phone to the system. Please wait for a while, as the application will automatically detect your phone and provide its snapshot.
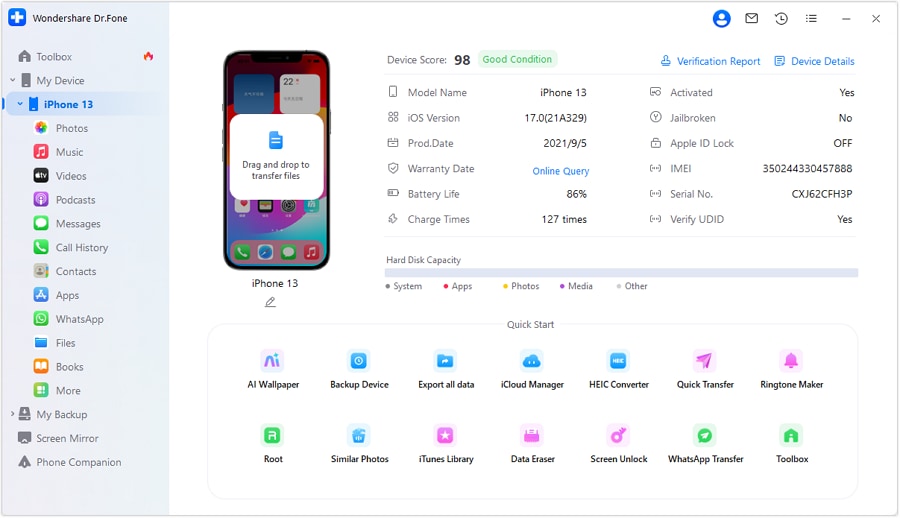
Step 2 Now, click on the “Photos” tab from the main menu. This will display all kinds of photos and videos stored on your system. From the left tab, you can access the data stored on your Camera Roll.
Step 3 From here, you can add photos from your system to camera roll. To do it, click on the “Add” button on the toolbar and select either the option of “Add file” or “Add folder”. This will open a new window from where you can browse the photos you wish to upload. Simply select the files and click on “Open” once you are done.

Step 4 To complete the process, open Dr.Fone - Phone Manager (iOS) app on your iPhone and allow the app to access your phone. If you have any kind of problem to install the app on your device, then you can watch this video about how to install Dr.Fone - Phone Manager (iOS) app.
As soon as you would allow the app to access your phone, it will initiate the process, and your photos will be transferred to your phone.
Video Tutorial: How to Transfer Photos Between PC and iCloud
Who knew managing pictures on your device could be so easy. With Dr.Fone - Phone Manager (iOS), you can transfer data from your device to your system and vice versa without any trouble. It also comes with plenty of other features, making it a must-have phone manager. Now when you know how to upload camera roll to iCloud, go ahead and give this amazing tool a try and make the most out of your smartphone.
Reference
iPhone SE has aroused wide attention around the world. Do also you want to buy one? Check the first-hand iPhone SE unboxing video to find more about it!
iCloud Transfer
- Transfer to iCloud
- 1. Sync Data from iTunes to iCloud
- 2. Transfer Google Drive to iCloud
- 3. Transfer iPhone Music to iCloud
- 4. Move iPhone Photos to iCloud
- 5. Upload Camera Roll to iCloud
- 6. Upload Photos to iCloud
- Transfer from iCloud
- 1. Transfer iCloud Data to Android
- 2. Transfer iCloud Data to Samsung
- 3. Transfer iCloud Contacts to Android
- 4. Transfer iCloud Photos to Android
- 5. Transfer iCloud Photos to iPhone
- 7. Export iCloud Contacts to Outlook
- 8. Restore WhatsApp Backup from iCloud to Android
- 9. Transfer WhatsApp Backup from iCloud to Google Drive
- iCloud Tips
- ● Manage/transfer/recover data
- ● Unlock screen/activate/FRP lock
- ● Fix most iOS and Android issues
- Transfer Now Transfer Now Transfer Now


Alice MJ
staff Editor