How to Sync Fitbit to iPhone in 2024
Jul 12, 2024 • Filed to: Data Transfer Solutions • Proven solutions
In today's world, connecting apps to your iPhone is essential to getting the most out of your device and improving your overall experience. Among the standout apps is Fitbit, a health and fitness tracker created in 2007 by Eric and James. "Fitbit" is what people wear, and with this tracker, they can live healthier while monitoring their daily activity, sleep, and exercise. This is an easy-to-use app for transferring files from one device to another, including Android to iPhone.
The app works perfectly with iOS 17, ensuring smooth synchronization. The supported file types include eight key types: photos, videos, contacts, messages, bookmarks, calendars, voice memos, and music. If you need to learn how to sync Fitbit to your iPhone, this article will help you provide information on how to pair the device to your iPhone and use "Dr.Fone" to transfer data between operating systems, from iOS to Android.
- Part 1. How to Pair Fitbit With iPhone
- Part 2. How to Sync Fitbit to iPhone
- Part 3. Dr. Fone as a Smart iPhone Transfer and Managing Solution
- Part 4. Steps to Export Data From iOS to a Computer Using Dr. Fone
Part 1. How to Pair Fitbit With iPhone
You can download the Fitbit app from the store and connect the Fitbit band to an iPhone or iPad to sign into an account. Make sure that the Bluetooth on the device is turned on. Click the "Next" button on the screen to begin the pairing process and view your Fitbit package contents. Let your Apple device search for and pair with your Fitbit band.
If you own a Fitbit model like Zip, Charge, Charge HR, Surge, Blaze, Alta, or One, input the code on the tracker screen. If you have Fitbit Flex, simply tap the band when prompted. Keep tapping "Next" on the setup screens and reading along with the provided information to help you understand the device. Tap "Next" on the wear and care screen to learn about the device and complete the setup, which will bring you to the Fitbit dashboard.
Part 2. How to Sync Fitbit to iPhone
Sometimes, your Fitbit stats data may not have been synced to your iPhone after returning from a workout session. This is a common problem seen in many devices. To fix this, there are a few steps to consider to sync data and get your device back to an expected stage.
If the tracker is not syncing data to the official Fitbit app, ensure that the tracker’s battery is fully charged. Another way you can try is by closing and reopening the Fitbit app. Doing this may prompt a complete data sync as per the default settings. Another troubleshooting tip is to turn off Bluetooth on your Apple device and then turn it back on before reopening the Fitbit app.
If you still have trouble with your Fitbit app after an update, consider re-installing it to resolve any errors that might have occurred during the updates. If this fails, too, try resetting your tracker. Just remember that the resetting steps can differ depending on your model.
Part 3. Dr. Fone as a Smart iPhone Transfer and Managing Solution
Dr. Fone — Phone Transfer will import, export, and delete files whenever you want. You can get a file into a program on your iOS with only a few seconds of the drag-and-drop feature. Besides, it also allows the rapid transfer of iCloud data to iOS devices and computers.
It also supports managing and synchronizing various kinds of data, from iCloud backups to iOS devices or computers. This all-in-one tool helps enhance connections, enables easy file sharing, and allows wireless synchronization between devices, hence integrating iOS devices and computers.
Part 4. Steps to Export Data From iOS to a Computer Using Dr. Fone
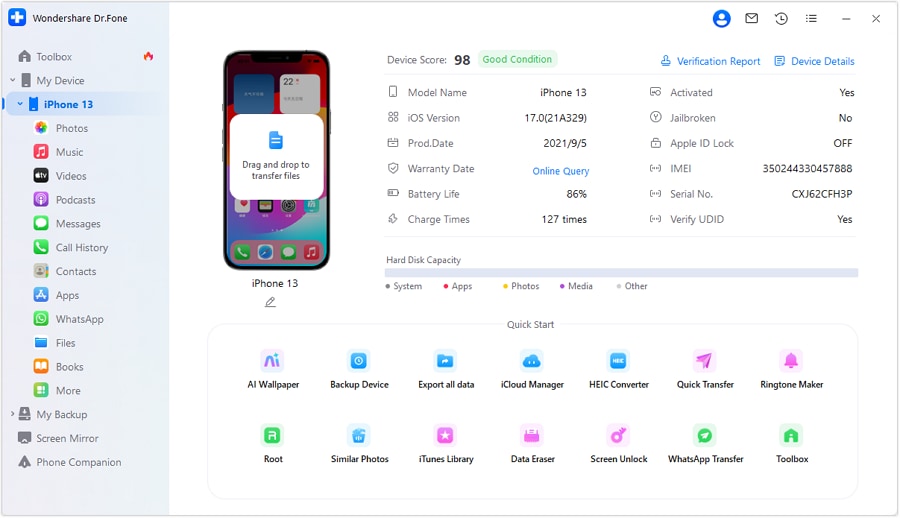
Connect your iOS device to the computer using a USB cable. The device should be recognized and displayed on your computer screen with the information relating to it. Click on the 'Export all data' button from the Quick Start section.
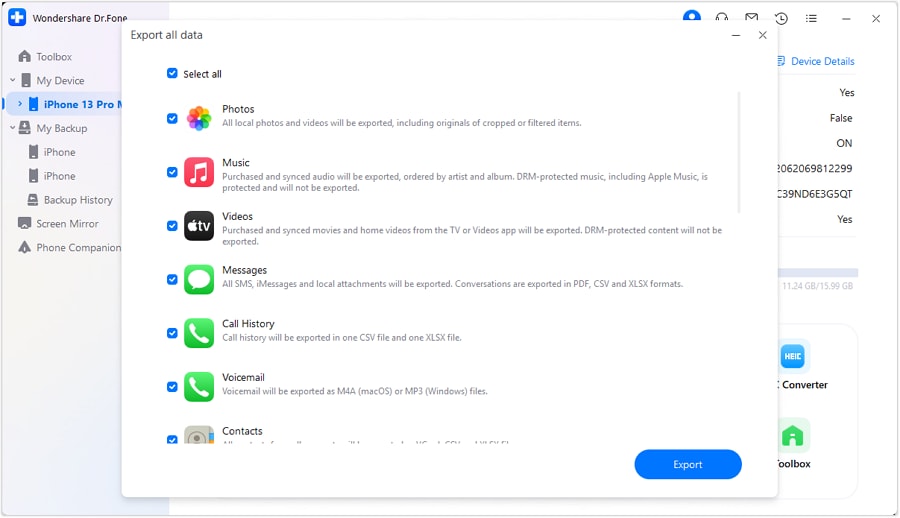
A new screen will appear, allowing you to choose the data types you wish to export. Ensure all relevant data types are checked, then click “Export.” Choose the destination folder on your computer for the exported data.
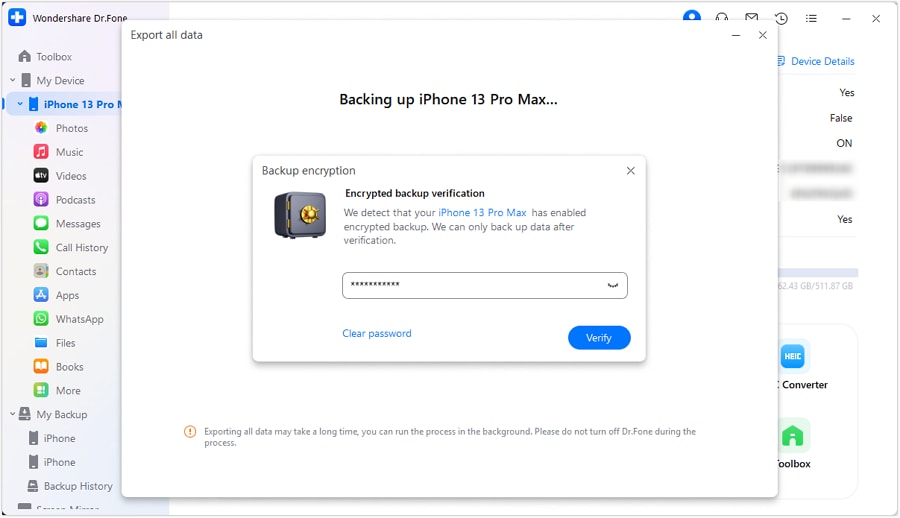
You will then be prompted to secure your backup with an encrypted password. Set and confirm your password, then click “Done” to start the export process.
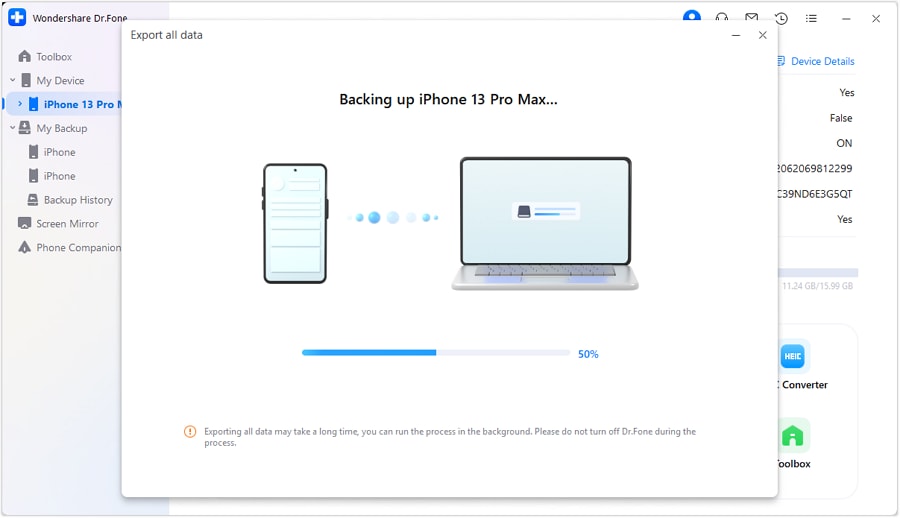
Your iOS device will begin exporting the selected data to your computer. The progress will be displayed on the screen, allowing you to monitor the transfer.
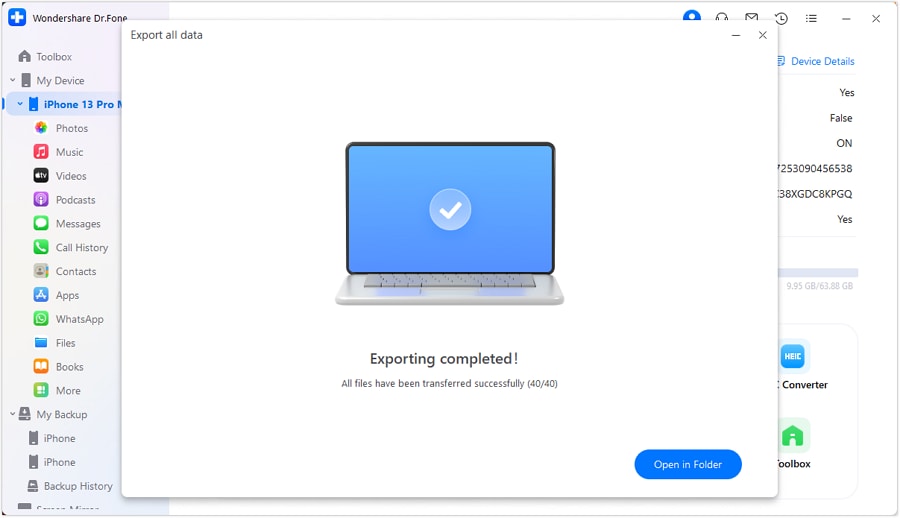
Once the data transfer finishes, you will see a notification on your computer. Simply click “Open” to open and view the exported data in the designated folder on your computer.
Save Fitbit Record to Computer
To save the Fitbit record on your iOS device directly to your computer for printing or reviewing improvements, start by opening the record on your device. Hold down the Sleep/Wake button on the top or side of your device, then quickly press and release the Home button to take a screenshot of the record. Find your screenshot in the Photos app by going to “Albums” and selecting “Camera Roll.” You can then transfer the screenshot to your PC for further use.
Conclusion
Knowing how to sync Fitbit to your iPhone will be necessary to make the most of tracking your health and fitness. By following the step-by-step instructions provided, along with troubleshooting tips and the assistance of tools like Dr. Fone, you can make the data transfer process smooth and practical during your fitness trip. Whether from keeping track of how active or inactive you are every day to even tracking your sleeping habits or daily exercise routine, connecting your Fitbit with your iPhone will inspire you to maintain your wellness goals. Take up this essential synchronization process to fully benefit from integrating your Fitbit device and iPhone.
Other Popular Articles From Wondershare
iPhone Transfer
- Data Transfer
- 1. Video from iPhone to External Drive
- 2. Transfer MP4 to iPhone
- 3. Put Wallpapers on iPhone
- 4. Move Photos to SD Card
- 5. Best Apps to Transfer from iPhone to Android
- iPhone to PC
- 1. Transfer Pictures From iPhone to PC
- 2. Transfer From iPhone to Computer
- 3. Transfer Album from iPhone to PC
- 4. Transfer Data from iPhone to PC
- 5. Copy Voice Memo from iPhone to PC
- 6. iPhone Camera Roll to Computer
- 7. Podcasts from iPhone to Computer
- 8. Transfer Notes from iPhone
- 9. Techniques Used in Mobile Phone Forensics
- iPhone to Mac
- 1. Voice memos from iPhone to Mac
- 2. Synce Notes from iPhone to Mac
- 3. Export iBooks to PC and Mac
- 4. Transfer Photos from iPhone to Mac
- 5. Transfer Music from iPhone to Mac
- Computer to iPhone
- 1. AirDrop From Mac to iPhone
- 2. Use AirDrop from Mac to iPhone
- 3. Transfer Data from PC to iPhone
- 4. Transfer Videos from PC to iPhone
- 5. Unsync iPhone from Computer
- 6. Sync iPhone with Multiple Computers
- Transfer to iPhone
- 1. Switch Cards Between iPhones
- 2. Facetime for Android to iPhone
- 3. Transfer Data from Motorola to iPhone
- 4. Samsung to iPhone Transfer
- 5. Transfer iPhone Apps to iPhone
- 6. Clone iPhone/iPad to iPhone
- Transfer from iPhone
- 1. Transfer Video from iPhone to Laptop
- 2. Transfer Data from iPhone to Laptop
- 3. Transfer Notes from iPhone to iPad
- 4. Transfer Data from iPhone to Android
- 5. Switch from iPhone to Google Pixel
- 6. Switch from iPhone to Samsung S10
- 7. Switch from iPhone to Samsung
- 8. Transfer from iPhone to Samsung S20
- iPhone Transfer Tips
- 1. Ford Sync iPhone
- 2. Sync iCal with iPhone
- 3. iPhone Calendar Not Syncing
- 4. iPhone Transfer Software
- WhatsApp Transfer
- 1. WhatsApp from iPhone to iPhone
- 2. WhatsApp from iPhone to Android
- 3. WhatsApp from iPhone to Samsung S10
- 4. WhatsApp Messages to iPhone
- 5. WhatsApp from iPhone to Samsung S9
- iTunes Transfer
- ● Manage/transfer/recover data
- ● Unlock screen/activate/FRP lock
- ● Fix most iOS and Android issues
- Transfer Now Transfer Now Transfer Now


James Davis
staff Editor