How to Clone iPhone/iPad to New iPhone? (iPhone 8/iPhone X Supported)
Jul 12, 2024 • Filed to: Data Transfer Solutions • Proven solutions
If you have got a new iOS device, then you must be looking for an easy way to clone iPhone to new iPhone. While getting a new iPhone is certainly exciting, transferring the data could be the most tedious thing to do. Even after moving our data from one device to another, we end up losing some crucial files. If you are going through the same dilemma and looking for a smart and quick solution to clone iPhone to iPad or iPhone, then you can halt your quest here. In this guide, we will make you familiar with two different ways on how to clone an iPhone.
Part 1: How to clone iPhone to new iPhone with 1 click?
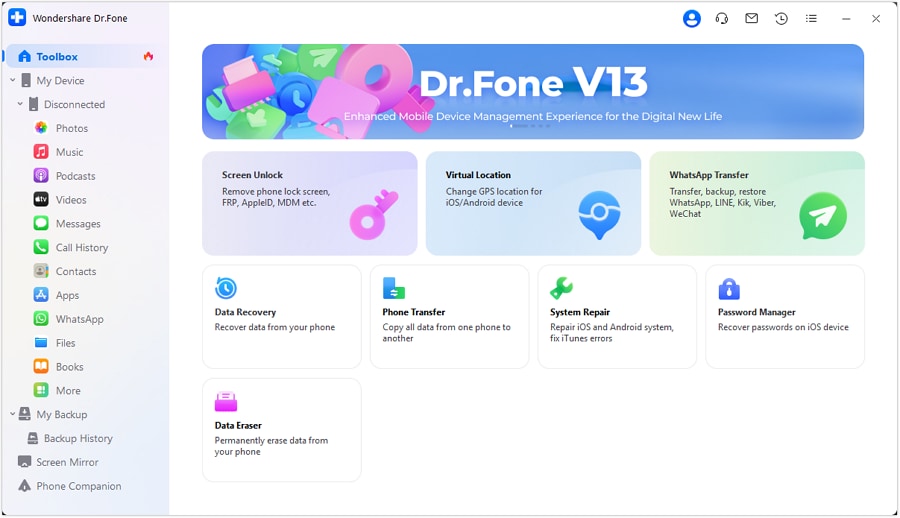
If you are looking for a reliable and fast way to learn how to clone an iPhone, then you should give Dr.Fone Switch a try. A part of the Dr.Fone toolkit, it can directly transfer all the crucial files from one device to another directly. Since it is compatible with all the leading versions of iOS (including iPhone X and iPhone 8/8 Plus), you won’t face any trouble to clone iPhone to new iPhone.

Dr.Fone - Phone Transfer
1-Click Phone to Phone Transfer
- Easy, fast and safe.
- Move data between devices with different operating systems, i.e iOS to Android.
-
Supports iOS devices that run the latest iOS version

- Transfer photos, text messages, contacts, notes, and many other file types.
- Supports over 8000+ Android devices. Works for all models of iPhone, iPad and iPod.
Using Dr.Fone Switch to learn how to clone an iPhone is pretty easy. Simply follow these three steps to clone iPhone to new iPhone.
Step 1: Connect the source and the target iOS device
To start with, launch the Dr.Fone toolkit on your computer. The application is available for both Windows and Mac systems.
Connect both the iOS devices to your system using a lightning or USB cable to clone iPhone to iPad or vice versa. Once the interface of Dr.Fone would be launched, you can click on the “Switch” option to start with.

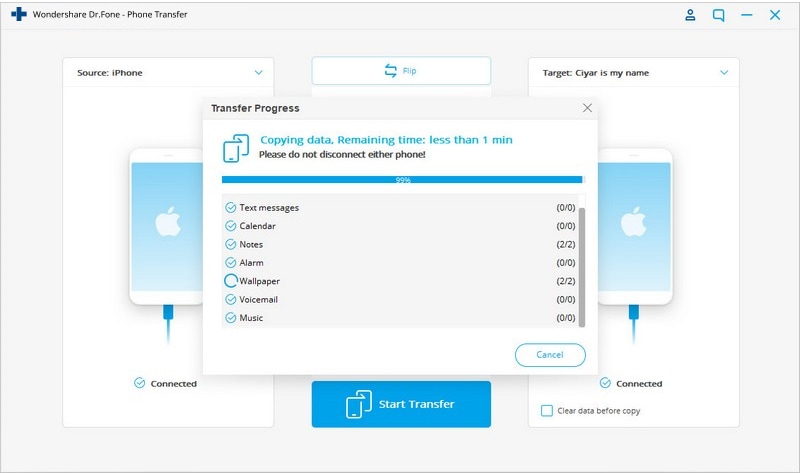
The application will automatically detect your devices and display them as a source and a target device. If your system is not able to detect your device, then you can connect it again as well. Additionally, you can use the “Flip” button to change the position of both the devices. Needless to say, your data would be transferred from the source to the destination device.
Step 2: Select the data you wish to transfer
Now, in order to clone iPhone to new iPhone, you can select the type of content that you wish to transfer. It could be messages, call logs, photos, etc.

In this way, you can clone an entire device or selectively transfer the data of your choice.
Step 3: Start transferring your data
After making your selection, click on the “Start Transfer” button to initiate the process. Furthermore, you can enable the “Clear data before copy” option to erase all the existing content on the target phone before the cloning process.

Sit back and wait for a while as Dr.Fone will transfer the selected content from a source to a destination iOS device. Make sure that both the devices are connected to the system for a seamless process.
Once the transfer process would be completed successfully, you will be notified. Now, you can just close the application and disconnect the devices safely.

In this way, you would be able to clone iPhone to new iPhone with a single click!
Part 2: How to clone iPhone to new iPhone using iCloud?
By using Dr.Fone Switch, you would be able to learn how to clone an iPhone directly in seconds. Though, if you wish to clone iPhone to iPad (or any other iOS device) wirelessly, then you can use iCloud as well. By default, Apple provides a free space of 5 GB to every iCloud account. You can also buy additional space if you wish to transfer more data.
In this technique, you have to first sync your source device to your iCloud account and later set up the new device through your iCloud account. To learn how to clone an iPhone, follow these steps:
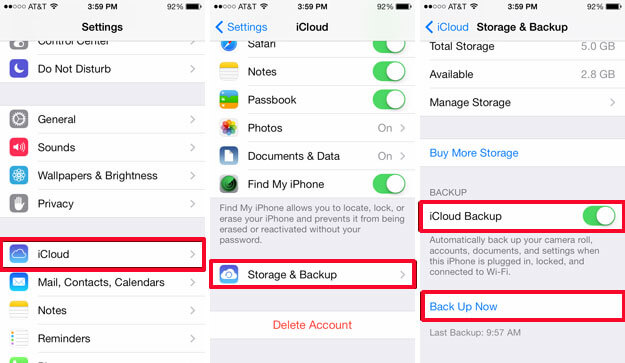
1. Firstly, unlock the source iOS device and go to its Settings > iCloud > Storage and Backup. From here, you need to turn on the option of “iCloud Backup”.
2. To take a backup of your content, tap on the “Backup Now” button. Additionally, you can select the kind of content that you wish to sync with your iCloud account from here as well.

3. Once your entire content has been synced, you can turn on the target device. If you are already using your phone, then you need to reset it entirely as the solution will only work while setting up a new device.
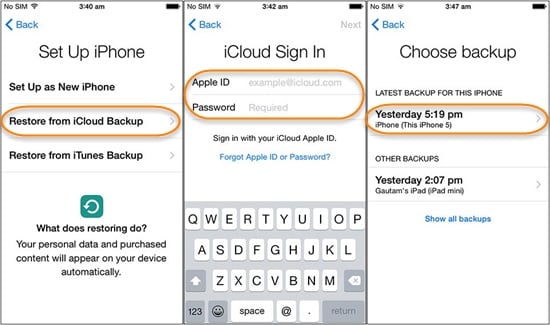
4. As the target iOS device would be turned on, it will provide options to set up the device. Choose the “Restore from iCloud backup” option.
5. The device will ask you to log-in with your iCloud account credentials. Make sure you enter the Apple ID and password of the account that is synced with your previous device.
6. After successfully logging-in, the interface will display the available backups. Just select the respective file and clone iPhone to new iPhone wirelessly.

By following these simple steps, you would be able to clone iPhone to iPad or vice versa. Now when you know how to clone an iPhone, you can easily move from one device to another without losing your data. If you wish to clone iPhone to new iPhone with just one click, then you should certainly try Dr.Fone Switch. It is a remarkable tool that will help you move from one iOS device to another without any trouble.
iPhone Transfer
- Data Transfer
- 1. Video from iPhone to External Drive
- 2. Transfer MP4 to iPhone
- 3. Put Wallpapers on iPhone
- 4. Move Photos to SD Card
- 5. Best Apps to Transfer from iPhone to Android
- iPhone to PC
- 1. Transfer Pictures From iPhone to PC
- 2. Transfer From iPhone to Computer
- 3. Transfer Album from iPhone to PC
- 4. Transfer Data from iPhone to PC
- 5. Copy Voice Memo from iPhone to PC
- 6. iPhone Camera Roll to Computer
- 7. Podcasts from iPhone to Computer
- 8. Transfer Notes from iPhone
- 9. Techniques Used in Mobile Phone Forensics
- iPhone to Mac
- 1. Voice memos from iPhone to Mac
- 2. Synce Notes from iPhone to Mac
- 3. Export iBooks to PC and Mac
- 4. Transfer Photos from iPhone to Mac
- 5. Transfer Music from iPhone to Mac
- Computer to iPhone
- 1. AirDrop From Mac to iPhone
- 2. Use AirDrop from Mac to iPhone
- 3. Transfer Data from PC to iPhone
- 4. Transfer Videos from PC to iPhone
- 5. Unsync iPhone from Computer
- 6. Sync iPhone with Multiple Computers
- Transfer to iPhone
- 1. Switch Cards Between iPhones
- 2. Facetime for Android to iPhone
- 3. Transfer Data from Motorola to iPhone
- 4. Samsung to iPhone Transfer
- 5. Transfer iPhone Apps to iPhone
- 6. Clone iPhone/iPad to iPhone
- Transfer from iPhone
- 1. Transfer Video from iPhone to Laptop
- 2. Transfer Data from iPhone to Laptop
- 3. Transfer Notes from iPhone to iPad
- 4. Transfer Data from iPhone to Android
- 5. Switch from iPhone to Google Pixel
- 6. Switch from iPhone to Samsung S10
- 7. Switch from iPhone to Samsung
- 8. Transfer from iPhone to Samsung S20
- iPhone Transfer Tips
- 1. Ford Sync iPhone
- 2. Sync iCal with iPhone
- 3. iPhone Calendar Not Syncing
- 4. iPhone Transfer Software
- WhatsApp Transfer
- 1. WhatsApp from iPhone to iPhone
- 2. WhatsApp from iPhone to Android
- 3. WhatsApp from iPhone to Samsung S10
- 4. WhatsApp Messages to iPhone
- 5. WhatsApp from iPhone to Samsung S9
- iTunes Transfer
- ● Manage/transfer/recover data
- ● Unlock screen/activate/FRP lock
- ● Fix most iOS and Android issues
- Transfer Now Transfer Now Transfer Now


James Davis
staff Editor