How to Share Apps Between iPhone and iPad? 4 Easy Ways
Jul 17, 2024 • Filed to: Data Transfer Solutions • Proven solutions
Looking for the best method to share apps between iPhone and iPad? There are several ways to do it. This guide will show you four simple methods. You can use Family Sharing, iCloud, Bluetooth, or Wondershare Dr.Fone-Phone Transfer. Each method has its own steps and benefits.
Family Sharing lets you share apps with family members. iCloud helps you sync apps across devices. Bluetooth offers a wireless option, though it has limits.
Wondershare Dr.Fone provides a quick and easy transfer solution. You can enjoy your favorite apps on both devices by following these steps. This guide will help you choose the best method for your needs. Read on to learn how to share apps between your iPhone and iPad.
Way 1. How to Share Apps Between iPhone and iPad Using Family Sharing?
The Family sharing method performs well only with iOS devices version 8 and later. This method allows you to easily share various files with your family members. The files include apps, books, movies, TV shows, and music.
Do you want to transfer apps from iPhone to iPad using Family sharing? Then, ensure you have set up the program on your iPhone and shared the purchases with your connected gadgets.
How To Sync Apps Between iPad And iPhone Using Family Sharing?
Below are the steps to sync app data between iPhone and iPad.
- Step 1. Go to 'Settings – iCloud' on your iPhone. Now, log in by entering the Apple ID credentials.
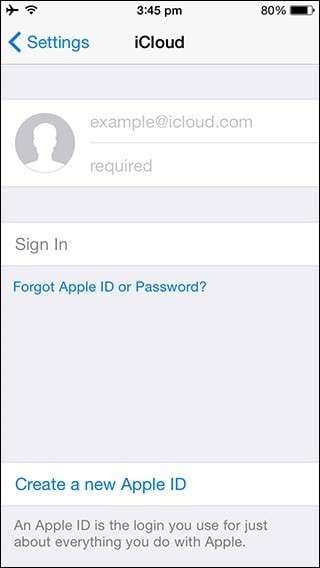
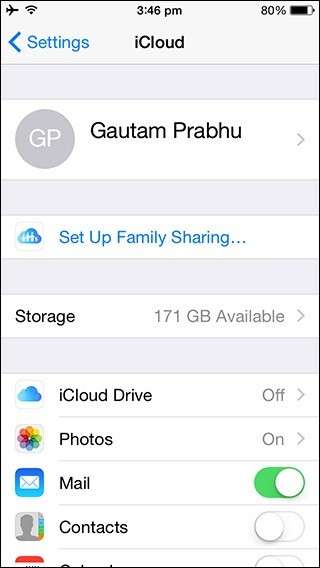
- Step 2. Press the "Set up Family Sharing" option and tap the "Get Started" button. Next, add your Family members. Then, agree to pay for the purchase made on iTunes, iBooks, App Store, etc.
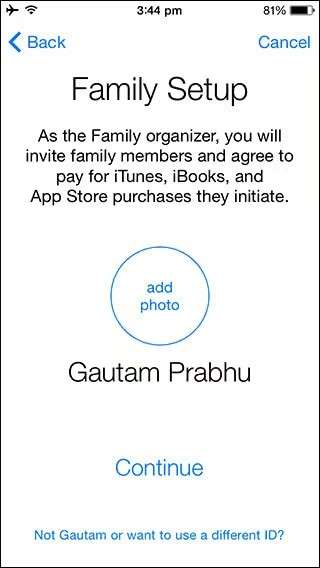
- Step 3. In the next tab, as a family organizer, you can invite family members. Agree to pay for iBooks, iTunes, and App Store purchases they initiate.
- Step 4. Now, sign in using the Apple ID you want to share iBook, iTunes, and App Store purchases.
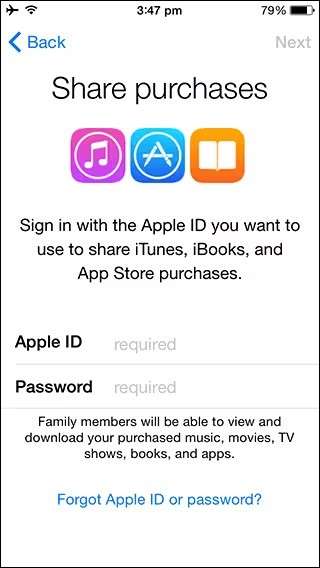
- Step 5. In the next tab, your iPhone will display the payment method that can be used to make payments. Tap on Managing Family Purchases> Done. Tap on continue > Share Location or Not Now. You are the organizer at this stage and can invite up to 5 additional members.
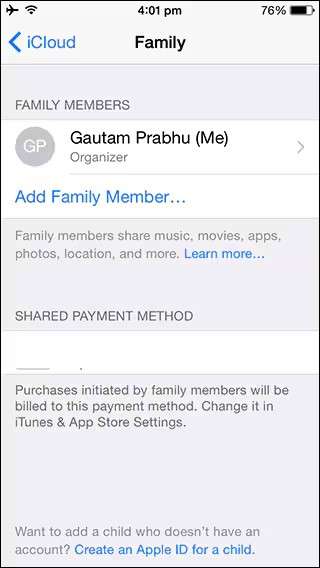
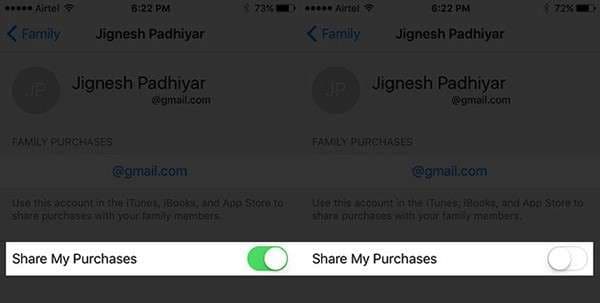
- Step 6. After the Family sharing set-up, log in to your iCloud account and click your name. Enable the 'Share my Purchases' toggle switch, which lets you access the apps from any iOS device through the Apps and Store option.
- Step 7. On your iPad, tap "App Store," then hit your name from the "Today" tab. Select "Purchased" and choose your name on the following screen, displayed by the Family Sharing option. Select the desired apps from the list and press the " Download" button.
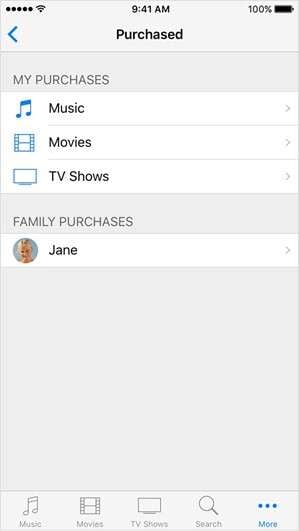
The desired apps are now available on your iPad using Family sharing. You can use this procedure to access any apps from your common Apple ID on your preferred iOS device
You can try this procedure to transfer apps on any iOS device anytime. This is because the Family sharing tool maintains the app's purchase list in your Apple ID, similar to the iCloud virtual storage for easy access to any iOS device.
We have covered everything about how to share apps between iphone and iPad using Family Sharing. Now, let’s shed light on the following potential solution.
Way 2. How to Transfer Apps from iPhone to iPad Using iCloud?
iCloud is Apple's computing service and cloud storage. This method ensures that all the apps on your iPhone can be accessed and downloaded onto your iPad if both devices use the same Apple ID.
Step-by-Step Guide on How to Share Apps Between iPhone and iPad
The following steps will help you transfer apps between iPhone and iPad.
- Step 1. Hit 'Settings' on your iPhone and select the Store option.
- Step 2. Turn 'On' the toggle switch before the 'Apps' option.
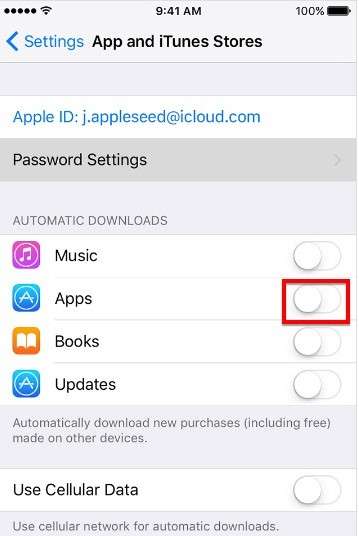
- Step 3. Now, toggle on the Automatic Downloads button.
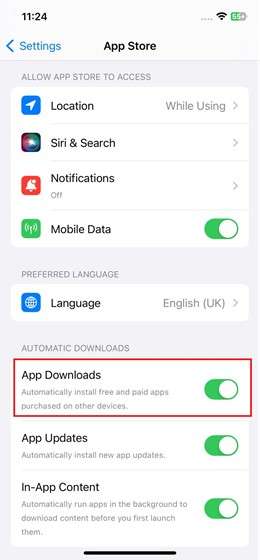
- Step 4. The changes made on your iPhone will also be reflected on your iPad. Log in with your Apple ID and effortlessly access the iPhone apps on your iPad.
That’s all about how to get apps to sync between iPhone and iPad using iCloud. Now, let’s talk about the next method!
Way 3. How to Share Apps from iPhone to iPad using Bluetooth
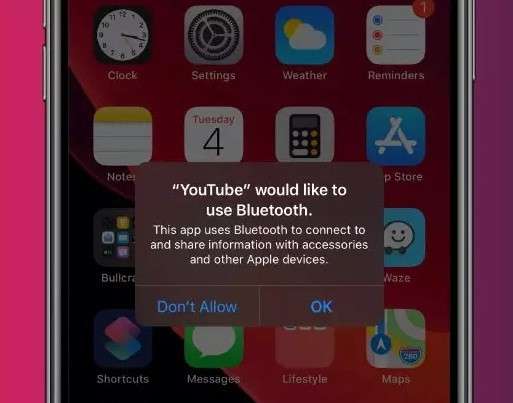
Do you prefer wireless data transfer between iPhone and iPad? You can try Bluetooth to complete the task. However, transferring apps from an iPhone to an iPad via Bluetooth is not a native feature of iOS devices. Apple does not support app transfers through Bluetooth directly.
Steps to Share Apps Between iPhone and iPad
The following steps will help you understand how to transfer apps between iphone and iPad.
- Step 1. Enable the Bluetooth option in your iPhone by navigating 'Settings – Bluetooth'.
- Step 2. Tap the settings option to turn on the Bluetooth feature.
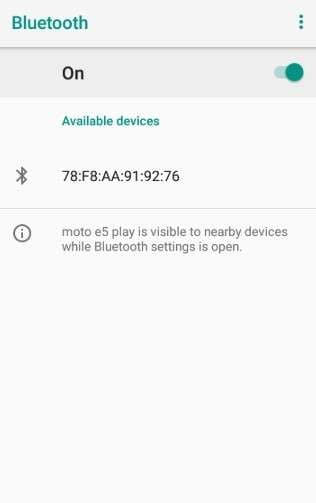
- Step 3. Now, add the iPad to your iPhone using the pairing technique.
- Step 4. After establishing a wireless connection between the devices, right-click your mouse on the desired app and select the ' Share' option.
- Step 5. Among the various ways, select Bluetooth and tap the iPad from the paired devices. Now press the 'Send' option to trigger the transfer process.
Way 4. How to Transfer Apps between iPhone and iPad with Wondershare Dr.Fone? (One-Click Transfer)
Transferring data between iDevices requires a lot of time and effort. Despite the introduction of many services and procedures, it is quite a challenge to share apps between iPhones and iPads.
Amidst the confusion, Dr.Fone Phone Transfer proves a savior by providing a comprehensive phone transferring system.
You can effortlessly transfer contacts, SMS, photos, videos, music, etc. The tool is compatible with Android 14 (Win) and the latest iOS 17. This phone transfer tool supports 13 file types for iPhone to iPad data transfer.

Dr.Fone - Phone Transfer
Transfer Apps between iPhone and iPad
- Move data between devices with different OSs, i.e. iOS to Android.
- Transfer contacts, SMS, photos, videos, music, and more types.
- Simple, click-through process
- Compatible with latest Android and iOS version.
Steps to Sync App Data between iPhone and iPad with Wondershare Dr.Fone
Download and install Dr.Fone on your PC or computer. Then follow the instructions below to share apps between iPhone and iPad.
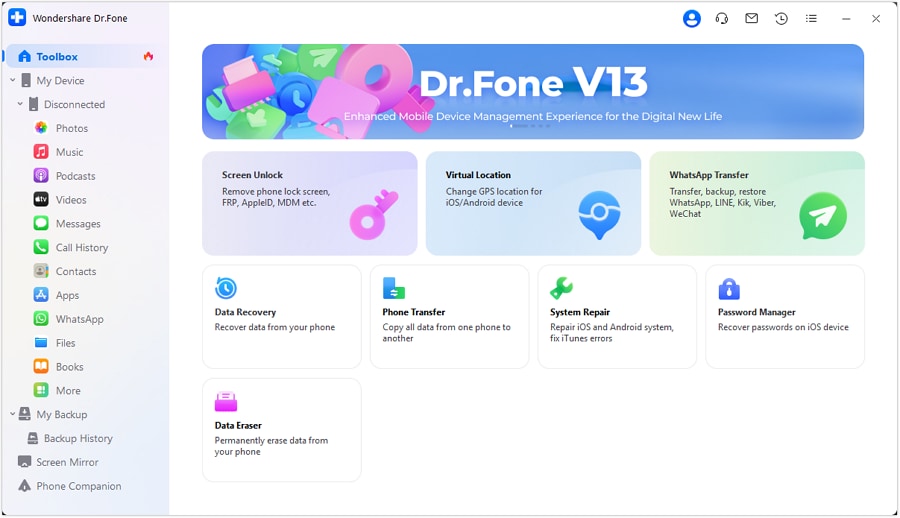
- Step 1. To begin with, launch Wondershare Dr.Fone on the computer. Continue from Toolbox > Phone Transfer.
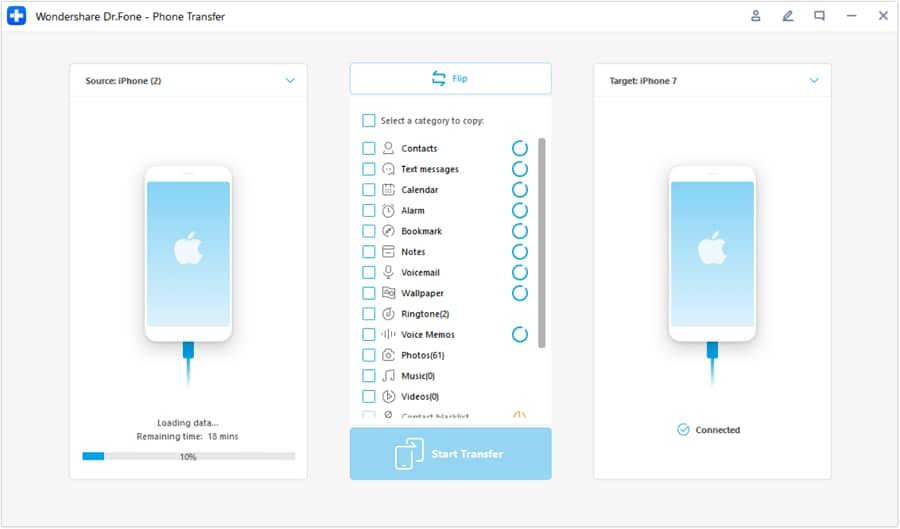
- Step 2. Connect your iOS devices and allow them to load their data on the next screen. Now, define the Source and Destination of the transfer. Use the Flip button on the top to change locations.
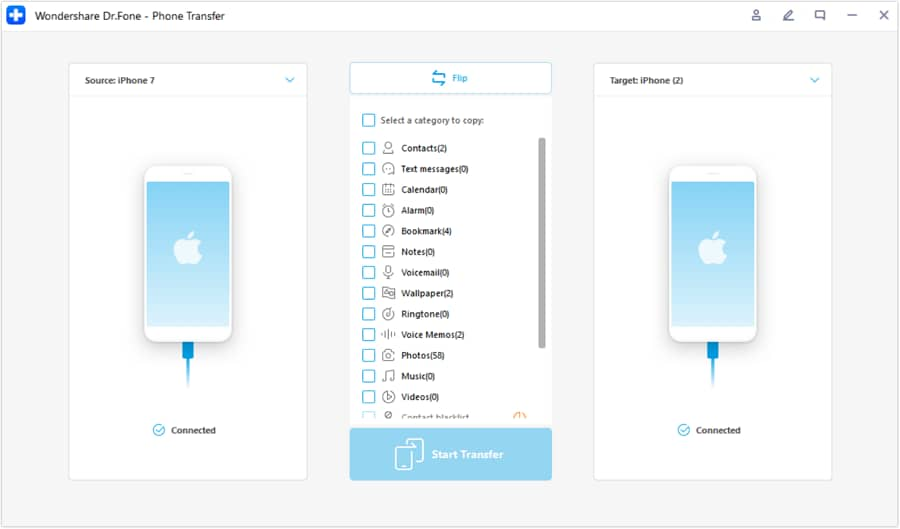
- Step 3. Now, choose the data type that you want to transfer. Next, Checkmark all the required data types and proceed to tap the Start Transfer button.
- Step 4. Now, turn off the Find My feature on iOS devices. To do this, continue from iCloud > Find My feature and turn it off.
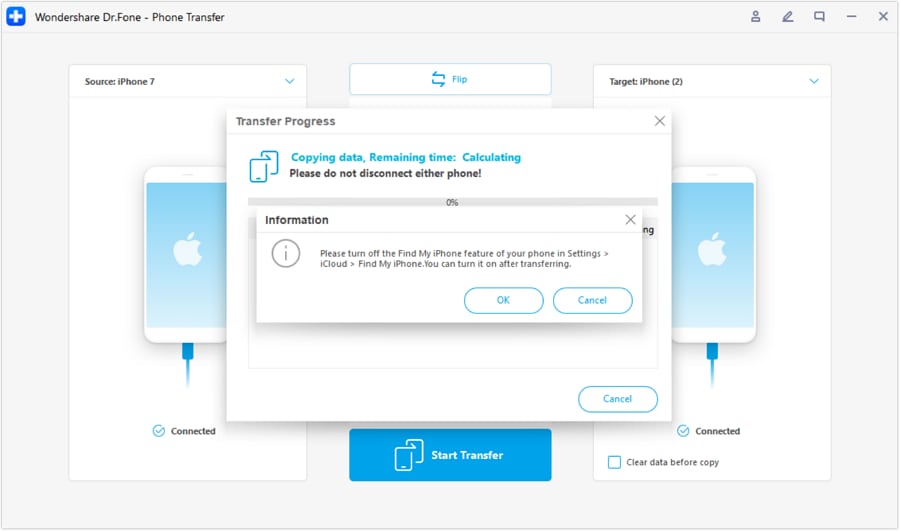
- Step 5. As you turn off the feature, the data transfer initiates. Wait for the complete iOS to iOS phone transfer.
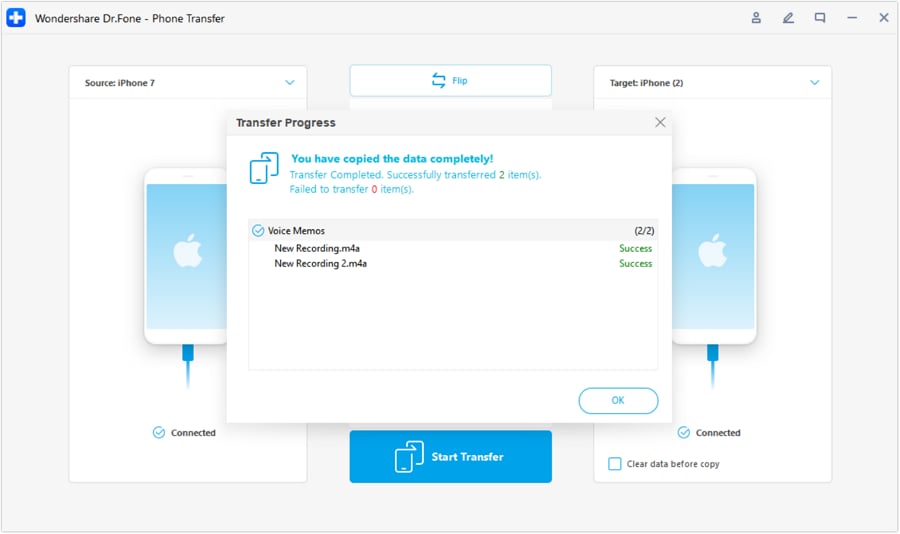
That’s all about using Dr.Fone - Phone Transfer to share apps between iPhone and iPad. Let's conclude our discussion with the final part.
Final Words!
It is quite simple to share apps between iPhone and iPad using the methods discussed above. When you take a deeper note of transfer strategies, many ways knock on your door in a queue. You need to decide wisely to choose the best way to transfer apps from iPhone to iPad.
Family Sharing and iCloud offer easy options within Apple's ecosystem. Bluetooth is a wireless option, though limited.
For the best and most efficient solution, use Dr.Fone-Phone Transfer. It supports many data types and allows quick, easy transfers between devices.
It saves you time and effort. With Dr.Fone, you can sync apps and data with just a few clicks. Transfer large-size data within a fraction of a minute between iDevices easily!
Other Popular Articles From Wondershare
iPhone Transfer
- Data Transfer
- 1. Video from iPhone to External Drive
- 2. Transfer MP4 to iPhone
- 3. Put Wallpapers on iPhone
- 4. Move Photos to SD Card
- 5. Best Apps to Transfer from iPhone to Android
- iPhone to PC
- 1. Transfer Pictures From iPhone to PC
- 2. Transfer From iPhone to Computer
- 3. Transfer Album from iPhone to PC
- 4. Transfer Data from iPhone to PC
- 5. Copy Voice Memo from iPhone to PC
- 6. iPhone Camera Roll to Computer
- 7. Podcasts from iPhone to Computer
- 8. Transfer Notes from iPhone
- 9. Techniques Used in Mobile Phone Forensics
- iPhone to Mac
- 1. Voice memos from iPhone to Mac
- 2. Synce Notes from iPhone to Mac
- 3. Export iBooks to PC and Mac
- 4. Transfer Photos from iPhone to Mac
- 5. Transfer Music from iPhone to Mac
- Computer to iPhone
- 1. AirDrop From Mac to iPhone
- 2. Use AirDrop from Mac to iPhone
- 3. Transfer Data from PC to iPhone
- 4. Transfer Videos from PC to iPhone
- 5. Unsync iPhone from Computer
- 6. Sync iPhone with Multiple Computers
- Transfer to iPhone
- 1. Switch Cards Between iPhones
- 2. Facetime for Android to iPhone
- 3. Transfer Data from Motorola to iPhone
- 4. Samsung to iPhone Transfer
- 5. Transfer iPhone Apps to iPhone
- 6. Clone iPhone/iPad to iPhone
- Transfer from iPhone
- 1. Transfer Video from iPhone to Laptop
- 2. Transfer Data from iPhone to Laptop
- 3. Transfer Notes from iPhone to iPad
- 4. Transfer Data from iPhone to Android
- 5. Switch from iPhone to Google Pixel
- 6. Switch from iPhone to Samsung S10
- 7. Switch from iPhone to Samsung
- 8. Transfer from iPhone to Samsung S20
- iPhone Transfer Tips
- 1. Ford Sync iPhone
- 2. Sync iCal with iPhone
- 3. iPhone Calendar Not Syncing
- 4. iPhone Transfer Software
- WhatsApp Transfer
- 1. WhatsApp from iPhone to iPhone
- 2. WhatsApp from iPhone to Android
- 3. WhatsApp from iPhone to Samsung S10
- 4. WhatsApp Messages to iPhone
- 5. WhatsApp from iPhone to Samsung S9
- iTunes Transfer
- ● Manage/transfer/recover data
- ● Unlock screen/activate/FRP lock
- ● Fix most iOS and Android issues
- Transfer Now Transfer Now Transfer Now


Daisy Raines
staff Editor