Essential Guide to Taking Screenshots on Samsung Galaxy J2/J3/J5/J7
Jul 12, 2024 • Filed to: Latest News & Tactics • Proven solutions
Galaxy J is a highly anticipated Android-based smartphone series produced by Samsung. It is already used by millions of users the world over with the inclusion of various devices like J2, J3, J5, and so on. Since it is an affordable and resourceful series, it has got plenty of positive feedback from its users. Though, we have been asked by our readers, several queries like how to screenshot in Samsung J5. If you have the same thought, then you have come to the right place. In this post, we will let you know different ways to take a screenshot on your Samsung smartphone.
Part 1: How to screenshot Galaxy J5/J7/J2/J3 using buttons?
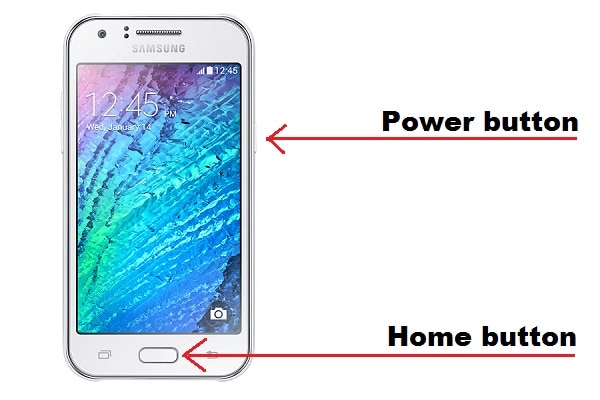
Just like any other Android smartphone, it is quite easy to take screenshots on Galaxy J series phones as well. To start with, you can apply the correct key combinations and capture the screen on your device. Before we teach you how to screenshot in Samsung J5, J7, J3, etc. it is important to check if the device’s buttons are working or not. Make sure that the Home and the Power button are functioning before taking a screenshot. Afterward, simply follow these easy steps.
- 1. Unlock your smartphone and open the screen that you wish to capture.
- 2. Now, press the Home and the Power button at the same time.
- 3. You will hear a flash sound and the screen will vibrate as your phone will take a screenshot.

Ideally, it is important to note that both the buttons (Home and Power) should be pressed at the same time. Additionally, one should hold them for a few seconds as the screenshot would be taken.
Part 2: How to screenshot in Galaxy J5/J7/J2/J3 with palm-swipe gesture?
To make it easier for its users to take a screenshot on their Galaxy devices, Samsung has come up with a smart solution. Using its palm-swipe gesture, you can take a screenshot without pressing any button. Too many times, users find it hard to press both the buttons at the same time. Therefore, in this technique, all you need to do is swipe your palm in one direction to take a screenshot. The gesture controls were originally introduced in the Galaxy S series and later implemented in the J series devices as well. To learn how to screenshot in Samsung J5, J7, J3, and other similar smartphones, follow these steps:
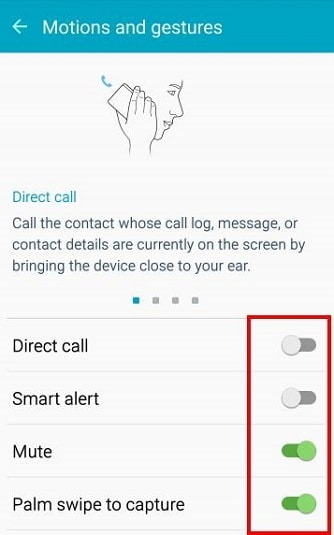
- 1. Firstly, you need to turn on the feature of palm swipe gesture on your device. To do this, go to its Settings > Motions and Gestures and turn on the option of “palm swipe to capture”.
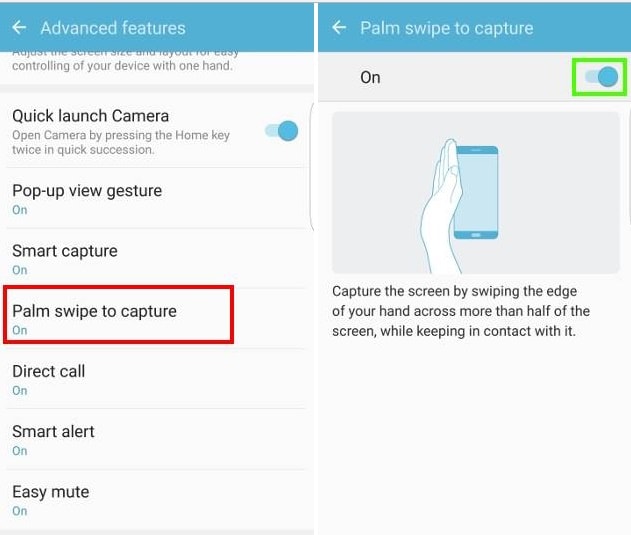
- 2. If you are using an older version of Android, then you need to visit Settings > Advanced features to find the option of “Palm swipe to capture”. Tap it and turn the feature on.
- 3. Great! Now you can capture the screenshot on your device by simply swiping your palm in one direction. Just open the screen you wish to capture and swipe your palm from one side to another by keeping a contact with the screen.


That’s it! Once the gesture is completed, your phone will automatically take a screenshot on your device. You would hear a flash sound and the screen will blink, depicting that the screenshot has been taken.
Part 3: How to find the screenshot on Galaxy J5/J7/J2/J3?
After taking a screenshot on your Galaxy J smartphone, you can view it whenever you want. One can also edit the screenshot as per their needs by using the device’s inbuilt editor app. If you are finding it hard to search the screenshot that you have recently captured, then don’t worry. We have got you covered. Here are 3 ways to find the screnshot on Galaxy J5/J7/J2/J3 devices.
1. Right after when we take a screenshot on an Android device, it notifies us. After taking a screenshot, you will get a notification on your screen stating “Screenshot Captured”. All you have to do is tap on it. This will open the screen for you to view or edit.
2. Furthermore, you can also access your previously taken screenshots whenever needed. All the screenshots are saved in your phone’s gallery by default. Therefore, to find a screenshot on Galaxy J5, J7, J3, or J2, simply tap on its “Gallery” app.
3. Most of the times, screen captures are listed under a separate folder “Screenshots”. Just tap on the folder to access all the screenshots that you have captured. If you won’t see a distinctive folder, then you will find your screenshots with all the other pictures on your device (gallery).
Part 4: Video tutorial on taking screenshots on Galaxy J5/J7/J2/J3
Are you still not sure on how to screenshot in Samsung J5, J7, J3, or J2? Don’t worry! You can learn it by watching these video tutorials. We have already provided a stepwise solution above by including pictures and illustrations on how to screenshot in Samsung J5 and other devices of the series. Though, you can also view these videos and learn to do the same instantly.
Here’s a video on how to screenshot in Samsung J5, J7, J3, and more by applying the correct key combinations.
Now when you know how to screenshot in Samsung J5, J7, J3, and J2, you can easily capture your device’s screen whenever you want. We have provided stepwise tutorials for both the techniques in this post. You can either apply the correct key combination or simply take the assistance of palm swipe gesture to take a screenshot. There are also various third-party apps that can be used to perform the same task. So what are you waiting for? Go ahead and give it a try and let us know about your experience in the comments below. If you know someone who is finding it hard to take a screenshot, feel free to share this tutorial with them as well!
Samsung Transfer
- Android to Samsung
- 1. Transfer Content To Galaxy
- 2. Transfer Data from Android
- 3. Transfer Huawei to Samsung
- 4. Transfer Data from LG
- 5. Transfer from Xiaomi to Samsung
- 7. Transfer Data from Pixel
- 8. Transfer Google Nexus to Samsung
- 9. Transfer Data from Motorola
- 10. Transfer Data from Sony
- iCloud to Samsung
- iOS to Samsung
- 1. Transfer Photos from iPad
- 2. Transfer Music from iPod
- 3. Switch from iPhone to Samsung
- 4. Switch from iPhone to Samsung S
- 5. Transfer from iPhone to Samsung
- 6. Transfer WhatsApp from iPhone
- 7. Transfer WhatsApp to Samsung S10
- Samsung Switch
- 1. Samsung Smart Switch Backup
- 2. Smart Switch
- 3. Samsung Switch Alternative
- 4. Samsung Smart Switch Solution
- Samsung to Android
- 1. Transfer Photo to Samsung
- 2. Transfer Everything to Samsung S8
- 3. Transfer Data from Samsung
- 4. Transfer Music to Samsung
- Samsung to iOS
- 1. Transfer Data to iPad
- 2. Transfer Photos to iPhone
- 3. Samsung to iPhone Transfer
- 4. Transfer Contacts to iPhone
- Samsung Tips
- 1. Fix Samsung Brick
- 2. Play Flash on Samsung
- 3. PC Suites for Samsung
- 4. Track Samsung Lost Phone
- 5. Top 10 Samsung Music Players
- 6. Take Screenshots on Samsung J5
- 7. Top 6 Video Calling Apps
- 8. Remove Google Account Bypass
- 9. Bypass Lock Screen Pattern
- 10. Uninstall an App from Samsung
- 11. Import Contacts to Samsung
- 12. Transfer Photos to Chromebook?
- 13. Transfer Data to Another Phone
- 14. Transfer Photos to Samsung
- ● Manage/transfer/recover data
- ● Unlock screen/activate/FRP lock
- ● Fix most iOS and Android issues
- Transfer Now Transfer Now


James Davis
staff Editor