From Chaos to Clarity: Deleting Duplicate Contacts Made Simple on Android
Jul 12, 2024 • Filed to: Manage Device Data • Proven solutions
Duplicate contacts are a common problem many Android phone users need help with. This issue arises when multiple instances of the same contact are saved in the phone's contact list, leading to confusion and clutter. It is a frustrating issue that can make finding and managing contacts difficult.
Duplicate contacts may occur due to several reasons. One of the most common reasons is syncing contacts from different accounts like Google, Facebook, or Twitter. Users may unknowingly create duplicate entries when they import their contacts from multiple accounts. Another reason is when contacts are saved multiple times under slightly different names, phone numbers, or email addresses. This can happen when a user switches phones or has multiple devices and manually saves the same contact in each of them.
Part 1. Challenges of Having Duplicate Contacts
Having duplicate contacts in the phone's contact list can cause inconvenience to the user. It makes finding the right contact when needed and clutters the contact list, making it difficult to manage. It can also lead to sending messages or making phone calls to the wrong person, which can be embarrassing and even cause problems.
Here are some of the challenges that you may face when dealing with duplicate contacts:
- Cluttered and Confusing Contacts List: Multiple duplicates of the same contact can make your contacts list cluttered and difficult to navigate. Finding the right contact when needed can be challenging, frustrating, and time-consuming.
- Wasted Storage Space: Duplicate contacts take up valuable storage space on your phone, slowing down your device and reducing its overall performance. This can also cause your phone to run out of storage space more quickly, which can be a real issue if you need to save important files or apps.
- Outdated or Inaccurate Information: Duplicate contacts can cause outdated or inaccurate information issues. For example, it can be difficult to know the correct number if you have multiple duplicates of the same contact with different phone numbers.
- Inconsistent Syncing Across Devices: If you use multiple devices, such as a phone and a tablet, having duplicate contacts can cause inconsistencies between your devices. This can lead to issues syncing your contacts across devices, which can be frustrating and confusing.
To avoid duplicate contacts, users should ensure they only save a contact once, keep their contact list organized, and avoid syncing multiple accounts. In case duplicate contacts exist, users can use built-in features on Android phones or third-party apps to merge or delete duplicate entries to keep their contact list tidy and easy to manage.
Part 2. How to Delete Duplicate Contacts on Android
When you add a new contact to your Android phone, it's easy to accidentally save it multiple times, leading to a cluttered and confusing contacts list. Having duplicate contacts can be frustrating when finding the right person to call or message. Luckily, there are several ways to delete duplicate contacts on Android.
Method 1: Via Settings
The first method to delete duplicate contacts on Android is through the settings. This method works for most Android phones and is easy to follow.
To get started, follow these steps:
Step 1: Open the Contacts app on your Android phone.
Step 2: Tap the three dots in the top right corner and select Settings.
Step 3: Scroll to the Manage Contacts section and select Merge duplicates.
Step 4: Your phone will scan your contacts for duplicates and show you a list.
Step 5: Select Merge or Merge All to combine the duplicates into one contact.
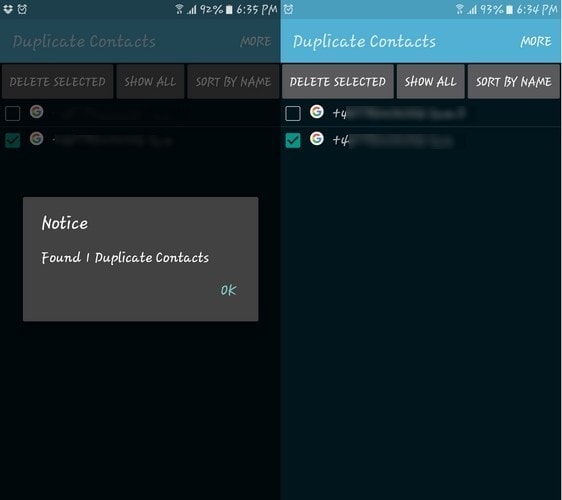
This method is the easiest way to delete duplicate contacts on Android, as it only takes a few steps. However, it may only catch some duplicates, especially if the contacts have different names or phone numbers.
Method 2: By Built-in Contacts App
Another way to delete duplicate contacts on Android is through the built-in Contacts app. This method is useful if you want to delete specific duplicates and keep others.
To delete a duplicate contact using the Contacts app, follow these steps:
Step 1: Open the Contacts app on your Android phone.
Step 2: Tap on the duplicate contact you want to delete.
Step 3: Tap the three dots in the top right corner and select Delete.
Step 4: Confirm that you want to delete the contact.
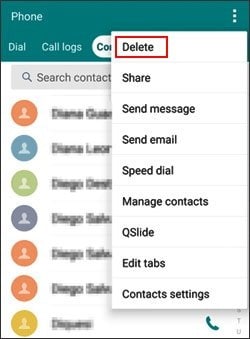
This method allows you to delete individual duplicates, but it can be time-consuming if you have many duplicates to delete.
Method 3: In Google Contacts App
You can delete duplicates through the app using Google Contacts to manage your contacts. This method is useful for deleting duplicates across all your devices.
To delete duplicates using Google Contacts, follow these steps:
Step 1: Open the Google Contacts app on your Android phone.
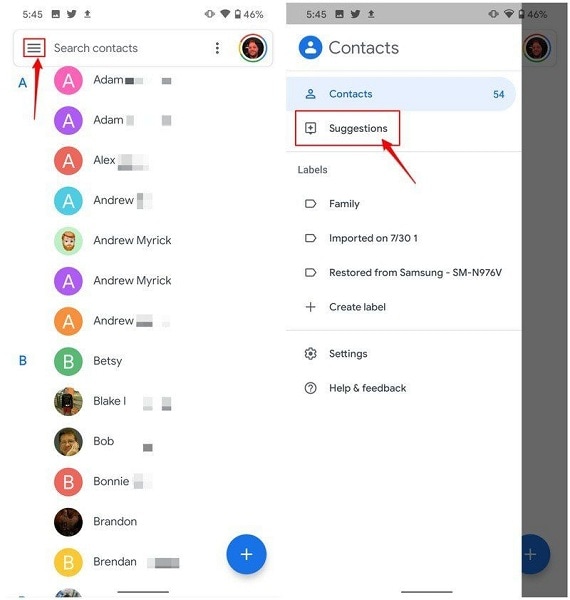
Step 2: Tap on the Duplicates tab at the top.
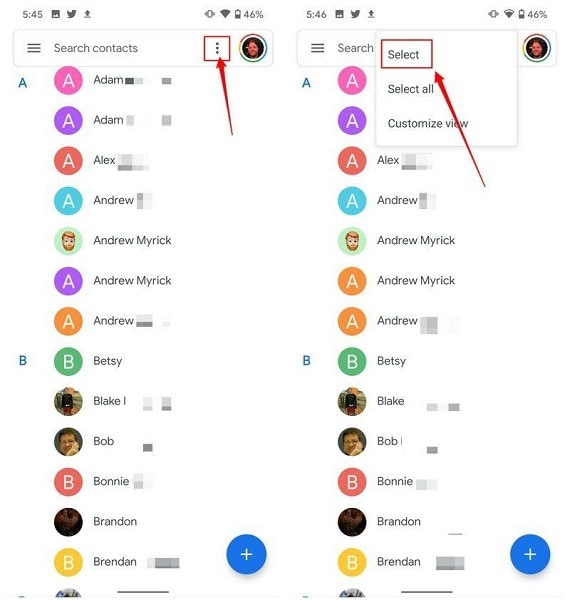
Step 3: Google will automatically group the duplicates. Select the group of duplicates you want to delete.
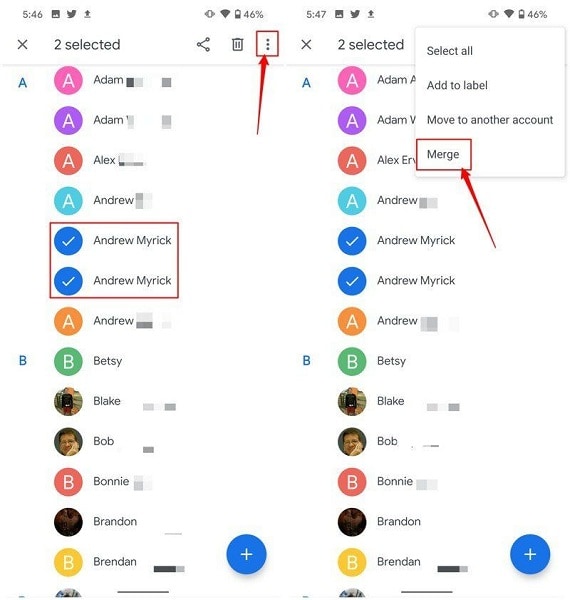
Step 4: Tap the three dots in the top right corner and select Delete.
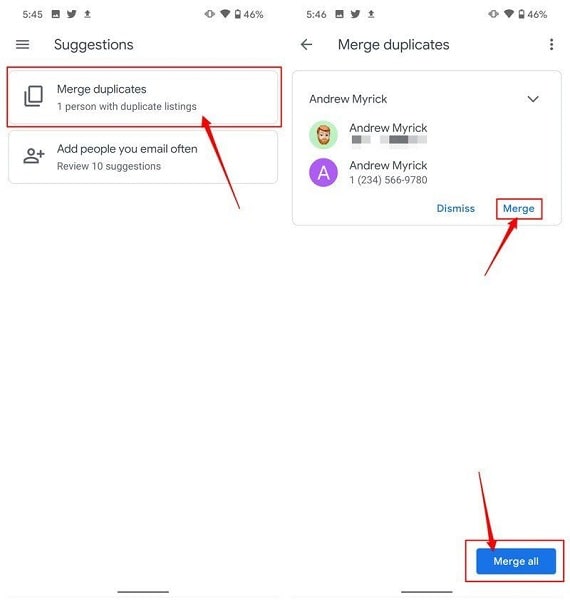
This method is the most efficient way to delete duplicates across all your devices, but it requires you to use Google Contacts.
Part 3. How to Delete Duplicate Contacts on Android using Third-party Apps
If you have many duplicate contacts on your Android phone, you may want to use third-party apps to delete them. Several apps on the Google Play Store can help you delete duplicate contacts on Android. In this article, we will introduce two of the most popular apps for removing duplicate contacts on Android.
Method 1: Using Duplicate Contacts Fixer
Duplicate Contacts Fixeris a popular app that can help you find and remove duplicate contacts on Android. Here's how to use it:
Step 1: Download and install Duplicate Contacts Fixer from the Google Play Store.
Step 2: Open the app and grant it the necessary permissions.
Step 3: Tap the Find Duplicates button to scan your contacts for duplicates.
Step 4: The app will show you a list of duplicate contacts. Select the ones you want to delete and tap Merge Selected.
Step 5: Confirm that you want to merge the selected contacts.
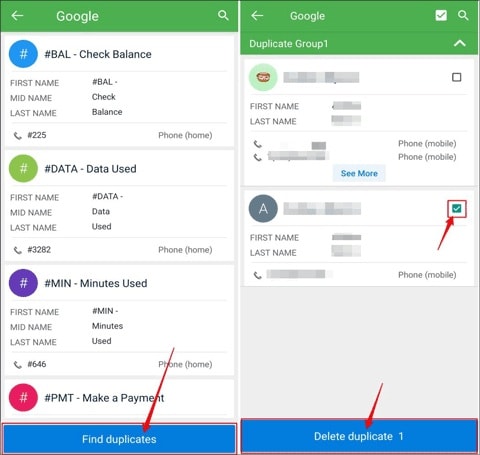
Duplicate Contacts Fixer also has a Smart Merge feature that automatically merges duplicate contacts based on name, phone number, and email address. This feature can save you time if you have many duplicate contacts to merge.
Method 2: Using Cleaner - Merge Duplicate Contacts
Cleaner - Merge Duplicate Contacts is another popular app that can help you delete duplicate contacts on Android. Here's how to use it:
Step 1: Go to Google Play Store to download and install the Cleaner - Merge Duplicate Contacts application.
Step 2: Open the app and allow it to access the necessary permissions on your Android phone.
Step 3: Look for the Find Duplicates button within the app, then tap it to initiate a scan of your phone's contact list for duplicates.
Step 4: Select the duplicates you wish to delete and tap the Merge option.
Step 5: Select Yes when prompted by the app.

Cleaner-Merge Duplicate Contacts also has a "Smart Merge" feature that automatically merges duplicate contacts based on name, phone number, and email address.
Duplicate Contacts Fixer and Cleaner-Merge Duplicate Contacts are easy-to-use apps that help you quickly clean up your contacts list. However, remember that these apps may only catch some duplicates, especially if the contacts have different names or phone numbers.
Part 4. How to Manage Your Android Contacts with Wondershare Dr.Fone
Wondershare Dr.Fone is a comprehensive Android management tool that offers a variety of features for managing contacts, messages, and other data. This powerful tool is designed to help users manage their Android devices easily and efficiently.
If you're looking for a reliable tool to manage your Android contacts, Wondershare Dr.Fone is an excellent choice. Here's how to use Wondershare Dr.Fone to remove duplicate contacts:
Step 1: Download and install Wondershare Dr.Fone on your computer.

Step 2: Connect your Android phone to your computer using a USB cable.

Step 3: Launch Wondershare Dr.Fone and select the Contacts option from the main menu.
Step 4: Click on the De-duplicate button to scan your contacts for duplicates.
Step 5: Select the ones you want to delete and click the Delete button.
Step 6: Confirm that you want to delete the selected contacts.

One of the key benefits of using Wondershare Dr.Fone to manage your Android contacts is its ability to back up and restore contacts. You can easily back up your contacts to your computer or cloud storage to keep them safe. If you accidentally delete a contact or lose your phone, you can quickly restore your contacts from the backup.
Wondershare Dr.Fone also allows you to merge duplicate contacts, a useful feature for cleaning up your contacts list. You can merge duplicates based on name, phone number, or email address, saving time and organizing your contacts list.
Another great feature of Wondershare Dr.Fone is its ability to export contacts to different formats. You can export your contacts as vCard, CSV, or HTML files, which can be useful if you need to share your contacts with others or import them into another app.
Wondershare Dr.Fone is an excellent tool for managing your Android contacts. With its backup and restore features, de-duplication capabilities, and export options, you can easily keep your contacts list organized and up-to-date. If you're looking for a comprehensive Android management tool, Wondershare Dr.Fone is worth checking out.
Conclusion
Managing contacts on your Android phone can be daunting, especially when dealing with duplicates. However, with the various methods and tools outlined in this article, such as the built-in settings, third-party apps, and Wondershare Dr.Fone, keeping your contacts organized and up-to-date is now easier than ever. Whether you prefer a simple built-in tool or a comprehensive management tool like Wondershare Dr.Fone, there's a solution for everyone.
Android Erase
- Android Diagnostics
- 1. Fix Android Microphone Issues
- 2. Test NFC on Android Device
- 3. Check Android Device in Minutes
- 4. Apps For Sensor Check Android
- 5. Apps for Testing Device's Hardware
- 6. Tools for Conducting Screen Tests
- 7. Ways to Check Phone's Vibrations
- 8. Check Mobile Signal Strength
- 9.Realme Touch Screen Test Codes
- 10.Android Codes To Test Touch Screen
- 11.Phone Processor Speed Tests
- Erase Android
- 1. Delete Browsing History on Android
- 2. Clear App Data and Cache on Android
- 3. Delete Photos from Android
- 4. Wipe Android When It's Lost
- 5. Wipe Cache Partition on Android
- 6. Delete Text Messages on Android
- 7. Delete WhatsApp Backup
- 8. Wipe Data or Factory Reset
- 9. Erase Android Data Before Selling
- 10. Delete Contacts on Android
- 11.Delete Multiple Contacts on Android
- 12.Wipe Android Phone before Selling
- 13.Delete Photos on Android
- 14.Remove Pre-installed Apps
- 15.Delete Apps on Android
- 16. Access Trash on Android
- Android Reset
- 1. Restart Phone without Power Button
- 2. Reset Phone without Volume Buttons
- 3. Factory Reset Android Phone
- 4. Hard Reset Android Phone Using PC
- 5. Hard Reset Locked Infinix Phone
- 6. Factory Reset Lenovo Phone
- 7. Factory Reset Android Tablets
- 8. Factory Reset Lenovo Tablets
- 9. Format Your Android Phone
- 10. Hard Reset Android Phones
- 11.Reset Android Without Home Button
- 12.Restart Your Android Phone
- 13.Soft Reset Android Devices
- 14.Reset Android without Losing Data
- 15.Ways to Hard Reset Tecno Spark
- 16.Updated Android Factory Reset Code
- Data Erase Apps
- 1. Speed Booster for Android
- 2. Android Cleaners to Boost Device
- 3. Data Erase Apps to Protect Privacy
- 4. Data Eraser Apps to Wipe Android
- 5. 15 Best Cleaning Apps for Android
- Sell Old Android


James Davis
staff Editor