How to Move WhatsApp to SD Card | Step-by-Step Guide
WhatsApp Manage
- WhatsApp Transfer
- 1. Save Whatsapp Audio
- 2. Transfer WhatsApp Photos to PC
- 3. WhatsApp from iOS to iOS
- 4. WhatsApp from iOS to PC
- 5. WhatsApp from Android to iOS
- 6. WhatsApp from iOS to Android
- 7. WhatsApp from Huawei to Android
- 8. Switch Between WhatsApp and GBWhatsApp
- 9. Transfer GBWhatsApp to New Phone
- 10. WhatsApp Template for Holidays
- 11. WhatsApp Template to Sell More
- WhatsApp Backup
- 1. Access WhatsApp Backup
- 2. WhatsApp Backup Extractor
- 3. Backup WhatsApp Messages
- 4. Backup WhatsApp Photos/Videos
- 5. Backup WhatsApp to PC
- 6. Backup WhatsApp to Mac
- 7. WhatsApp Backup Stuck
- 8. Restore WhatsApp Backup from Google Drive to iCloud
- 9. Find the Best WhatsApp Clone App
- WhatsApp Restore
- 1. Top Free WhatsApp Recovery Tools
- 2. Best WhatsApp Recovery Apps
- 3. Recover WhatsApp Messages Online
- 4. Recover Deleted WhatsApp Messages
- 5. Restore Deleted WhatsApp Messages
- 6. Retrieve Deleted WhatsApp Messages
- 7. Recover Deleted WhatsApp Images
- 8. WhatsApp Restoring Media Stuck
- 9. Restore Old WhatsApp Backup
- 10. See Deleted WhatsApp Messages
- WhatsApp Tips
- 1. Best WhatsApp Status
- 2. Best WhatsApp Messages
- 3. Most Popular WhatsApp Ringtones
- 4. Best WhatsApp Mod Apps
- 5. Get WhatsApp on iPod/iPad/Tablet
- 6. Access Whatsapp Folder
- 7. Delete WhatsApp Account
- 8. Hide WhatsApp Ticks
- 9. Hack WhatsApp Account
- 10. Verify WhatsApp without SIM
- 11. Unlock WhatsApp Without Password
- 12. WhatsApp Plus Download
- 13. YoWhatsApp Download
- WhatsApp Problems
- 1. WhatsApp Common Problems
- 2. WhatsApp Calls Not Working
- 3. Whatsapp Not Working on iPhone
- 4. WhatsApp Backup Stuck
- 5. WhatsApp Not Connecting
- 6. WhatsApp Not Downloading Images
- 7. WhatsApp Not Sending Messages
- 8. Couldn‘t Restore Chat History
- 9. WhatsApp Not Showing Contact Names
- WhatsApp Business Manage
- 1. WhatsApp Business for PC
- 2. WhatsApp Business Web
- 3. WhatsApp Business for iOS
- 4. Add WhatsApp Business Contacts
- 5. Backup & Restore WhatsApp Business
- 6. Convert a WhatsApp Account to a Business Account
- 7. Change A WhatsApp Business Account to Normal
- 8. WhatsApp Notifications Are Not Working
- Other Social Apps Manage
- ● Manage/transfer/recover data
- ● Unlock screen/activate/FRP lock
- ● Fix most iOS and Android issues
- Manage Now Manage Now
Jul 12, 2024 • Filed to: Manage Social Apps • Proven solutions
WhatsApp has long served as a pivotal means of communication for both businesses and individuals across various platforms. However, the app's utility comes at a cost – it tends to occupy a substantial portion of your phone's internal storage. The accumulation of chat backups and media transfers can swiftly consume valuable space, potentially leading to storage-related challenges.
Fortunately, Android devices present a straightforward remedy to this issue, leveraging the presence of an SD card slot in every device. This built-in feature allows users to seamlessly alleviate storage constraints and streamline their storage management. The question then arises: How can one efficiently transfer WhatsApp data to the SD card?
In this comprehensive guide, we will explore diverse methods that empower you to safeguard your crucial WhatsApp data by creating backups directly on your SD card. By following these steps, you can take charge of your device's storage, ensuring that you never have to fret over losing essential messages or media files again. Join us as we navigate through these practical solutions, providing you with the knowledge and confidence to optimize your WhatsApp experience.
- Q&A 1: Is it possible to move WhatsApp to SD Card?
- Q&A 2: Why should I set an SD Card as default storage?
- Part 1: How to move WhatsApp to the SD Card using the ES File Explorer app? [Non-rooted]
- Part 2: How to move WhatsApp to SD Card using Dr.Fone - WhatsApp Transfer?
- Part 3: How do I set WhatsApp as default storage to SD Card?
Q&A 2: Why should I set an SD Card as default storage?
Android phones provide you with a unique feature of transferring your primary storage from Internal to SD Card. The slot and option of attaching SD Cards in your phone are what makes them outplay their rivals. Setting your phone with SD Card as the default storage not only helps save space and improve its speed but enhances the performance of the phone and saves it from getting hanged due to excessive memory. Having your default storage changed helps you in having large applications installed easily on your phone, without any performance issue.
Part 1: How to move WhatsApp to the SD Card using the ES File Explorer app? [Non-rooted]
As stated above, there are no personalized settings available on WhatsApp Messenger that allows you to backup your data on WhatsApp to your SD Card. However, different manual mechanisms are available for Android phones, which includes file explorer applications that are readily available at the Play Store. There is a very dividend variety available in Android phones with very varying traits that develops the fact that there might be different inbuilt file managers on the phone. Smartphones lacking with a smart file manager needs an external application to serve the purpose. One of the best applications available in the Play Store, the ES File Explorer provides you with a free platform to manage and transfer data from one source to another. However, before having your data transferred to another location, it is important to confirm the availability of space on the source where the data is to be transferred. To have your data successfully moved from WhatsApp to your SD Card, you need to follow the series of steps that would be beneficial in carrying out the task.
Step 1. Open ES File Explorer
Before working on the application, it is essential to have that application on your phone. Install the latest version from Play Store and have it opened on your phone to perform the transfer.
Step 2. Browse the Necessary Files
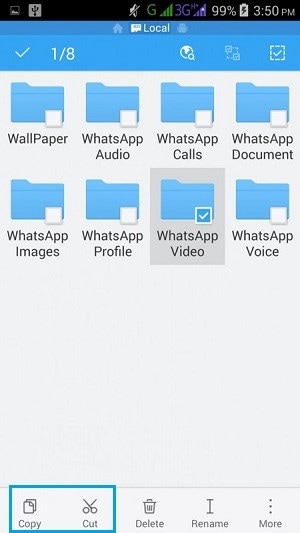
ES File Explorer acts completely like a normal file explorer that enables you to browse the files present within your phone. Browse the folders present on the device of WhatsApp. Open “Internal Storage” followed by the “WhatsApp" folder. This leads you to the folder that allows access to all the files that are contained in your WhatsApp Messenger. Select the folders that you seek meaningful to move.
Step 3. Move your Files
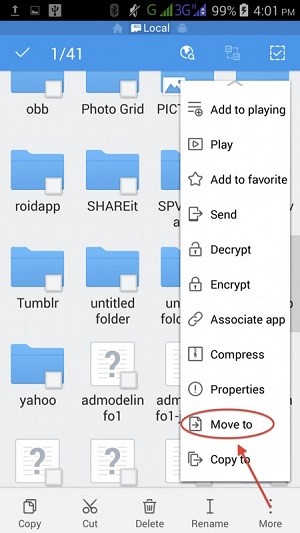
After selecting all the necessary folders, simply select the option on the bottom left of the toolbar showing "Copy." Another option also caters to the needs of the users. The option of "Move to" can be accessed from the "More" button that opens a special menu.
Step 4. Browse to the destination
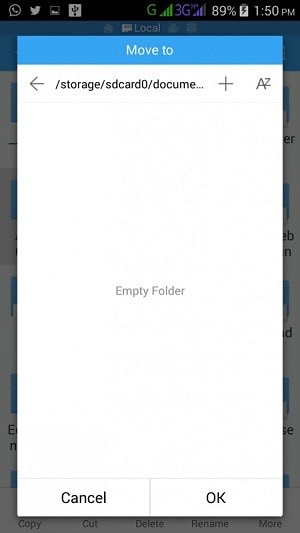
After selecting the “Move to” option, you need to simply browse the location of the SD Card where you wish to transfer your files. Have the location confirmed and execute the task to successfully transfer your data from Internal Storage to the SD Card. However, this only moves the associated data to the SD Card. This means that the user would not be able to access the data from the WhatsApp Messenger since it has been disconnected from the source.
Part 2: How to move WhatsApp to SD Card using Dr.Fone – WhatsApp Transfer?
If you are searching for an application that provides you the ultimate solution of having your data from WhatsApp moved to the SD Card without rooting, Dr.Fone - WhatsApp Transfer can provide very explicit features to its users. This PC tool is not restricted in transferring data but involves other features such as providing cloud backup and restoration of your WhatsApp data on your phone. To perform the tasks of moving WhatsApp data to SD Card with Dr.Fone, you need to function according to the steps provided below.

Dr.Fone - WhatsApp Transfer
Handle Your WhatsApp Chat, Easily & Flexibly
- Transfer WhatsApp messages to both Android and iOS devices.
- Back up & export WhatsApp messages to computers and devices.
- Restore WhatsApp backup to Android and iOS devices.
- Backup LINE/Viber/Kik/WeChat chat history!

Step 1. Install Dr.Fone Tool on PC
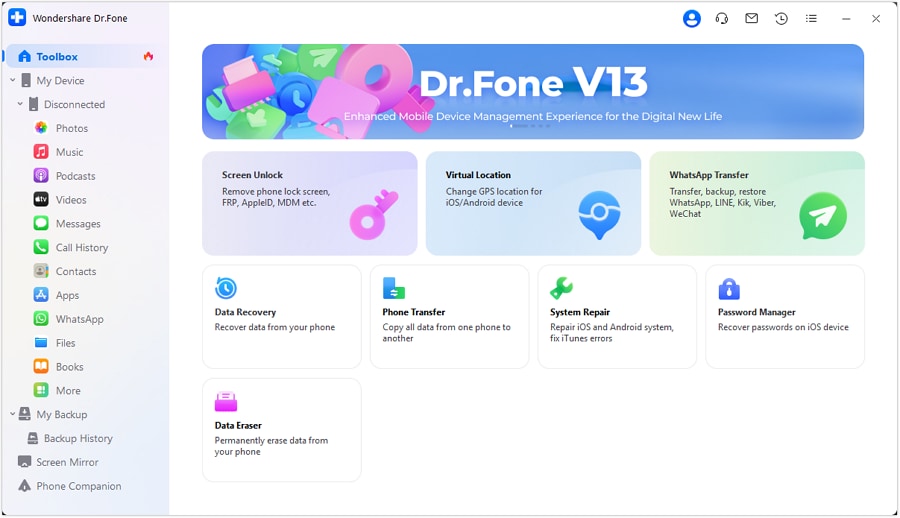
For a perfect experience in WhatsApp backup, transfer, and restoration on Android, Dr.Fone provides its users with an experience worth a while. Install the tool and have it opened. A screen shows on the front showing a series of options to perform. You need to select the option displaying “WhatsApp Transfer” to have the work done.
Step 2. Connect your Phone
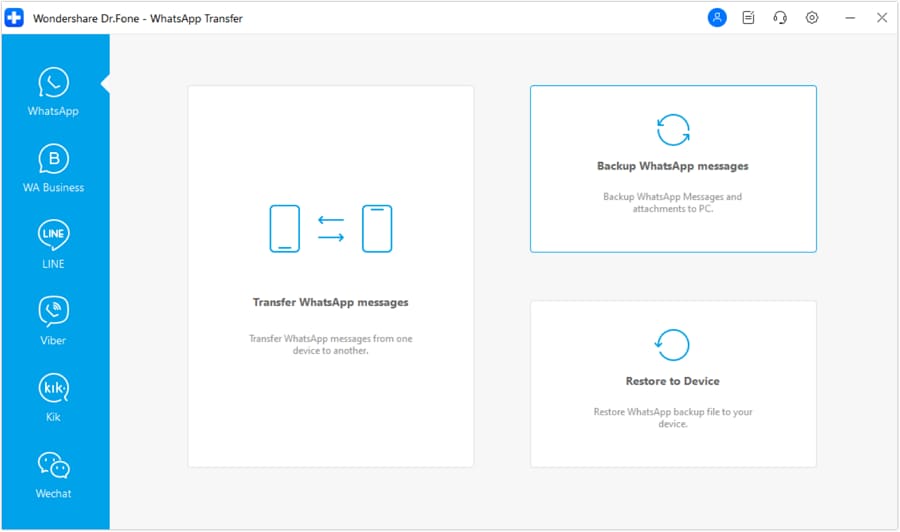
Have your phone connected with a USB cable. After the computer successfully reads the phone, tap on the option of “Backup WhatsApp Messages” to carry out the backup from the phone.
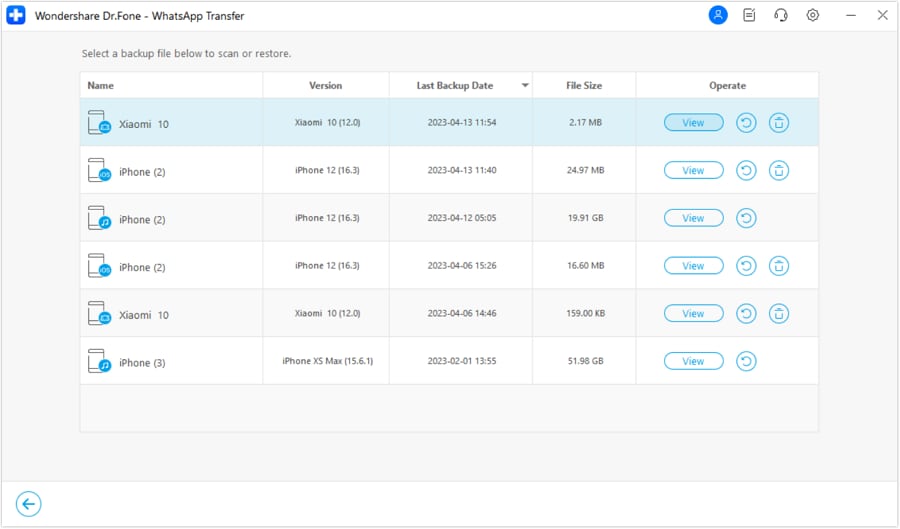
The tool processes the phone and initiates the backup. The backup successfully elapses, which can be observed from the series of options that are marked as complete. You can click “View” to confirm the presence of the backed-up data on the PC. A new window appears that shows the backup records present on the PC.
Step 4. Change the default storage location of your Phone
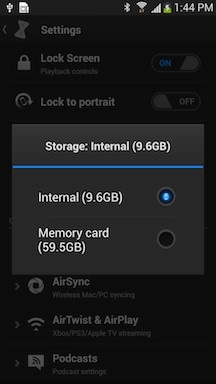
From the settings available on your phone, have the default location changed to SD Card so that any memory allocation will be done using the SD Card.
Step 5. Open Dr.Fone and Select Restore
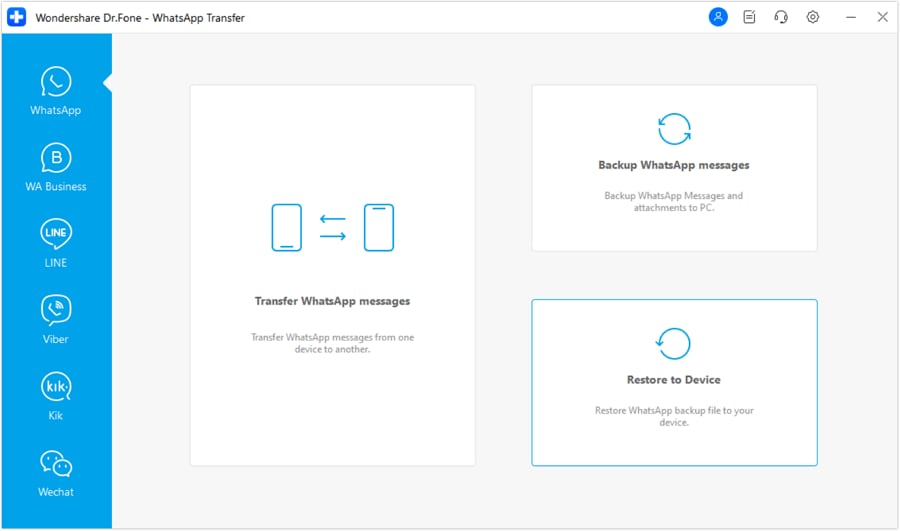
Access the option of "WhatsApp Transfer" from the homepage. Select the option depicting "Restore to Device", which will lead you to the next window.
Step 6. Restoration elapses
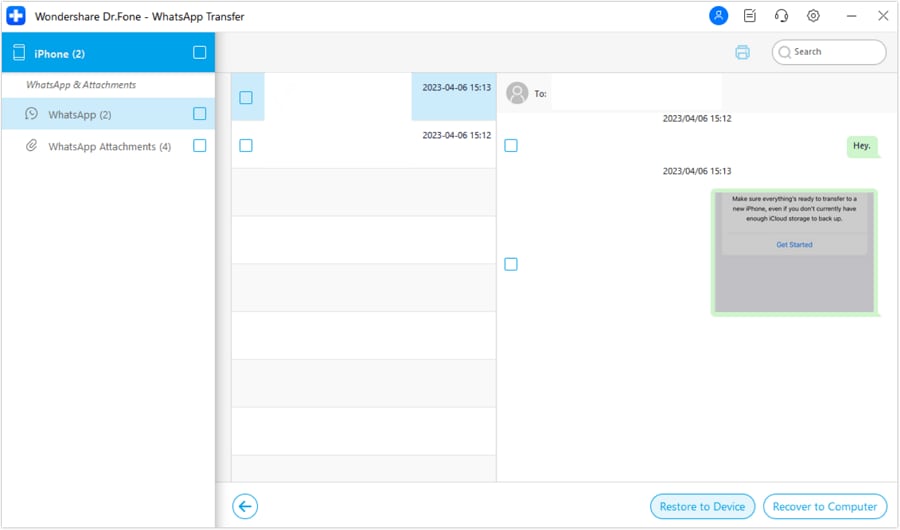
A new window showing the option of "Restore" opens. All the data that is associated with the WhatsApp backup is moved to the phone. After successful completion, it can be seen in the file manager of the phone.
Part 3: How do I set WhatsApp as default storage to SD Card?
For setting the WhatsApp storage location to SD Card by default, the device needs to be rooted on the first hand. This requires multiple assistance of different applications that would help you set the SD Card as the WhatsApp media's default location. One such example of an application, XInternalSD is taken for this article. The following steps describe a method on how we can set WhatsApp media as default storage to SD Card.
Step 1. Install the Application
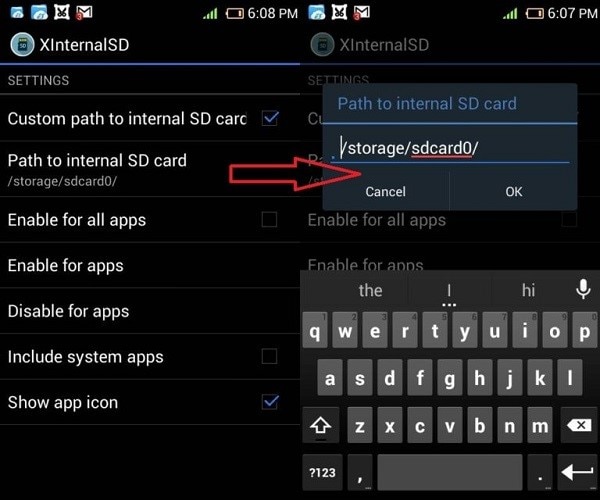
After successfully downloading its .apk file, you need to install XInternalSD and approach its settings. The option for setting a custom path needs to be activated. After enabling, you can change the option showing “Path to Internal SD Card” to your assorted external card.
Step 2. Enable the option for WhatsApp
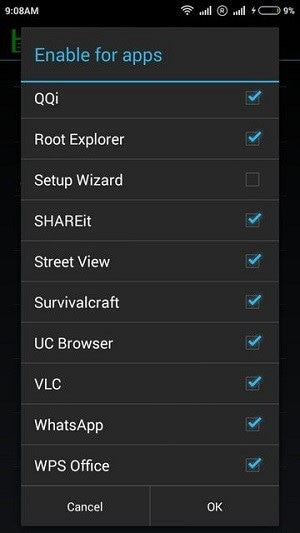
After having the path altered, you need to access the option showing "Enable for all apps." This will lead you to another window where you have to confirm enabling WhatsApp in the option.
Step 3. Transfer Files
This elapses the process of the application. Approach the file manager and transfer your WhatsApp folders to SD Card. Restart the device for applying all changes successfully.
Bottom Line:
In conclusion, we've explored diverse ways in which you can move WhatsApp to an SD card. Whether it be through the ES File Explorer app or Dr.Fone - WhatsApp Transfer, both options offer a convenient solution to help you manage your device's storage and ensure that all of your precious WhatsApp messages are safely stored away on your SD card. Transferring data with Dr.Fone is simple, quick, and secure - so why not give it a try? With a free trial available, there's no harm in testing out its capabilities first-hand! So don't hesitate any longer: take control of your storage using Dr.Fone - WhatsApp Transfer today!



Alice MJ
staff Editor