iMessage Not Working On iPhone 13? Read On to Fix It Pronto!
Jul 12, 2024 • Filed to: Mobile Repair Solutions • Proven solutions
iMessage is one of the pivotal experiences in the Apple ecosystem. It is fast, it is secure, has some unique experiences to boast of. And who doesn’t love the blue bubbles? If you have a family with various Apple devices, there is a high chance you are using iMessage to communicate with each other. It can be jarring when the iMessage stops working or does not work, so here is why it is not working and how to fix the iMessage not working issue on iPhone 13.
Part I: Why Is iMessage Not Working on iPhone 13?
There are several reasons why you may face the iMessage not working issue. Some of these could be in your control, some not. How to figure out if the issue is at your end? It’s easier to see if the issue is at Apple’s end, to begin with. If the issue is not at Apple’s end, then one may proceed to diagnose and fix iMessage not working on iPhone 13 on our own.
Step 1: Go to: https://www.apple.com/support/systemstatus/
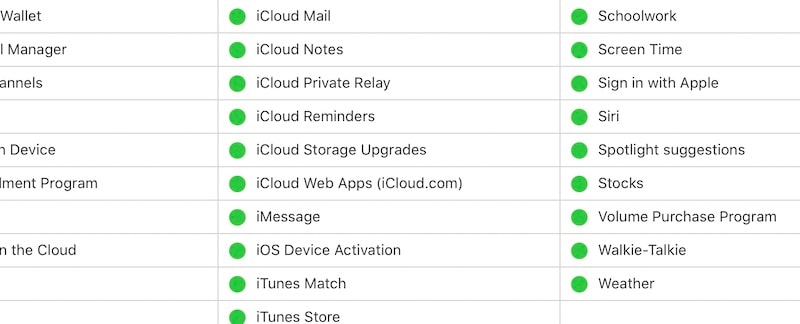
If this page shows iMessage with a green dot, it means there is no issue at Apple’s end, and you may now start fixing iMessage not working on iPhone 13 yourself. This next part outlines how to do that. Here it is.
Part II: 9 Simple Ways to Fix iMessage Not Working on iPhone 13(including Dr.Fone - System Repair (iOS))
Now that you know the issue is somewhere between your iPhone and Apple, there are a few things you can do to check where the iMessage not working issue exists. iMessage requires enabling, and that itself requires a couple of other things. Here are simple fixes to the iMessage not working issue on your new iPhone 13.
Solution 1: Enabling iMessage
iMessage needs to be enabled for it to work, and it is possible that it is disabled or not working for some reason. The first thing and the easiest of all is to activate iMessage again. Here is how to do this:
Step 1: Go to Settings and scroll down and tap Messages
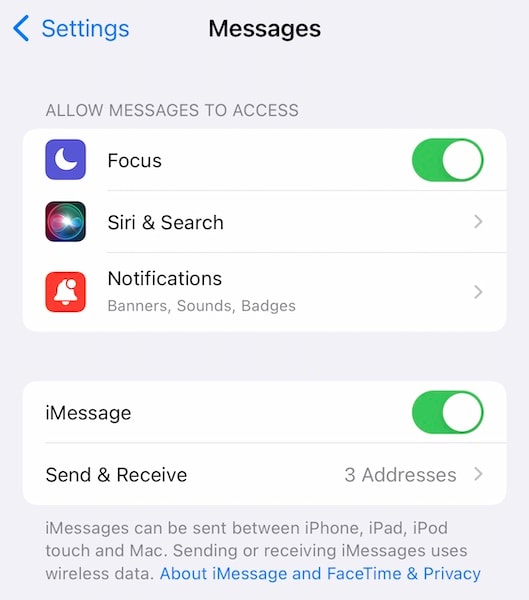
Step 2: If iMessage is toggled on, toggle it off. Wait a few seconds and toggle it back on.
If iMessage activates successfully, you should be able to send and receive iMessage from now on. Problem solved! However, if iMessage does not activate, this might point to another issue.
Solution 2: Is SMS Service Enabled?
This might seem absurd to you, but under some circumstances, SMS service may be currently non-functional on your iPhone, and activating iMessage requires SMS service even if you never see it. If you recently switched providers, it is possible that you are under a 24-hour cooling period wherein SMS is disabled on your line. The same holds true if you got a SIM change done, including if you upgraded your regular SIM to eSIM. Try again after 24 hours to see if it gets activated.
Solution 3: Is iMessage Set Up Correctly?
Now, even though iMessage is activated, it might not be set up correctly for you. iMessage uses your iCloud ID or Apple ID and your cellphone number. While it is supposed to work with your Apple ID alone, it may help to ensure that the cell number is active, too. There should be a checkmark next to it if it is.
Step 1: Go to Settings > Messages
Step 2: Tap Send and Receive
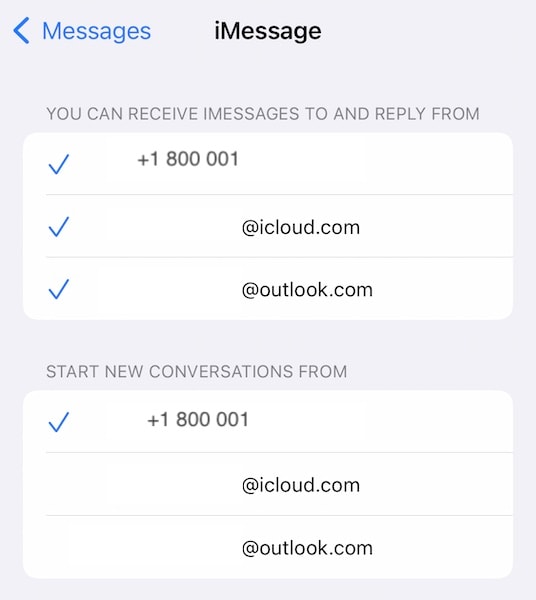
Step 3: There are two sections here, the first section deals with sending and receiving. Check the email and phone number you wish to receive and reply from. If you see a checkmark already, tap it to remove the checkmark and tap it again after a few seconds to re-register the number for iMessage.
Take note that your iPhone is a dual-SIM phone. If you are having another line active, check that the line you want to use is selected. At one time, there can only be one line selected.
Solution 4: Check Internet Connection
If you are using cellular data right now, switch to Wi-Fi and check again. If you cannot do that, switch to Airplane Mode and back so that the phone is registered on the network again and that might resolve any network issue that could be causing iMessage not working on iPhone 13.
Here is how to enable Airplane Mode:
Step 1: Swipe downwards from the top-right corner on the iPhone to launch Control Centre
Step 2: Tap the airplane symbol to enable Airplane Mode
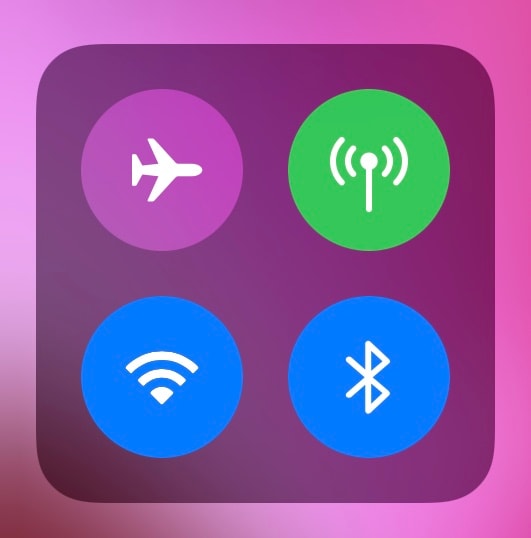
Step 3: After a few seconds, tap it again to disable Airplane Mode and have the phone register on the network again.
Here’s how to enable/ disable Wi-Fi:
Step 1: Swipe downwards from the top right corner of the iPhone to launch Control Centre and look at the first quadrant:
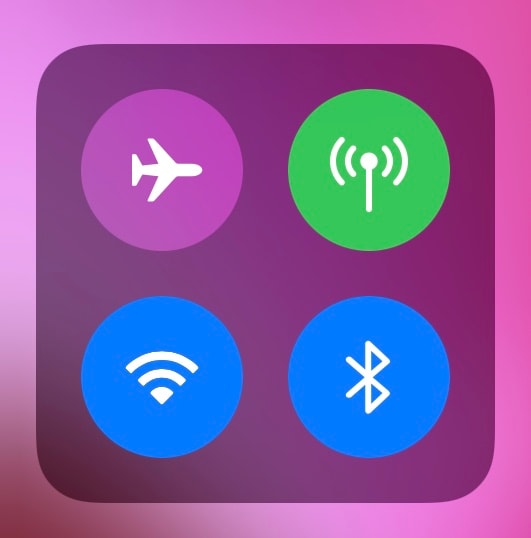
Step 2: If the Wi-Fi symbol is blue, it means it is On. Tap the Wi-Fi symbol to toggle it Off, wait a few seconds and tap it again to toggle it back On.
Solution 5: Reset Network Settings
Resetting network settings could help your iMessage not working on iPhone 13 issue, too, since this is a network issue after all. Here’s how to reset network settings on an iPhone 13:
Step 1: Launch Settings and tap General
Step 2: Scroll down till the end and tap Transfer or Reset iPhone
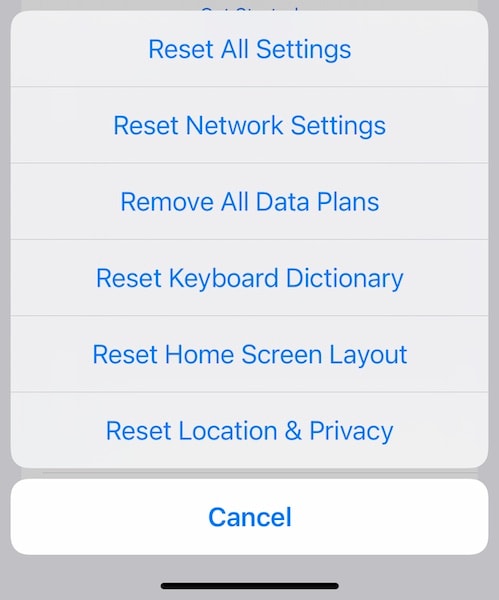
Step 3: Tap Reset and choose Reset Network Settings.
Solution 6: Check for Carrier Settings Update
It is possible that your carrier might have released new settings for your device and your old settings have become incompatible, causing issues with iMessage on the network. To check for the latest carrier settings, if any:
Step 1: Go to Settings > General
Step 2: Tap About
Step 3: Scroll down to your ESIM or Physical SIM
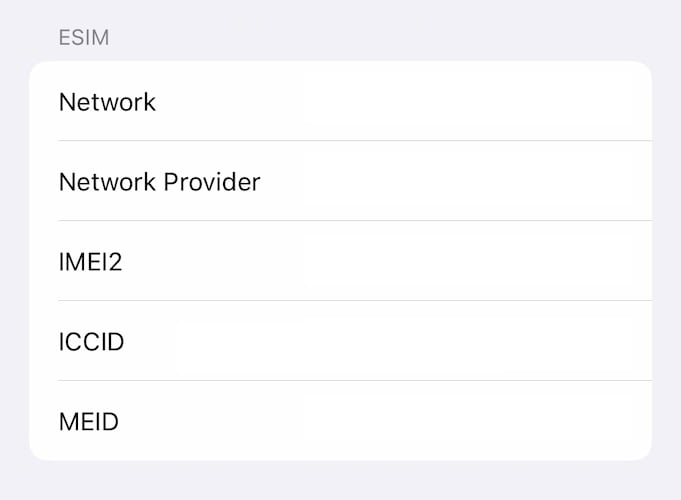
Step 4: Tap Network Provider a few times. If there is an update, this should show:
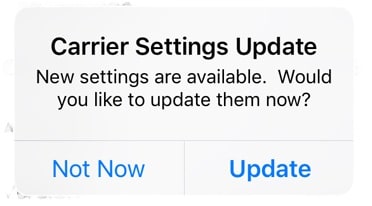
Step 5: Click Update to update carrier settings.
Solution 7: Check for iOS Update
You never know how a software bug may manifest for you. That iOS update you’ve been holding out on? It might just fix your iMessage not working on iPhone 13 issue. Keep your iPhone updated to the latest and greatest iOS at all times. It is even more important today since the newest updates not only add features and fix bugs, they also include security updates. Here is how to check for software updates on the iPhone itself:
Step 1: Go to Settings > General and tap Software Update
Step 2: If there is an update available, it will be listed here.
To update, connect your phone to Wi-Fi and charging cable and tap Download and Install or Install Now, as the case may be. The installation will take place only if the battery is over 50%.
Solution 8: Delete Those Old, Really Old Messages
This is bound to feel strange, but, occasionally, deleting old messages kickstarts iMessage. Nobody knows why this happens, but it does. iMessage, for all its goodness, is buggy and there’s no knowing what might help. Here’s how to delete the old messages from the Messages app:
Step 1: Launch the Messages app and scroll down to the end of your messages
Step 2: Swipe left on the message thread you want to delete
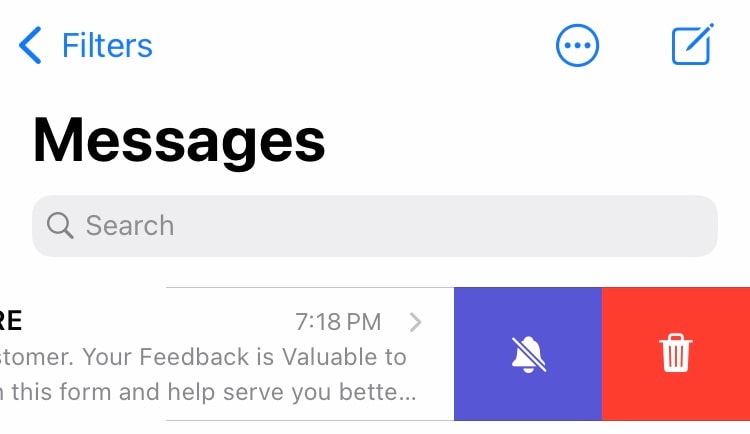
Step 3: Tap the trash can icon
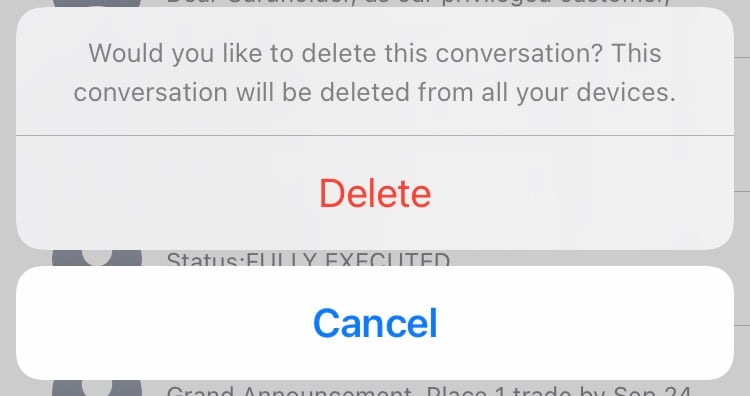
Step 4: Confirm delete by tapping Delete once again.
Solution 9: Fix iMessage Not Working on iPhone 13 With Dr.Fone - System Repair (iOS)
Dr.Fone is an amazingly nimble tool designed to help you breathe easier. How? Whenever you have any issue with your phone, be it Android or be it iPhone, think Dr.Fone and you will have a solution at hand. It features several modules, each designed to tackle specific issues, and together, this is one of the most comprehensive software tools in the world for fixing issues with your smartphone. This is Dr.Fone! Here is how to use the System Repair module in Dr.Fone to fix iMessage not working on iPhone 13 issue quickly and with no data loss:
Step 1: Get Dr.Fone
Step 2: Connect the iPhone to the computer and launch Dr.Fone:
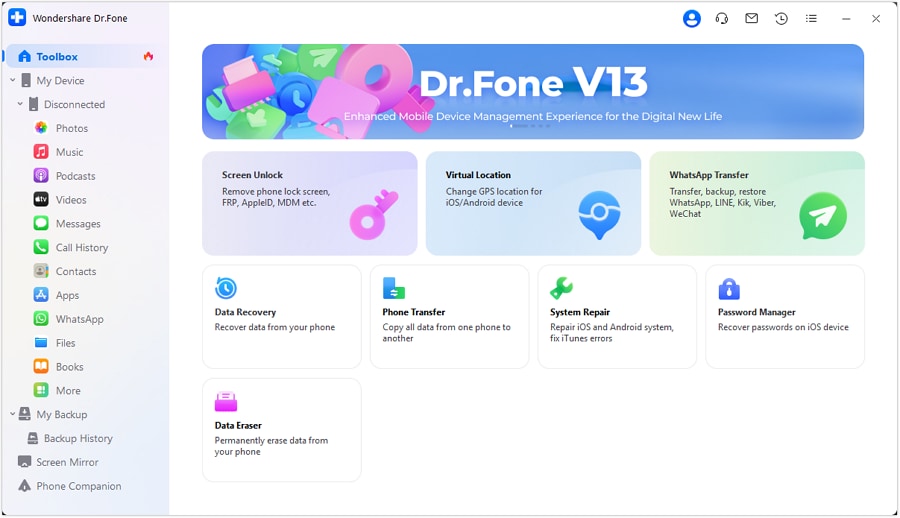
Step 3: Choose the System Repair module.
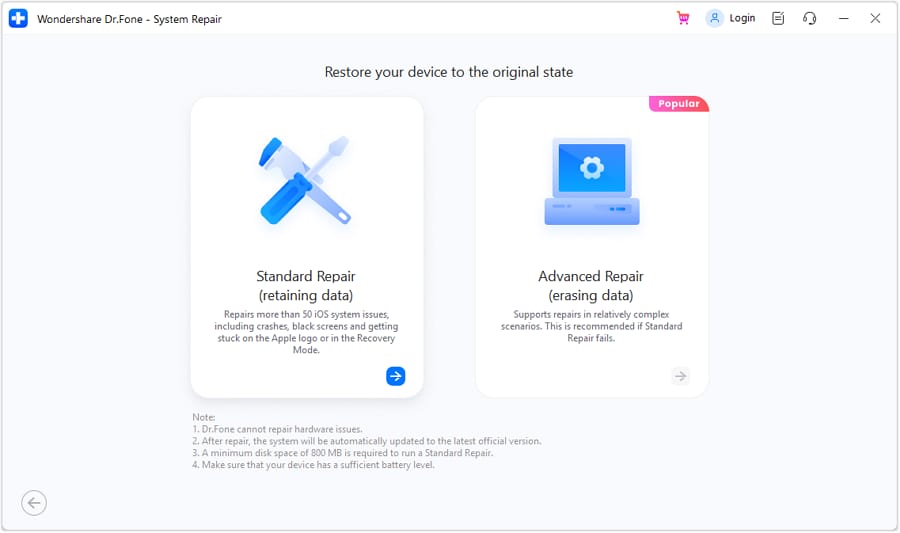
Step 4: Standard Mode is used most commonly as it fixes most everything without deleting your data. Advanced Mode is used when Standard Mode does not resolve the issue.
Step 5: After Dr.Fone detects your device and iOS version, verify that the detected iPhone and iOS version are correct and click Start:
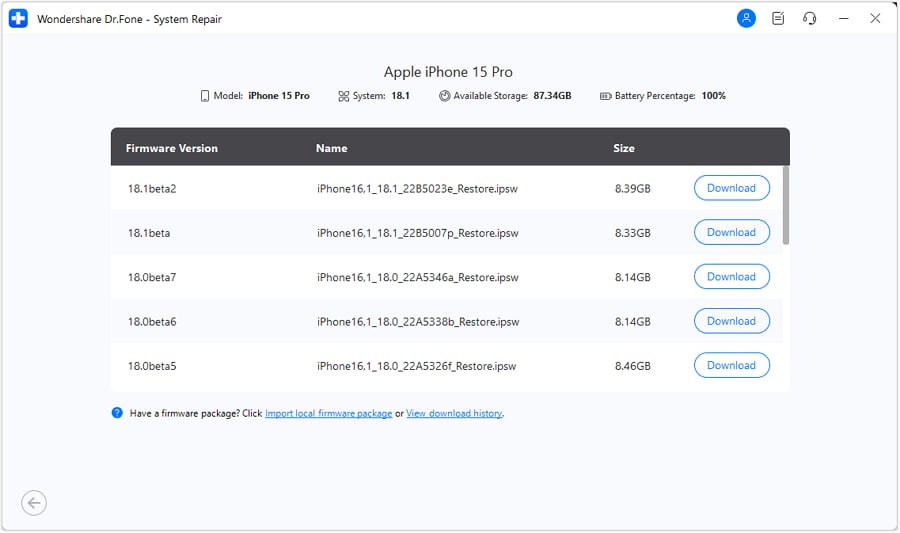
Step 6: Dr.Fone will download and verify the firmware and after a while, present you with this screen:
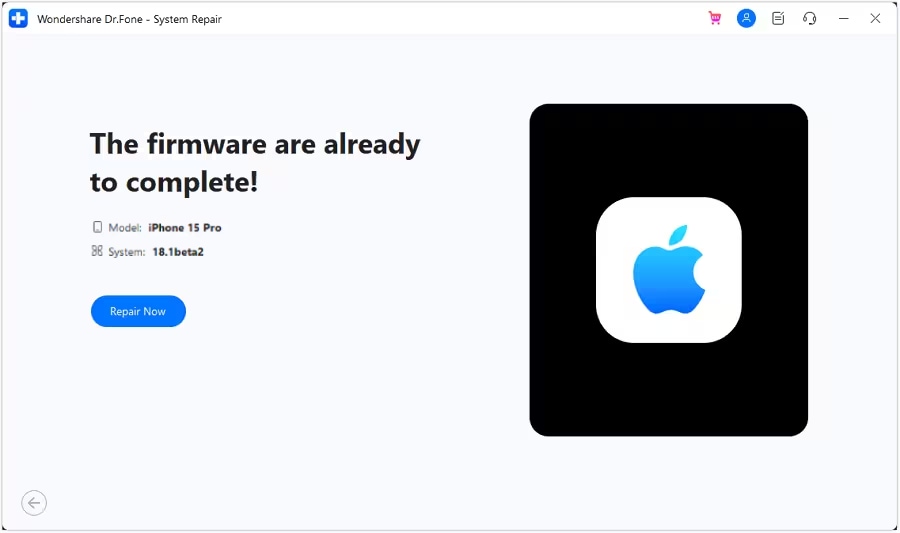
Click Fix Now to start restoring iOS firmware on your iPhone and fix the iMessage not working issue on iPhone 13.
Part III: Specific Problems with iMessage On iPhone 13
1. What should I do if an error occurs during iMessage activation?
If an error occurs during iMessage activation, there is no reason to panic. You can start the process again. Simply toggle iMessage off and back on. Here’s how to do that:
Step 1: Go to Settings and scroll down and tap Messages
Step 2: If iMessage is toggled on, toggle it off. Wait a few seconds and toggle it back on.
2. What to do if you are unable to send group iMessage?
If group messaging is not working for you, start with force-closing the Messages app, then restarting the iPhone, and finally, as a last resort, you can delete the thread and start over. Here’s how to force-close the Messages app:
Step 1: Swipe upwards from the bottom and hold without lifting your finder
Step 2: The app switcher will show open apps
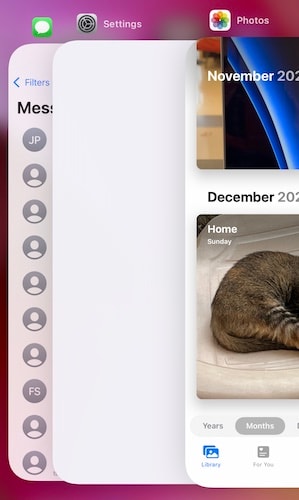
Step 3: Now, drag the screen left and right to find Messages, and flick the card up to force close the app.
Here’s how to restart the iPhone:
Step 1: Press the Volume Up key and the Side Button together and hold until the slider appears.
Step 2: Drag the slider to shut down the iPhone
Step 3: Use the Side Button to switch the iPhone On.
Here’s how to delete the group thread and start over:
Step 1: Launch the Messages app and swipe left on the thread you want to delete
Step 2: Tap the trash can icon and tap Delete again to confirm.
3. Why are iMessage visual effects not working?
iMessage features some amazing visual effects that are unique to Apple and iMessage. They are simply not available elsewhere, and if they are not working for you, one of the fixes is to check if Reduced Motion is turned On. Here’s how to do that:
Step 1: Open the Settings app on your iPhone
Step 2: Tap Accessibility and then tap Motion
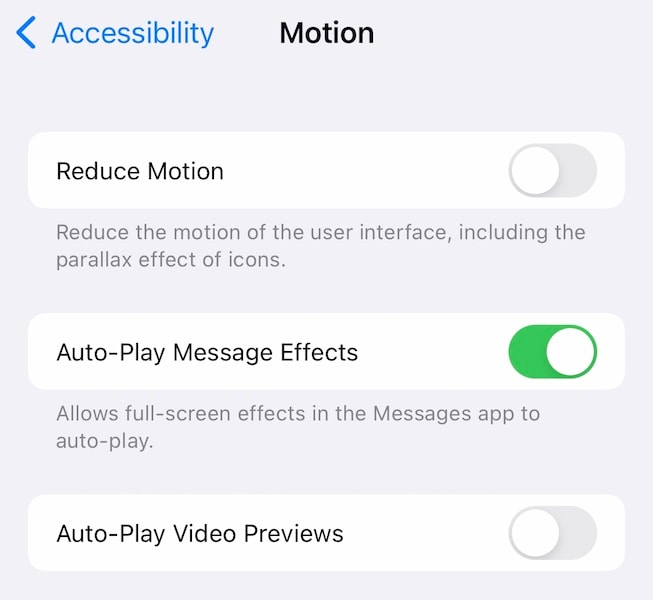
Step 3: Toggle Reduce Motion Off if it is On.
Step 4: Also toggle Auto-Play Message Effects On.
This is the most likely culprit and would resolve your issue, but if it does not, you may restart the device and see if that helps. Also, iMessage effects will work for iMessage to iMessage use only. You cannot send an iMessage effect as SMS to someone.
4. How to recover lost or accidentally deleted messages?

Dr.Fone - Data Recovery (iOS)
The best tool to recover from any iOS device!
- Designed with the technology of recovering files from iTunes, iCloud, or phone directly.
- Capable of recovering data in serious scenarios like device damage, system crash, or accidental deletion of files.
- Fully supports all the popular forms of iOS devices such as iPhone 13/12/11, iPad Air 2, iPod, iPad, etc.
- Provision of exporting the files recovered from Dr.Fone - Data Recovery (iOS) to your computer easily.
- Users can speedily recover selective data types without having to load the entire chunk of data altogether.
Is there a way to recover lost or accidentally deleted messages? Once messages are deleted from the iPhone, there is no official way to recover them on any of your Apple devices. However, third-party tools may be of help. One such is Dr.Fone - Data Recovery (iOS). You can use this intuitive tool to check for lost messages and recover them easily, and it works for deleted messages too. Here is how Dr.Fone - Data Recovery (iOS) looks after it scans your iPhone for lost and deleted messages:

Conclusion
iMessage not working on iPhone is frustrating. Unless the issue is at Apple’s end, rest assured you can fix the issue in no time. Fortunately, there are several simple ways to fix iMessage not working on iPhone 13 including a way to help you get back accidentally deleted iMessage from iPhone and recover lost messages as well.
iPhone Messages
- Back Up iPhone Messages
- 1. Back up Messages on iPhone
- 2. Save Text Messages on iPhone
- 3. Back up Viber messages
- 4. Back up WhatsApp Data to Computer
- 5. Export WhatsApp Message from iOS
- Delete iPhone Messages
- 1. Delete iMessages on iPhone and iPad
- 2. Delete Snapchat Messages on iPhone
- 3. Delete WA for Everyone
- 4. Delete WA Message Permanently
- 5. Delete Text Messages from iPhone
- 6. Tips about WhatsApp Delete Message
- 7. Undelete Messages on iPhone
- 8. View Deleted iMessage History on PC
- Recover iPhone Messages
- 1. Recover iPhone Deleted Text Messages
- 2. Recover Deleted Viber Messages
- 3. Recover Messages on iPhone 13
- 4. Recover Deleted Message on iPhone 8
- 5. Recover Deleted Message iPhone 6
- 6. Transfer from iPhone to iPhone
- 7. Recover WhatsApp Messages Online
- 8. Restore 1-Year-Old WhatsApp Chats
- Restore iPhone Messages
- 1. Restore Kik Messages from iPhone
- 2. Restore Text Messages on iPhone
- 3. Restore Viber Messages Selectively
- 4. Restore Kik Messages to iPhone
- Transfer iPhone Messages
- 1. Transfer from Android to iPhone
- 2. Transfer from iPhone to iPhone
- 3. Transfer from iPhone to Computer
- 4. Transfer from Android to iPhone XS
- 5. WhatsApp from Android to iOS
- 6. Transfer from Android to iPhone 13
- 7. WhatsApp from iPhone to PC
- 8. Download Text Messages from iPhone
- 9. Sync iMessage between iPhone and Mac
- iPhone Messages Problems
- 1. iMessage Not Working
- 2. iMessage Keeps Crashing
- 3. iMessage Not Syncing on a Mac
- 4.iPhone won't send or receive texts
- 5. iMessage Freezing or Not Working
- 6. Why Are My iPhone Messages Green
- iPhone Message Tricks
- 1. Export Messages from iPhone to PDF
- 2. Know Who Read WA Group Message
- 3. iPhone Message Tips and Tricks
- 4. Access iMessage Online
- 5. Extract Text Messages from iPhone
- 6. Forward Text on iPhone and Android
- 7. Print Text Messages from iPhone
- 8. View iPhone Messages on PC/Mac
- 9. Tell If You Are Blocked on iMessage


Daisy Raines
staff Editor
Generally rated4.5(105participated)