How to Make Use of Samsung Kies for Samsung Galaxy S23 Ultra
Jul 12, 2024 • Filed to: Data Transfer Solutions • Proven solutions
The newest models of Android smartphones on the market set the bar too high in terms of features and functions. Each of them has something distinctive to offer that caters to our varying necessities. Among them is the new Samsung Galaxy S23 Ultra. This mobile device is well-renowned for its cutting-edge technology and enhanced professional capabilities that keep it ahead of others. In a nutshell, Samsung Galaxy S23 Ultra is doubtlessly a great choice for an upgrade.
With regard to file management, the S23 Ultra is equipped with a default data manager application. You can use it to access the content of your local storage and make your preferred changes. But for complex procedures such as file transfer and data recovery, it’s better to use Samsung Kies.
In this article, we will delve into the highlights and benefits of Samsung Kies for Samsung Galaxy S23 Ultra. We will also provide some tutorials on how to use it for file transfer, data recovery, and backup. Continue reading below to learn more.
- A Quick Overview of Samsung Kies
- Why Do You Need to Install and Use Samsung Kies For Galaxy S23 Ultra?
- How to Use Samsung Kies For Your Samsung Galaxy S23 Ultra?
- Wondershare Dr.Fone: The Best Samsung Kies Alternative

A Quick Overview of Samsung Kies
In simple terms, Samsung Kies is a desktop application that allows us to access our mobile devices from a computer. It is mainly used to back up files, recover data, and transfer media content between smartphones and computers. Don’t worry. Samsung Kies is not that hard to navigate. In fact, it makes data management much more convenient. All you need to do is connect your mobile phone to the computer and take it from there.
There’s no doubt that installing Samsung Kies on your personal computer will help you in a lot of things. But before you download the software, read the system requirements listed below to ensure a smooth installation on your end.
Windows
- Available Space: 500 MB or more.
- AOS Specifications: Windows 7, 8, 8.1, 10, or newer.
- RAM: At least 2 GB.
- Processor: 2.1 GHz or higher.
Mac
Here are the system requirements of the Samsung Kies 3 application for Mac.
- Available Space: At least 30 MB or more.
- AOS Specifications: macOS X 10.6.
- RAM: At least 1 GB.
- Processor: 1.8 GHz or higher.
Why Do You Need to Install and Use Samsung Kies For Galaxy S23 Ultra?
Samsung Galaxy S23 Ultra is capable of doing a lot of things. May it be for professional endeavors or personal delights, this mobile device certainly comes in very handy. That’s why it’s best to welcome a helping hand when it comes to data management. Samsung Kies is one of the best software that can lend such assistance. Why so? Listed below are the main reasons why Samsung Kies is considered a useful data management software.
It has a clean interface that makes navigation so easy.
The last thing we want when organizing our files is to engage in complicated procedures. That’s why Samsung Kies is preferred by many for having an intuitive interface and clean toolbars. Imagine you can literally back up files or recover any data with just the snap of a finger.
It is compatible with numerous media file types.
Media content such as photos and videos are not limited to one format only. These files actually come in different types. But don’t worry about it. Samsung Kies supports various file formats. For images, it is compatible with PNG, JPG, GIF, and BMP. The same thing goes for video files. Samsung Kies supports motion pictures in DIVX, WMV, AVI, MOV, MKV, 3GP, and MP4 formats. Regarding audio files, Samsung Kies accepts them in MP3, AAC, MID, WAV, and OGG formats.
It allows file synchronization with other platforms.
You may sync your Samsung Galaxy S23 Ultra with other platforms using Samsung Kies. Let’s say you have to import a particular file or information from Google Calendar or MS Outlook. Samsung Kies can connect your mobile device to external service providers and facilitate the synchronization.
It is equipped with an audio player for snippets.
Samsung Kies provides an audio player for quick previews if you wish to review the audio files before the transfer. It is equipped with basic controls like Play, Next, Preview, and Volume settings. You may also view the metadata embedded into the media files in case you want to check a particular information.
It provides an option to adjust video settings.
Samsung Kies provides various options for users to configure video settings in case an adjustment is needed for the transfer. You may modify the video format, fine-tune the resolution, rename the file, or calibrate its bitrate. All these procedures can be performed within the platform.
It offers great backup and recovery tools for your files.
Do you need to back up some files or recover missing data on your Samsung Galaxy S23 Ultra? Samsung Kies can facilitate these procedures in just a matter of seconds or minutes. No need to engage in a complex series of steps. Just connect your smartphone to the computer and let Samsung Kies do the work for you.
Part 3: How to Use Samsung Kies For Your Samsung Galaxy S23 Ultra?
Assuming you already have the Samsung Kies 3 installed on your computer. That’s great. Now, it’s about time to explore its features and make the most of them. Below are short tutorials to help you get started. Follow the steps in order to get promising results from each procedure.
Transfer files from the computer to the Samsung Galaxy S23 Ultra
Here’s how to transfer files from the computer to Galaxy S23 Utra using Samsung Kies 3.
- Step 1: Launch the Samsung Kies 3 application on your computer. Then, connect your mobile device using a data cable.
- Step 2: Under the Library section on the left-side panel, choose the specific type of file you want to transfer.
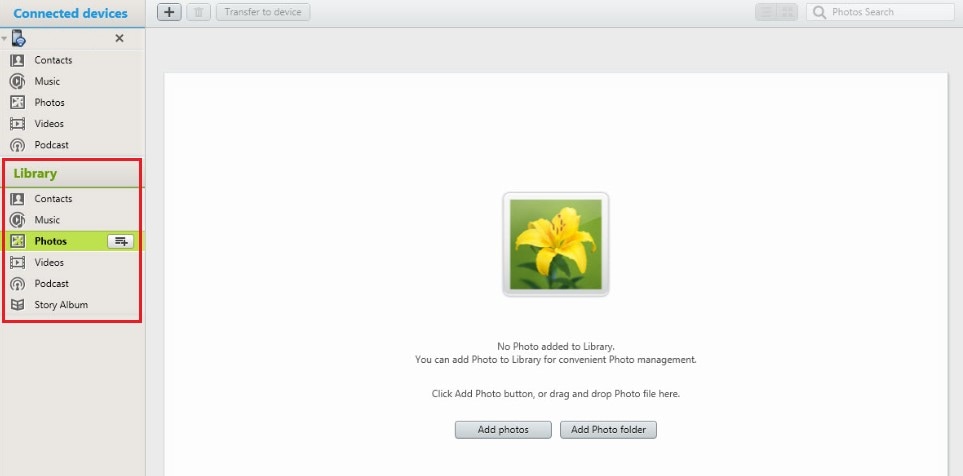
- Step 3: Click Add Photos or Add Photo Folder to load the files into the platform. Alternatively, drag the files to the dashboard or click the + below the top menu bar.
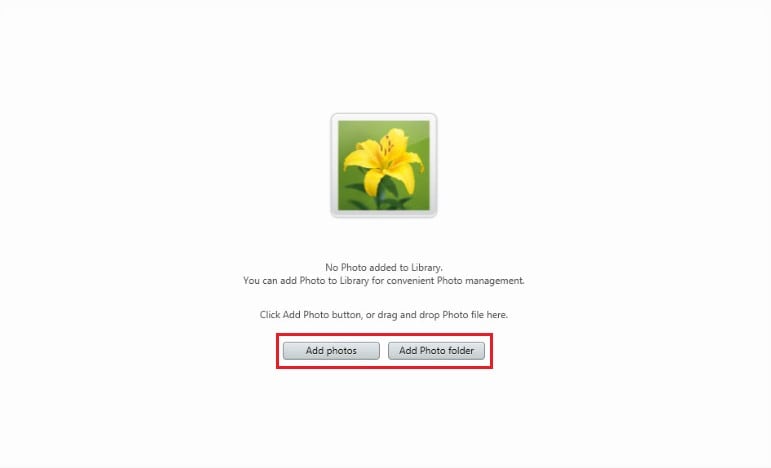
- Step 4: Click the Transfer to Device button beside the + icon below the top menu bar. Choose whether you want to save the file to your device’s local storage or external memory.
Transfer files from the Samsung Galaxy S23 Ultra to the computer.
Here’s how to transfer files from the Samsung Galaxy S23 Ultra to the computer using Samsung Kies 3.
- Step 1: Launch the Samsung Kies 3 application on your computer. Right after, connect your Samsung Galaxy S23 Ultra using a data cable.
- Step 2: Under the device section, choose the specific category of the file you want to transfer from your smartphone to the computer.
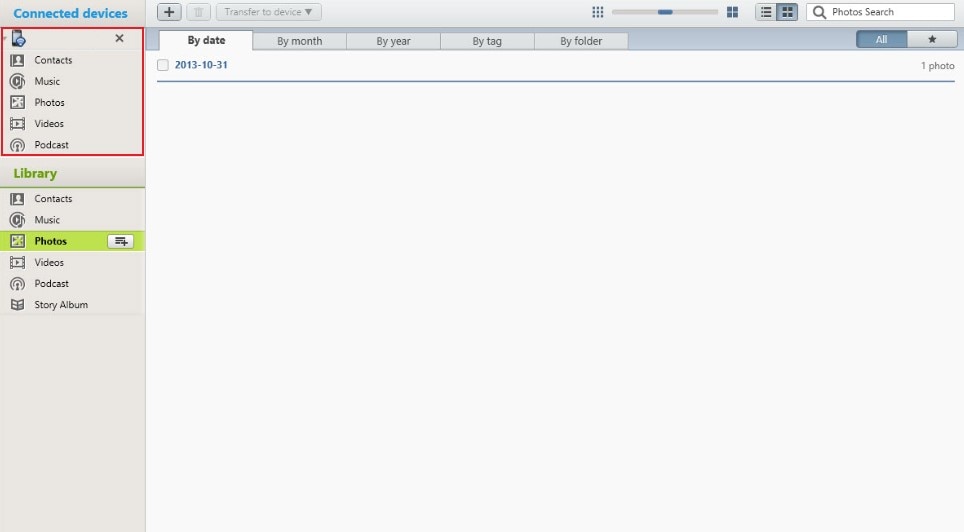
- Step 3: Go to the main dashboard and then select the files you want to transfer. Either check them one by one or click the tickbox next to Filename to select them all.
- Step 4: Click the Save icon below the top menu bar and then designate the location where you want to copy the files on your computer.
Back up and restore files.
Here’s how to back up and restore your files using Samsung Kies 3.
- Step 1: Launch the Samsung Kies application on your computer. Right after, connect your Samsung Galaxy S23 Ultra using a data cable.
- Step 2: Click your device on the left-side panel. Head over to the main dashboard and then click Back Up/Restore below the top menu bar.
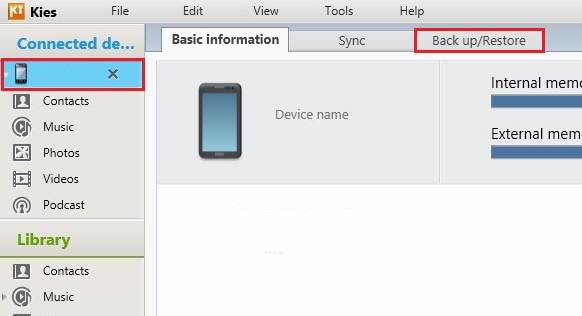
- Step 3: Click Data Backup to back up your files. Meanwhile, click Restore Data to access its data recovery feature. If you wish to migrate files from your Samsung Galaxy S23 Ultra to another device, simply click Transfer Between Devices.
- Step 4: Hit the toggle button next to Show Hidden Files.
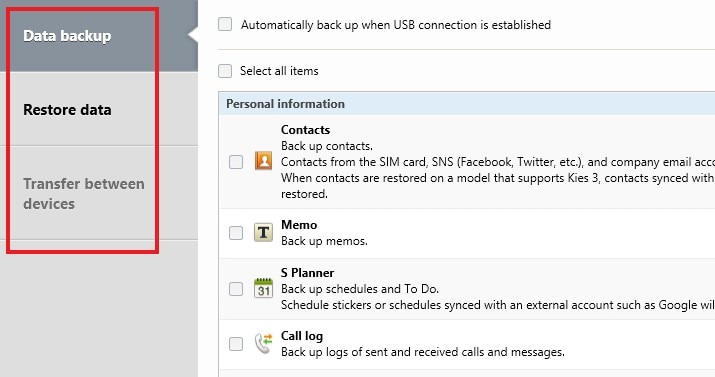
- Step 5: Select the file types you want to back up, restore, or transfer. Lastly, click Backup, Restore, or Send to proceed.
Part 4: Wondershare Dr.Fone: The Best Samsung Kies Alternative
It’s fair to say that Samsung Kies is a very useful data management software. However, it is only exclusive to Samsung mobile devices. Is there any alternative application for non-Samsung Android smartphones? The short answer is absolutely yes. Wondershare Dr.Fone offers users the same set of features for all Android smartphones regardless of the brand. Don’t worry. It’s very easy to use. Here are some tutorials to get you started.
File Backup
Here’s how to back up an Android smartphone using Wondershare Dr.Fone.
- Step 1: Launch the Wondershare Dr.Fone application on your computer. Once it fully loads up, connect your Android smartphone using a data cable.
- Step 2: Access the left-side panel and then click My Backup. On the main dashboard, click Back Up Now.
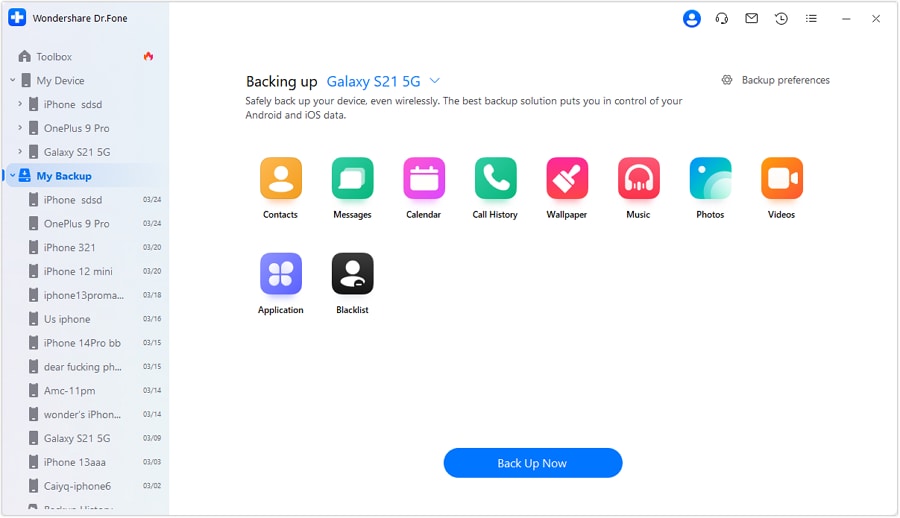
- Step 3: Follow the on-screen instructions for SMS backup. After that, click OK to proceed.
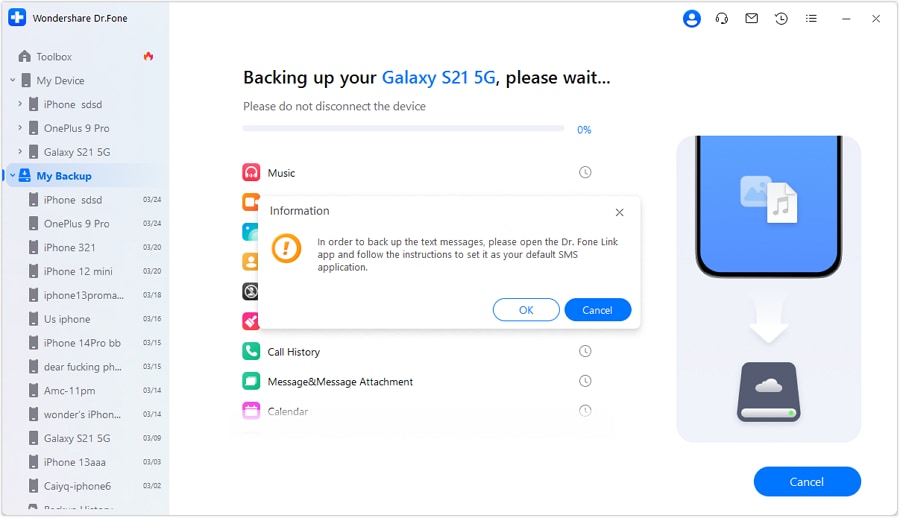
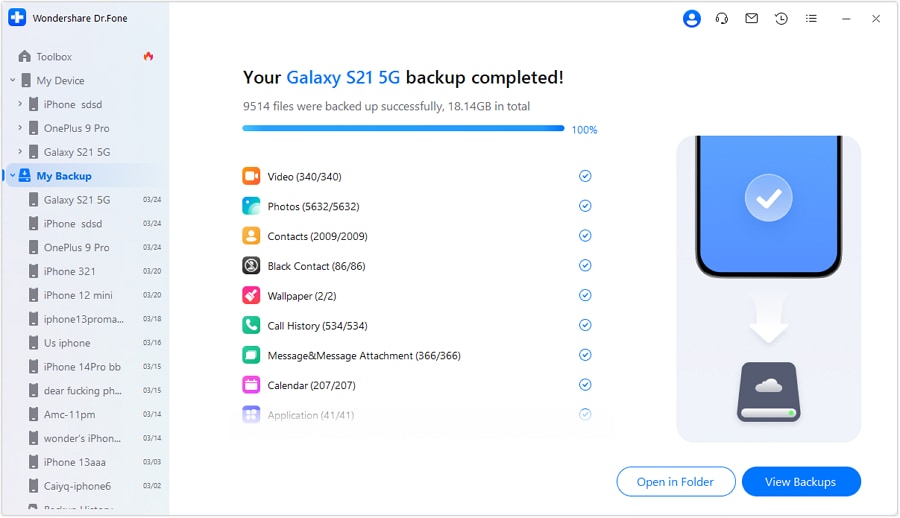
- Step 4: Wait while Wondershare Dr.Fone is creating a backup for your files.
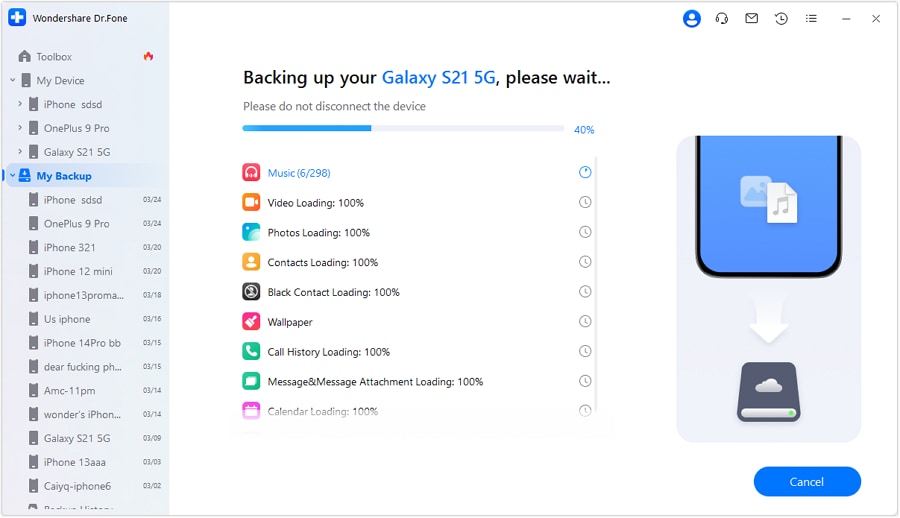
- Step 5: After completing the process, click View Backups or Open in Folder to review your files.
Data Recovery
Here’s how to recover lost data on your Android smartphone using Wondershare Dr.Fone.
- Step 1: Launch Wondershare Dr.Fone on your computer. Right after, connect your Android smartphone using a data cable.
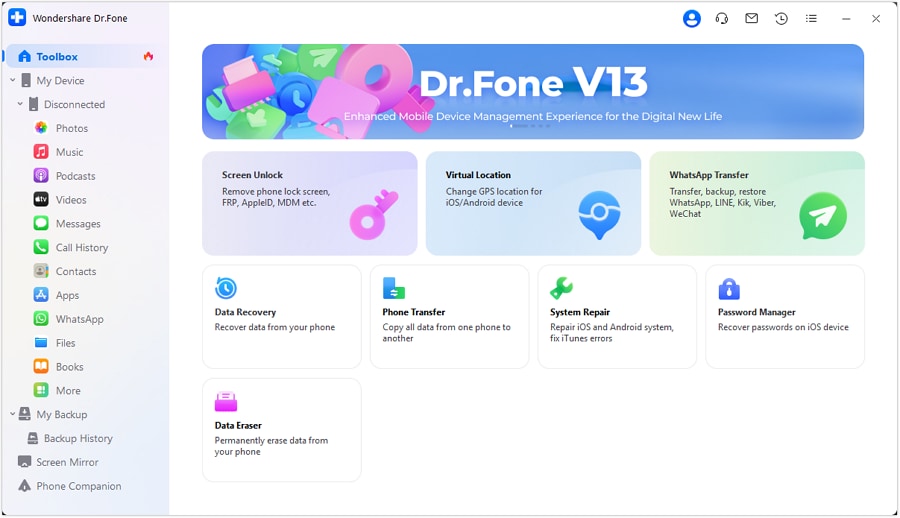
- Step 2: Click Toolbox on the left-side panel. Head over to the main dashboard afterward and then click Data Recovery.
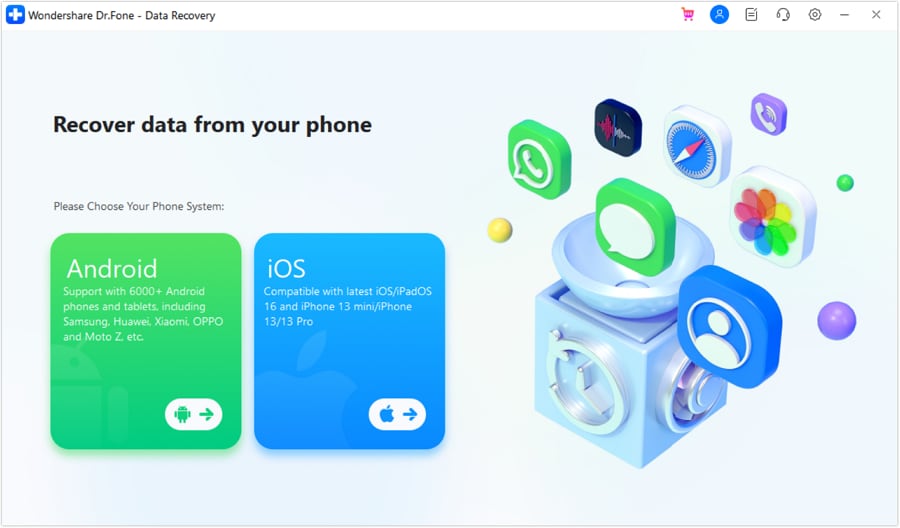
- Step 3: Click Android.
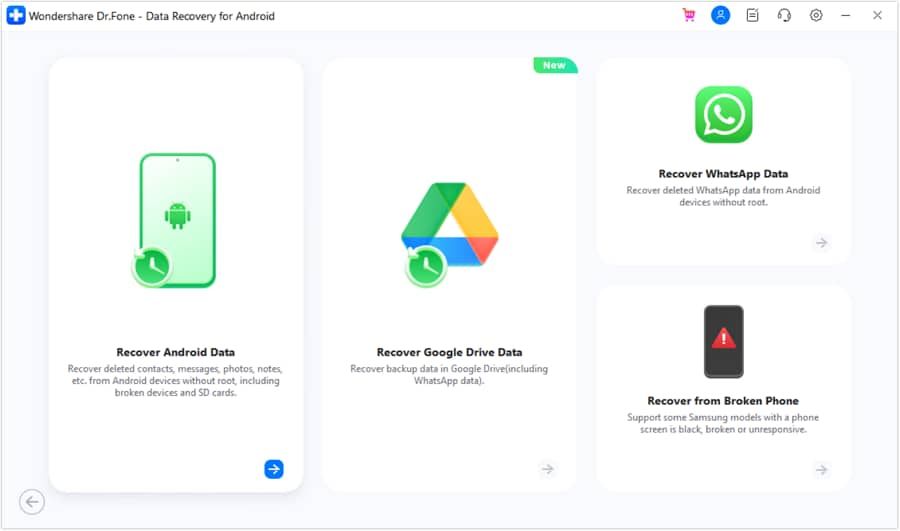
- Step 4: Click Recover Android Data.
- Step 5: Specify the file types you want to recover. Right after, click Start Scan.
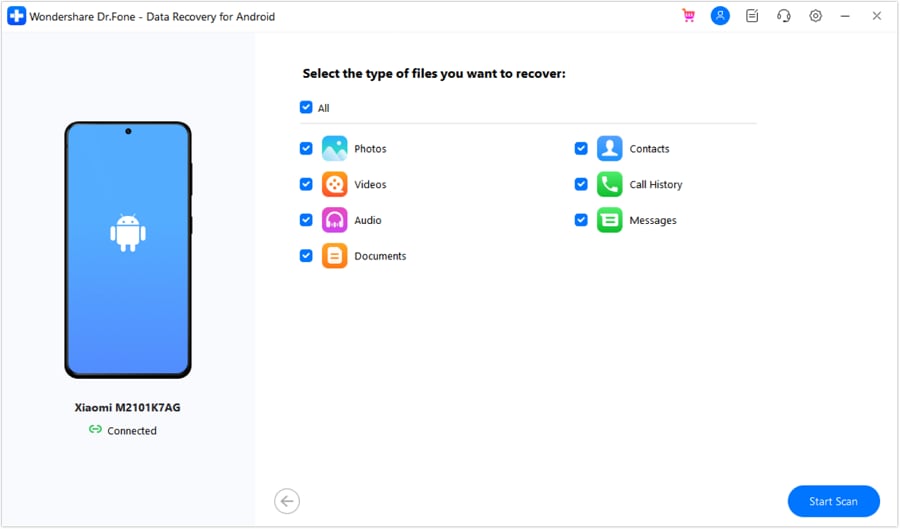
- Step 6: Wait while Wondershare Dr.Fone is scanning the content of your mobile device.
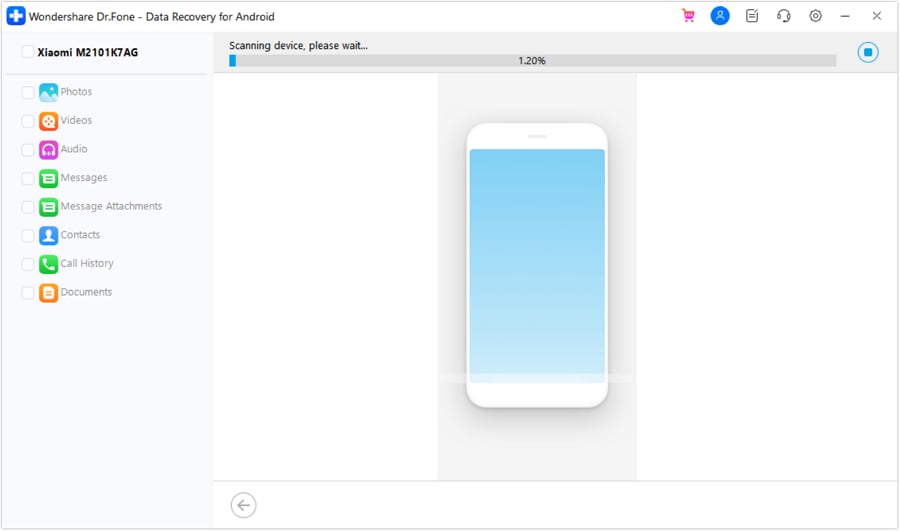
- Step 7: After completing the scan process, Wondershare Dr.Fone will subsequently display the list of files fetched from the mobile device. Choose the specific files you want to recover and then click Recover.
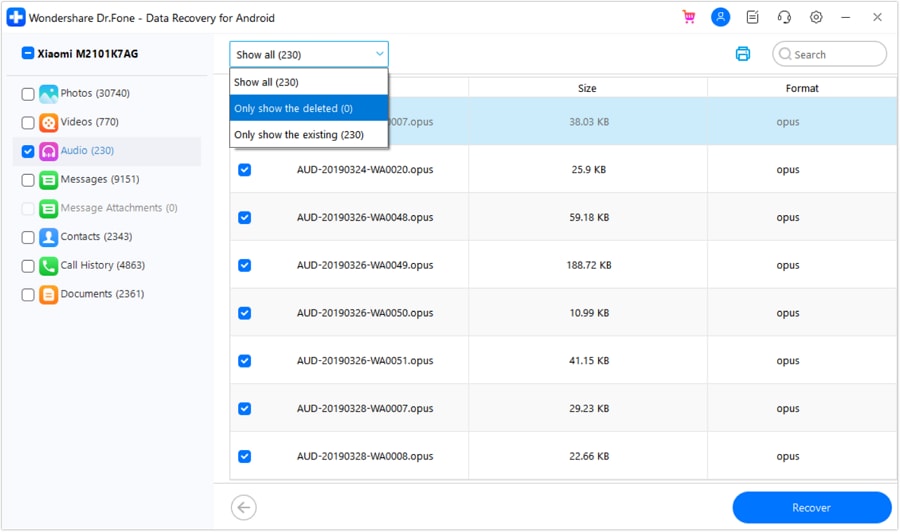
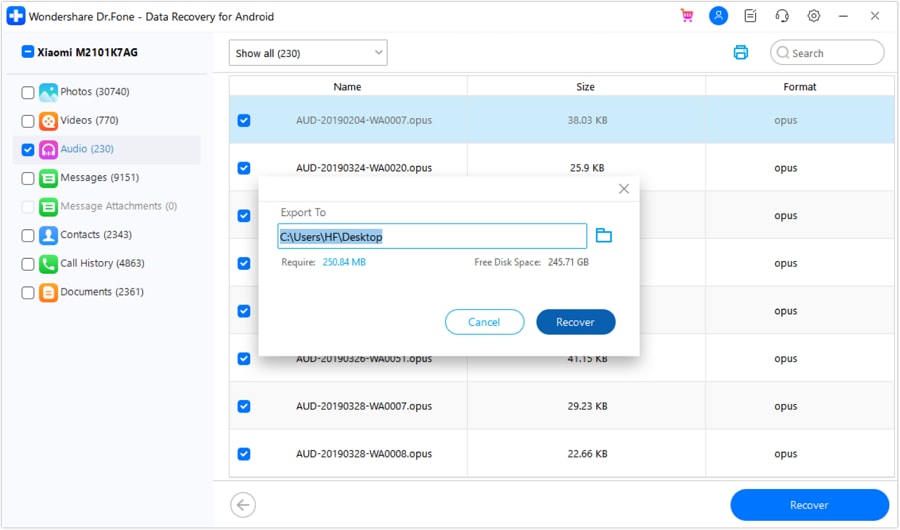
- Step 8: Designate a specific folder where you want to restore the scanned files. After that, click Recover to start and complete the data recovery process.
Phone Transfer
Here’s how to migrate data from one Android smartphone to another using Wondershare Dr.Fone.
- Step 1: Launch Wondershare Dr.Fone on your computer. Once it fully loads up, connect the two Android smartphones using a data cable.
- Step 2: Go to the left-side panel and then click Toolbox. Right after, click Phone Transfer on the main dashboard.

- Step 3: Specify the Source and the Target Android mobile devices. Alternatively, click the Flip button to set out your desired direction of the transfer.
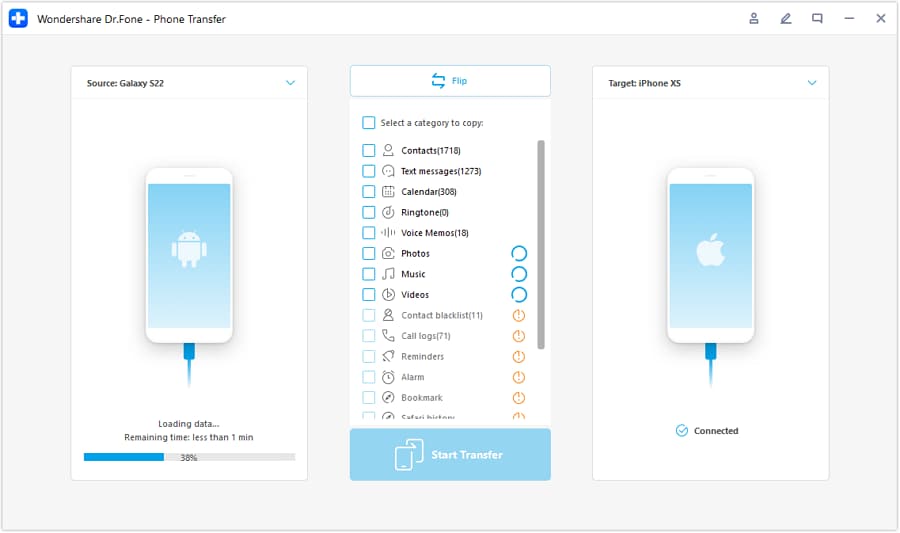
- Step 4: Choose the categories of files you want to transfer. Then, click Start Transfer.
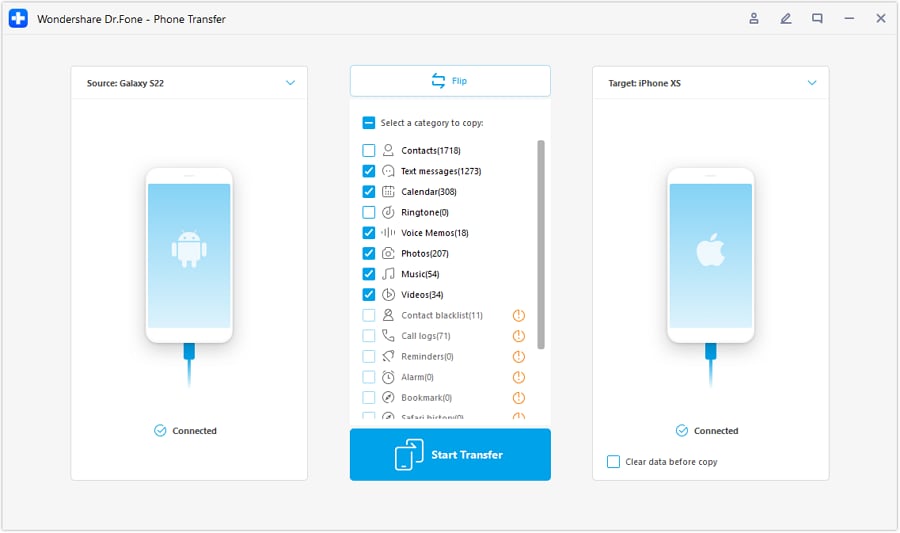
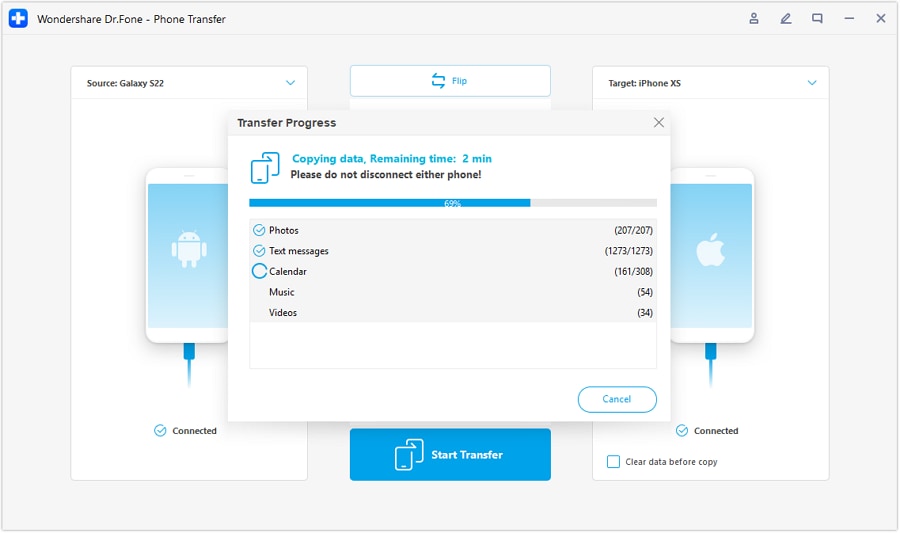
- Step 5: Wait while Wondershare Dr.Fone is facilitating the transfer procedure. In the event that you wish to terminate the process, simply click Cancel.
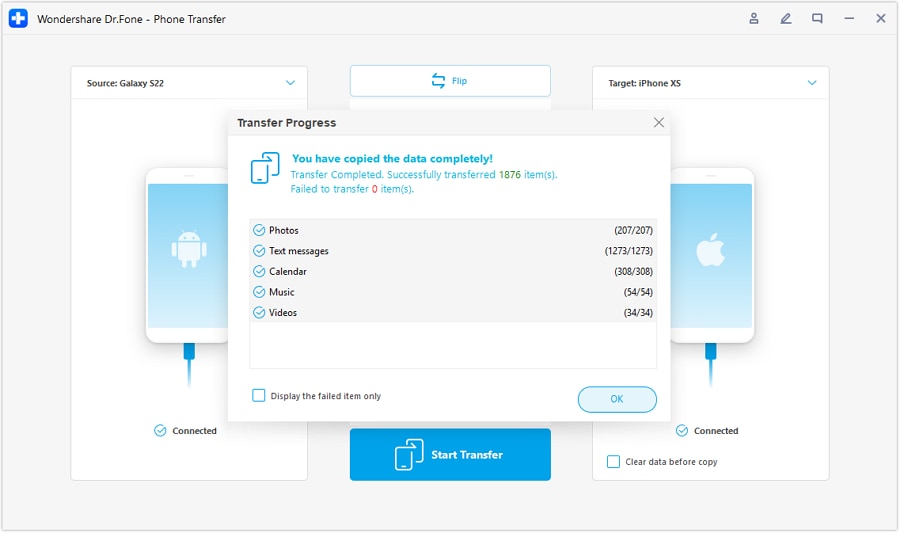
- Step 6: After completing the process, click OK to wrap it up.
Conclusion
Managing the files on our smartphones is indeed a lot of work. That’s why using data management tools like Samsung Kies is considered a huge help. Imagine you can back up, restore, and transfer files with just the snap of a finger. For non-Samsung smartphones, Wondershare Dr.Fone can be used as the Samsung Kies for Android. It offers file backup, data recovery, and phone transfer features for both Android and iOS mobile devices. Download it for free and make the most of its outstanding functions.
Other Popular Articles From Wondershare
Samsung Tips
- Best Samsung Phones
- 1. Samsung Galaxy Note 20
- 2. Samsung Galaxy S22
- 3. Top 10 Samsung S22 Tips
- 4. Samsung S9 Tips
- 6. Tips for New Samsung S22
- Samsung Alternatives
- 1. Royole vs. Samsung Galaxy Z Fold
- 2. Samsung Galaxy S21 vs. Xiaomi Mi 11
- 3. Huawei P50 Vs Samsung Galaxy S22
- 4. iPhone 13 VS Samsung S22
- 5. Samsung Galaxy S10 vs. Huawei P20
- 6. Samsung vs. iPhone
- Samsung Useful Tips
- 1. Transfer Photos from Galaxy S9
- 2. Transfer Photos from Samsung
- 3. Samsung Kies 2 Free Download
- 4. Use Samsung Kies for Samsung Note
- 5. Samsung Kies Download for Windows
- 6. Samsung Kies Not Working
- 7. Use Samsung Kies for Samsung
- 8. Transfer Contacts from Samsung
- 9. Sync iTunes to Android
- 10. Turn on Phone without Power Button
- 11. Move Old Phone Data to Samsung
- 12. Fix Samsung Phone Got Bricked
- 13. Play Flash on Samsung
- 14. PC Suites for Samsung
- 15. Track and Lock Samsung Lost Phone
- 16. Top 10 Samsung Music Players
- 17. Take Screenshots on Samsung
- 18. Video Calling Apps for Samsung
- 19. Remove Google Account Bypass
- 20. Bypass Samsung Lock Screen


Alice MJ
staff Editor