
Managing iOS 18 Beta: How to Remove and Downgrade Safely
Sep 24, 2024 • Filed to: Mobile Repair Solutions • Proven solutions
Have you ever felt the thrill of trying out the latest iOS beta only to encounter unexpected bugs and issues? iOS 18 Beta offers a sneak peek into exciting new features, but it may come with stability problems that make daily use challenging.
You might want to revert to the stable version, whether it's frequent crashes, battery drain, or compatibility issues. Removing iOS 18 Beta can restore your device's reliability and performance, making it a necessary step for many users.
This guide provides a clear, step-by-step approach to safely removing iOS 18 Beta from your device. We'll cover essential backup strategies to protect your data and introduce Wondershare Dr.Fone, a powerful tool for effective system repair. Let's ensure a smooth transition back to a stable iOS experience.
Part 1. Understanding iOS 18 Beta Removal
iOS 18 Beta allows users to explore new features and improvements before the official release. However, beta versions are often not fully optimized and can contain bugs that affect functionality. Users may experience frequent crashes, battery drain, or app compatibility issues, prompting the need to uninstall the beta and revert to a stable version.
Impact of Beta Versions on Device Performance and Stability
Running a beta version of iOS can significantly impact your device's performance and stability. Beta software is still in the testing phase, meaning it hasn't undergone the rigorous testing required for final release. This can result in unexpected behavior, reduced battery life, and even data loss in some cases. These issues can be frustrating and disruptive, especially if your device is essential for daily activities.
Importance of Backup Before Proceeding with Removal
Before removing iOS 18 Beta, it's crucial to back up your device. A backup ensures that your data, settings, and apps are safe if anything goes wrong during removal. By backing up your device, you can restore your information easily and avoid potential data loss. This step is essential for protecting valuable data and ensuring a smooth transition to a stable iOS version.
Part 2. Preparing to Remove iOS 18 Beta: Backup Strategies
Before removing iOS 18 Beta, following best practices for backing up your iPhone data is crucial. Regularly updating your backup to include the latest data and settings ensures you have a current copy of your important information. Ensure you have sufficient storage space on your backup medium, whether it's iCloud or your computer, and verify that the backup is complete and successful before proceeding with the removal.
Using iCloud for Secure Data Backup
To ensure your data is securely backed up using iCloud:
Step 1: Go to Settings > [Your Name] > iCloud > iCloud Backup. Toggle on iCloud Backup.
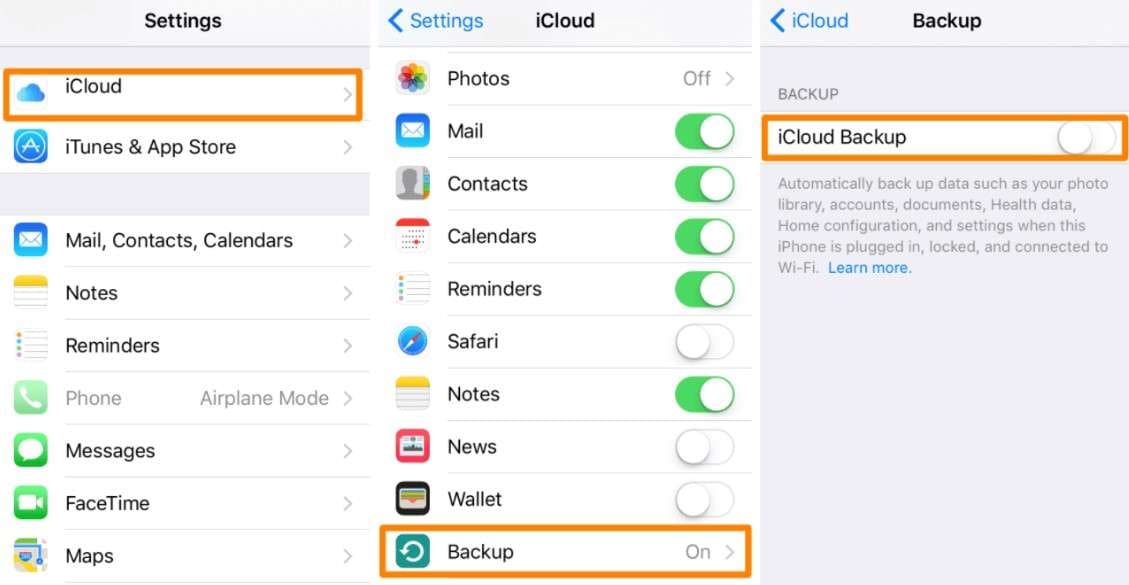
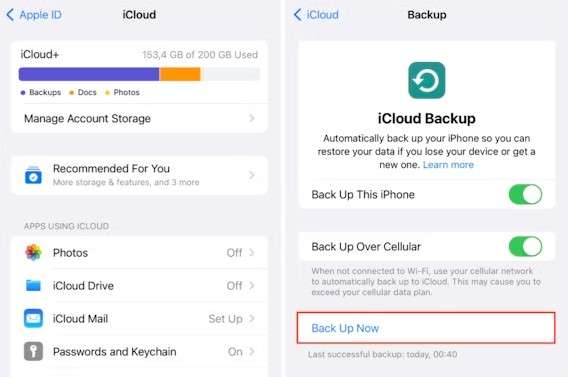
Step 2: Tap " "Back Up Now." " Ensure your device is connected to Wi-Fi and plugged into a power source.
Using iTunes for Secure Data Backup
To securely back up your data using iTunes:
Step 1: Connect your iPhone to your computer using a USB cable.
Step 2: Open iTunes and select your device.
Step 3: Click “Restore” and choose the ""Restore Backup"" section. Confirm that the backup is completed by checking the latest backup date and time.
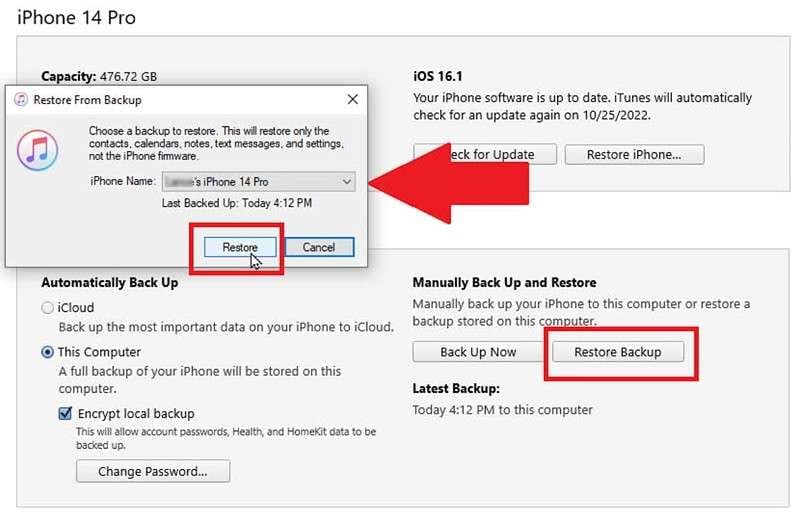
These steps will help safeguard your data before removing iOS 18 Beta, ensuring you can easily restore your information afterward.
Tips to Ensure Data Integrity and Ease of Restoration
- Verify Backup Content: Double-check that all essential data, such as photos, contacts, and app data, are included in the backup.
- Encrypt Backup for Added Security: Use iTunes or Finder (on macOS Catalina and later) to encrypt your backup.
- Restore Backup Post-Removal: After removing iOS 18 Beta, restore your backup by following the reverse steps. Verify that all data is intact and functioning correctly after restoration.
By applying these tips, you can ensure a smooth transition back to a stable iOS version while protecting your valuable data.
Part 3. How to Remove iOS 18 Beta without a Computer
Removing iOS 18 Beta directly from your iPhone settings is straightforward and ensures a smooth transition back to a stable iOS version. Follow these steps:
Step 1: Open Settings on your iPhone.
Step 2: Go to General and select Profile.
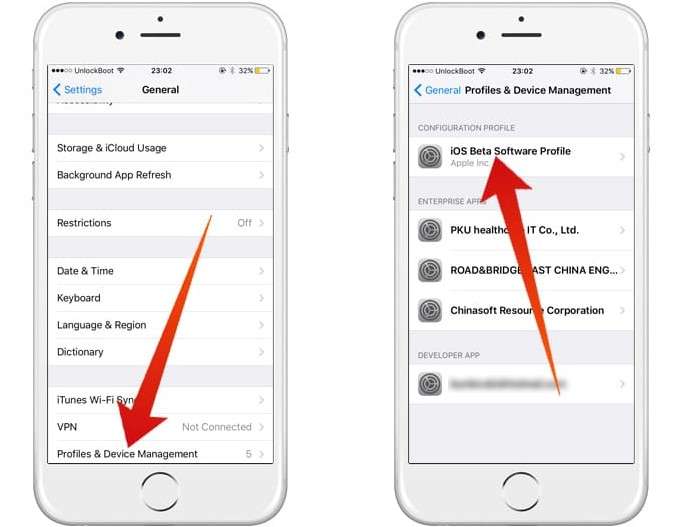
Step 3: Tap on the iOS Beta Software Profile.
Step 4: Choose Remove Profile and enter your device passcode if prompted.
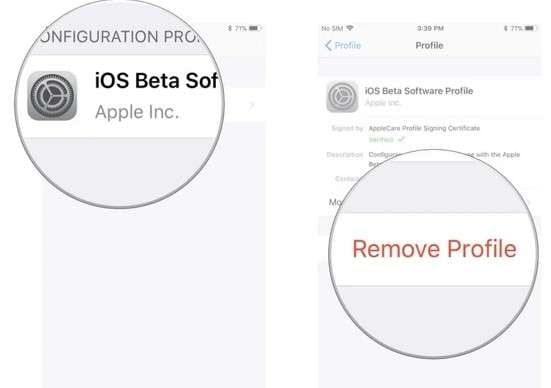
Step 5: Confirm the removal and restart your iPhone.
Considerations for Safely Reverting to the Stable iOS Version
Before transitioning back to the stable iOS version, consider the following:
- Check for Updates: After removing the beta profile, go to Settings > General > Software Update to install the latest stable iOS version.
- Ensure Reliability: Installing the stable version ensures your device operates optimally with reliable performance.
Testing Device Functionality Post-Removal to Ensure Stability
After reverting to the stable iOS version, remember these considerations to ensure your device functions smoothly
- Verify Essential Functions: Test calls, messaging, apps, and connectivity to ensure everything functions correctly.
- Monitor Performance: Monitor battery performance and overall device stability in the days following the removal.
Following these steps and considerations, you can safely transition your iPhone back to a stable iOS version after removing iOS 18 Beta, ensuring a smooth and reliable user experience.
Part 4. Using Wondershare Dr.Fone System Repair Feature
Wondershare Dr.Fone is a versatile tool designed to manage various aspects of iOS devices, offering solutions for data recovery, system repair, backup, and more. It allows users to resolve common iOS issues effectively, making it a valuable asset for maintaining device performance and stability.

Dr.Fone - System Repair (iOS)
Repair iOS System Errors Without data loss.
- Only fix your iOS to normal, no data loss at all.
- Fix various iOS system issues stuck in recovery mode, white Apple logo, black screen, looping on start, etc.
- Downgrade iOS without iTunes at all.
- Work for all iPhone/iPad/iPod Touch, running on all iOS versions
Features and Benefits for Removing iOS 18 Beta and Downgrading to iOS 17
Wondershare Dr.Fone offers essential features and benefits for safely removing iOS 18 Beta and downgrading to iOS 17:
- System Repair: Dr.Fone's System Repair feature is designed to fix iOS system issues, including those encountered during beta versions.
- Downgrade Capability: It facilitates a smooth downgrade process from iOS 18 Beta to iOS 17, ensuring compatibility and stability.
- Data Protection: Safeguards user data during the removal and downgrade process, minimizing the risk of data loss.
These capabilities make Dr.Fone a reliable tool for managing iOS versions effectively, providing peace of mind during the transition from beta to stable releases.
Step-by-Step Guide on Using Wondershare Dr.Fone
Wondershare Dr.Fone offers a user-friendly solution for managing iOS system issues and version transitions. Follow these steps to effectively use Dr.Fone for downgrading your iOS.
Step 1: Visit the official Wondershare website and download Dr.Fone. Follow the on-screen instructions to install the software on your computer.
Step 2: Open Dr.Fone and select the ""System Repair"" feature from the main interface. Connect your iPhone to the computer using a USB cable.
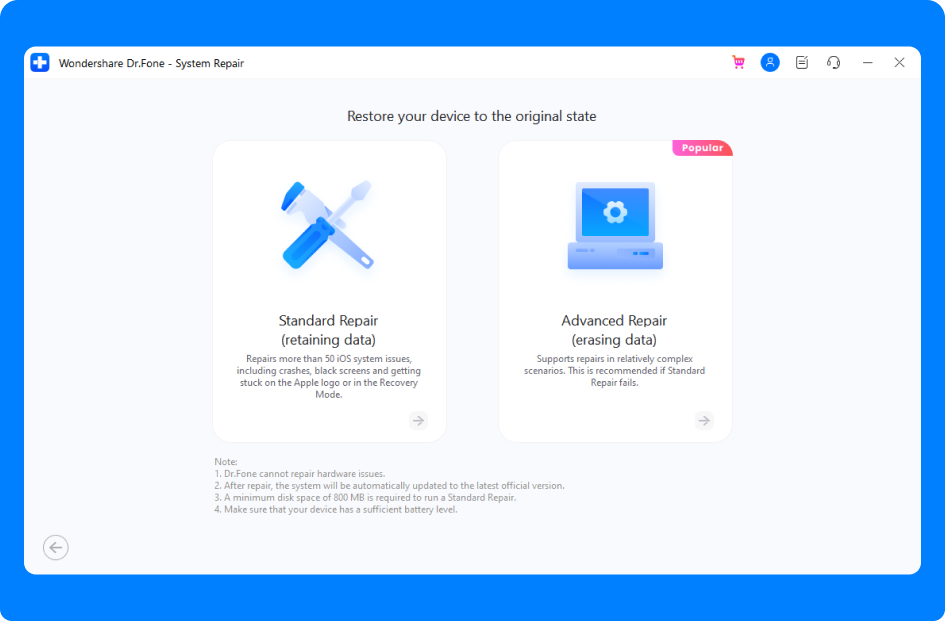
Step 3: Choose the appropriate repair mode based on your specific iOS issue or requirement (e.g., iOS Stuck, Boot Loop).
Step 4: Dr.Fone will detect your device and download the latest stable iOS firmware. Confirm the firmware details and click ""Download"" to proceed.
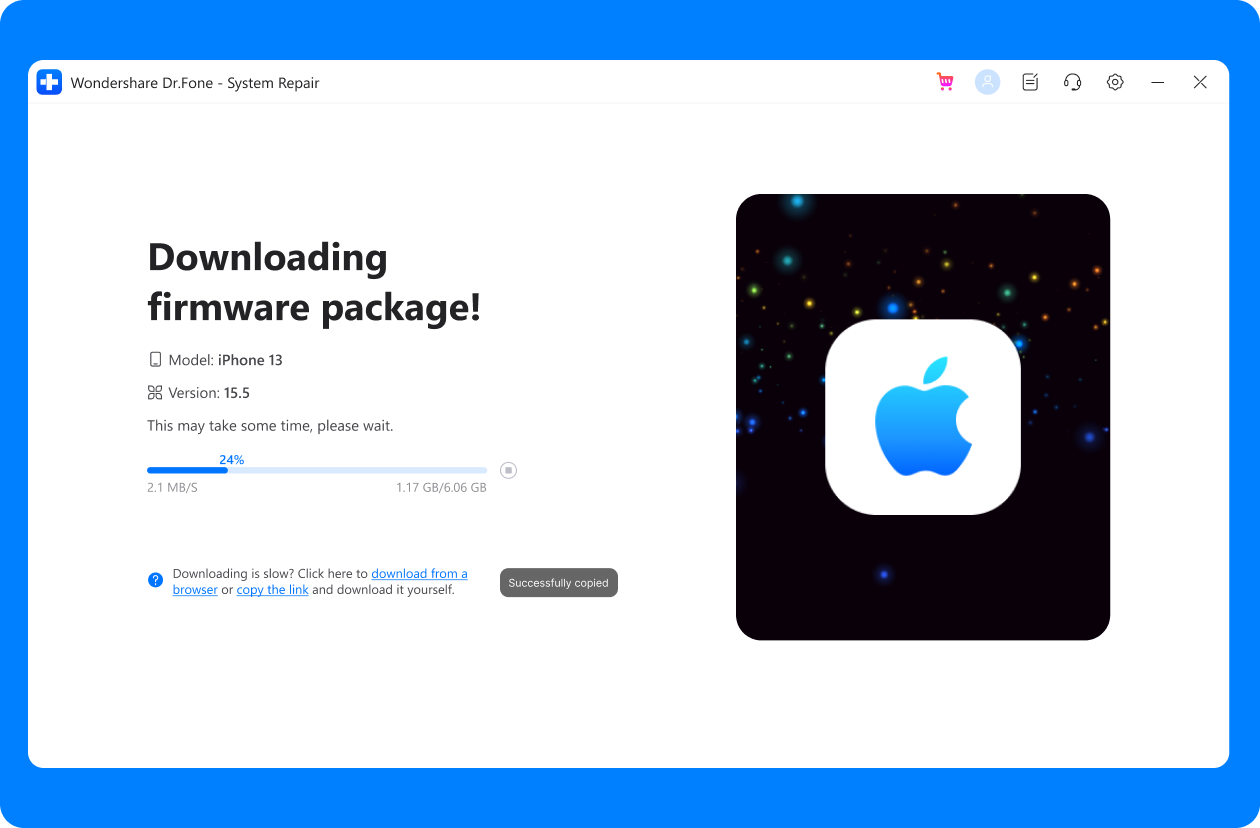
Step 5: Once the firmware is downloaded, follow the on-screen instructions to complete the repair process.
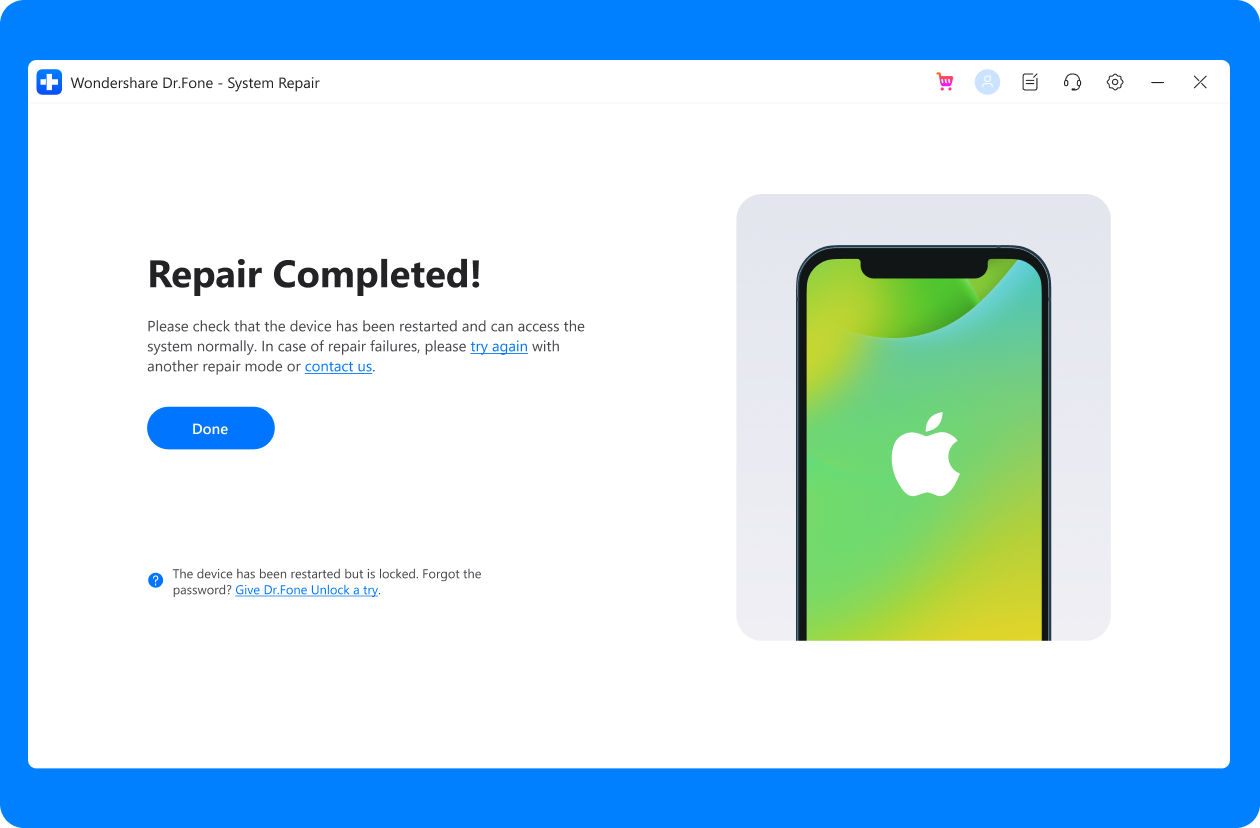
By utilizing Wondershare Dr.Fone's System Repair feature, you can effectively manage the removal and downgrade process of iOS 18 Beta to iOS 17, ensuring a safe and reliable transition on your iPhone.
Conclusion
This guide explored crucial steps for safely removing iOS 18 Beta and transitioning back to a stable iOS version. It's essential to prioritize backing up your data before proceeding with the removal process to safeguard your information. We've detailed how to remove the beta directly from your iPhone settings and emphasized the importance of testing device functionality post-removal to ensure stability.
For a comprehensive solution, consider leveraging Wondershare Dr.Fone. It has robust tools like System Repair to fix iOS system issues and facilitate smooth downgrades. With its user-friendly interface and reliable performance, Dr.Fone provides peace of mind during iOS updates, making it a valuable asset for iPhone users seeking to manage their devices effectively.
FAQs
Upgrade & Downgrade
- iOS Beta Install
- 1. Download iOS Beta Profile
- 2. Download the iOS 13 Beta
- 3. iOS 16 Beta Download
- 4. Uninstall iOS Beta
- 5. Install iPhone Beta Profile
- 6. Install Mac Beta Profile
- 7. Install iOS 15 Beta Profile
- 8. Upgrade iPad to iOS 14
- iOS News
- 1. Update iPhone 4s to iOS 9
- 2. Cheaper iPhone
- 3. Customize iPhone Home Screen
- 4. Know About iOS 15 Lock Screen
- 5. Add Lyrics to Song on Apple Music
- iPhone Downgrade Tips
- 1. Downgrade iOS Like a Pro
- 2. Roll Back to an Older iOS Version
- 3. Downgrade to iOS 15
- 4. Install Developer Profile
- 5. Downgrade iOS without iTunes
- 6. Downgrade to iOS 14
- 7. Download and Install the iOS 16
- iPhone Update Tips
- 1. iPhone & iPad Security Updates
- 2. Undo an Update on iPhone
- 3. Update iPhone with/without iTunes
- 4. Fix iPhone Checking for Update Stuck
- 5. Fix iPad Software Update Failed
- 6. Fix iPhone Stuck On Update
- 7. Fix iPhone Won't Update
- 8. Fix Update Server Not Be Contacted
- 9. Fix iPhone Stuck on Update Requested
- 10. Resolve iPhone Cellular
- 11. Resolve iPhone Error 1110
- 12. Fix iPhone Frozen
- iOS 11/12 Problems
- 1. Fix iPhone Stuck on Waiting
- 2. Fix iPhone Can't Make Calls
- 3. Fix iPhone Stuck on Logo
- 4. Fix Photos Disappeared from iPhone
- 5. Fix iPhone Keeps Freezing
- iOS 13 Problems
- 1. Fix CarPlay Not Connecting
- 2. Fix Resolve Apps Won't Open
- 3. Fix Song/Playlist Missing
- 4. Fix iPhone Asking for Passcode
- iOS 14 Problems
- 1. Fix Map Voice Navigation Won't Work
- 2. Fix iMessage Not Working
- 3. Recover Deleted Data on iOS 14
- 4. Recover Disappeared Notes on iOS 14
- iOS 15 Problems
- iOS 16 Problems
- 1. Fix iPhone Wi-Fi Not Working
- 2. Fix iOS 16 Battery Drain Issues
- 3. Fix Screen Mirroring Not Working
- 4. Fix Apple CarPlay is Not Supported
- 5. Fix iPhone Screen Not Responding
- 6. Fix iPhone Apps Keep Crashing
- 7. Fix Call Failed iPhone Issue
- 8. Fix iPhone Stuck On Apple Logo
- 9. Counter iPhone Heating Problems
- 10. Fix iPhone Stuck in Boot Loop
- 11. Fix iPhone Bluetooth Not Working
- iOS 17 Problems
- 1. iPhone Freezing After Update
- 2. iOS 17 Wallpapers Blurry at Top
- 3. Fix iPhone Charging Slow
- 4. Enable Live Activities iOS 17
- 5. Fix iOS 17 Apps Crashing
- 6. Fix iPhone Stuck on Verifying Update
- 7. Overheating after 17 Update
- 8. Fix iOS 17 Keyboard Bug
- 9. Fix iOS 17 Green Screen Issue
- 10. iOS 17 Bugs & Fixes
- 11. No iOS 17 Update on Your iPhone
- 12. iOS 17 Unable to Download
- 13. Missing contacts with iOS 17 update


Daisy Raines
staff Editor
Generally rated4.5(105participated)