Solutions to Root Samsung Galaxy S7& S7 Edge
Jul 12, 2024 • Filed to: Manage Device Data • Proven solutions
The Samsung Galaxy S7 and S7 Edge were launched the Korean smartphone giant a while back only. Both these smartphone devices were well received by the tech lovers and has made a considerable impact on the smartphone industry. Samsung has definitely worked very hard on its new devices and it is visible from the specs that it has added to these two with amazing features and high end hardware. While the Samsung Galaxy S7 and S7 Edge come with 4GB RAM and are powered with a Exynos 8890, in the United States however, these Galaxy duos have Snapdragon 820 SoC in them which did result in some controversy. Specific to its US market, the Galaxy duos with Snapdragon unfortunately come with locked bootloader which makes its difficult for power users to root and use it to install custom ROMs.
However, making it easier for our readers fond of the Galaxy duos, today we have come up with two very effective methods of rooting your favorite devices which will help you flash custom ROMs and use your Galaxy S7 and S7 Edge to its fullest.
Let us look at each one of them one by one:
Part 1: Preparation of rooting Galaxy S7
Now before you start rooting you Samsung Galaxy device, there were some preparations that we need to take care of as in other devices.
- Backup all the data you need, as rooting might erase your phone, if it does not go smoothly.
- Make sure you have a windows computer handy beforehand.
- Ensure that you have disabled the secure boot in Settings>Lock screen.
- Make sure you have 60% or more charge in your Galaxy duo device.
- Download and install USB drivers for Samsung Galaxy S7 in your personal computer.
- Go to Settings > About Phone> Tap on developer options at least five times to enable it.
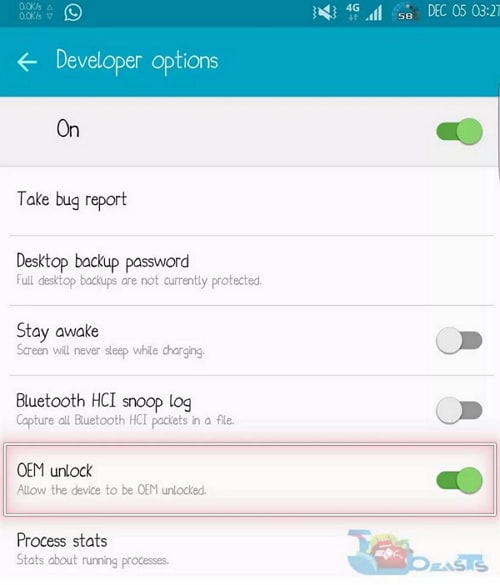
- Now enable OEM Unlock in the Developer options.
- To enable USB debugging, go to Menu>Settings>Applications. Now navigate and tap on Developer options so that USB debugging is enabled.
So these were the pre conditions that you must follow before starting the rooting process of your Samsung Galaxy S7 or S7 Edge.
Part 2: How to root GalaxyS7 with Odin
In this part we will understand in detail how we can use Odin to root the Samsung Galaxy S7 and S7 Edge.
Before you start the process of rooting your Samsung S7, keep in mind a few things.
- Rooting will void your phone's warranty.
- Make sure you backup all your data in order to avoid data loss.
- The process is risky, you may face challenges.
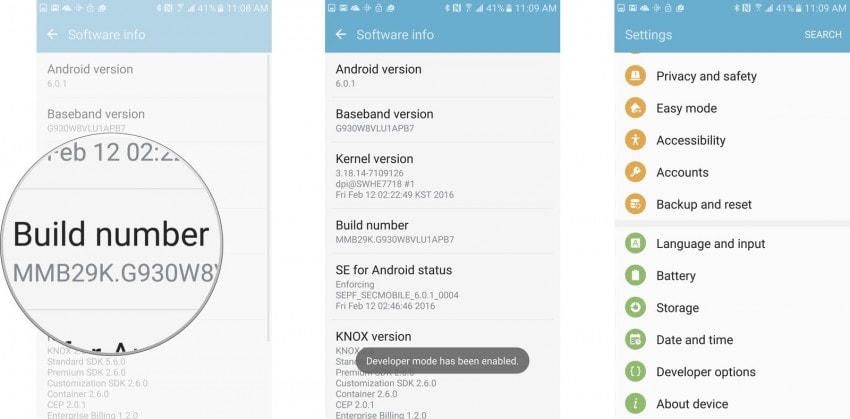
Step No 1: This is to enable Developer Options:
Go to device settings and find the phone's build number and once you see it, tap on it about five times and you would have enabled your developer options.
Step No 2: Once you are able to see Developer options in settings, go to Developer options to enable OEM Unlock.
Step No 3: Getting the root files.
Before starting the rooting process, you will have to download the Odin file on your Samsung duos. Then you will have to download the auto-root file from Chainfire for S7 and S7 Edge and save both on the computer. Since you will get compressed files, you will have to unzip them, get files with.tar.md5 extension before you begin the process.
- Download Odin
- Download Chainfire auto-root files
- Download Auto Root for S7 Edge
Step No 4 : Once all this is done, move on to your phone.
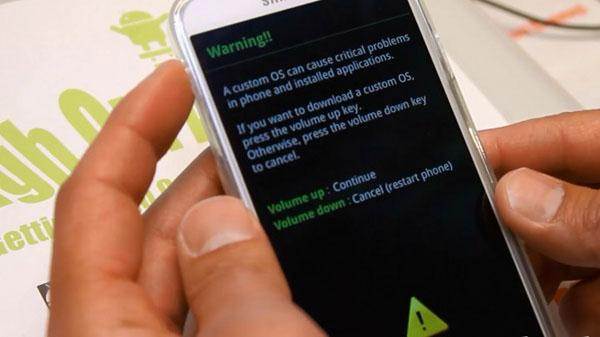
Boot your Samsung device to download mode by turning off your phone and reboot by pressing and holding the home, power and volume down buttons, in a few seconds you will see that your smartphone is in download mode.
Step No 5 : Now to get phone drivers. You should make sure that Samsung mobile phone drivers are installed in your computer. Simply download the drivers from your Samsung Galaxy duos and install them on your computer to proceed.
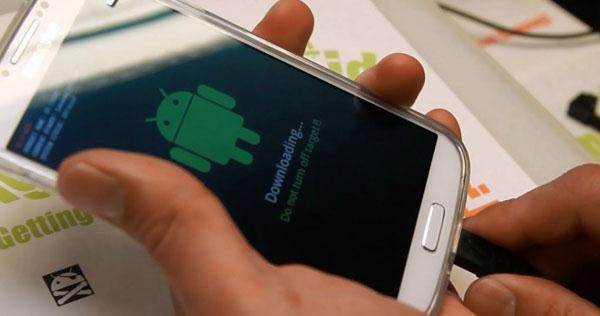
Step No 6: Since you have downloaded the root files on your PC and your smartphone is on download mode, run the Odin file on your computer and connect your device using a USB cable. You will see the 'Added message' on Odin.
Step No 7 : Starting the Root Process.
Go to Odin tool and click on the Auto Root button. Now you will need to browse your computer for the .tar.md5 file saved earlier the step no 3. Once you pick up the root file, click on Start and continue with the process.
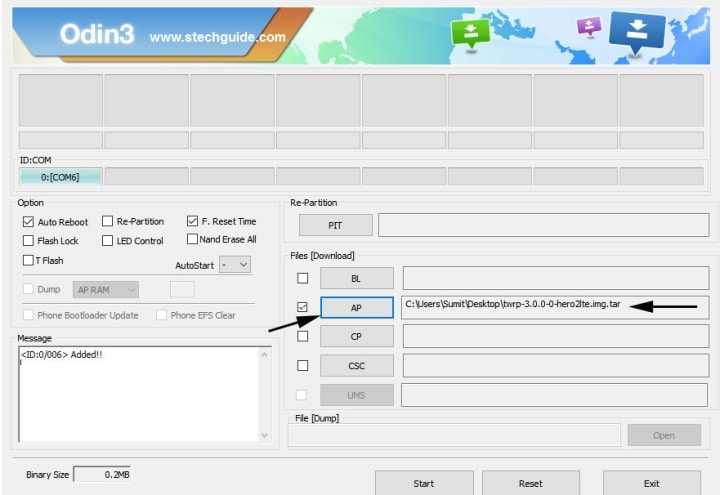
You will see Samsung logo on your device during the process and it will reboot a couple of times in between as well. The process will be complete once finally your Samsung Galaxy S7 and S7 Edge device will boot into Android.
Note: Please repeat the method if the rooting is unsuccessful the first time and keep repeating the process as there is no guarantee of its success.
So these were the two methods that you can use to root your Galaxy S7 and S7 Edge devices successfully. However, the important thing to keep in mind is that rooting your Samsung duos will void their warranty, so be completely sure about the pros and cons of rooting before proceeding with any of these methods.
Samsung Manage
- Samsung Data Manage
- 1. Best Samsung Manager
- 2. Manage Contacts on S9/S8
- 3. Manage Music on Samsung
- 4. Manage Music on Samsung S8
- 5. Transfer Photos to Samsung S8
- 6. Manage Photos on Samsung S9
- 7. Best Galaxy S9 Manager
- 8. Samsung Gear Manager
- 9. Samsung Task Manager
- 10. Remove Samsung Bloatware
- Samsung Erase
- 1. Tips for Selling Old Samsung
- 2. Wipe A Samsung Phone
- 3. Tips to Erase Data
- 4. Remove Samsung Apps
- 5. Uninstall Apps on Samsung
- Samsung Mirror
- 1. Share the Phone Screen
- 2. Screen mirror to Samsung TV
- 3. Use Allshare Cast To Mirror
- 4. Samsung Mirror Screen to PC
- Samsung Record
- 1. Screen Record on Samsung A50
- 2. Screen Record on Samsung S10
- 3. Screen Record on Samsung s9
- 4. Samsung S8 Screen Record
- 5. Top Samsung Screen Recorder
- Samsung Root
- 1. Root Samsung Galaxy S7
- 2. Jailbreak Samsung Phones
- 3. Root Samsung Galaxy S3
- 4. Root Samsung Galaxy S4
- 5. Root Samsung Galaxy S5
- 6. Root Samsung Galaxy J5
- 7. Samsung Root Apps Without PC
- 8. Top 6 Samsung Root Software
- 9. Used Apps to Root Samsung Note
- 10. Root Samsung Galaxy S3 mini
- 11. Root Galaxy Tab 2 7.0
- 12. Unroot Android Devices
- Samsung to Mac
- 1. Transfer Photos to Mac
- 2. Samsung File Transfer for Mac
- 3. Transfer Photos from Samsung
- 4. Transfer Pictures to Mac
- 5. Transfer Pictures from Samsung
- 6. Transfer Files to Macbook
- Samsung to PC
- 1. Transfer Contact from Samsung
- 2. Transfer Photos to PC
- 3. Transfer Photos to Laptop
- 4. Transfer Photos from Samsung
- 5. Transfer Files to PC
- 6. Transfer Photos From Note 8 to PC
- USB Debugging
- Samsung Tips
- ● Manage/transfer/recover data
- ● Unlock screen/activate/FRP lock
- ● Fix most iOS and Android issues
- Manage Now Manage Now Manage Now


James Davis
staff Editor