How To Transfer Pictures From Samsung To PC?
Jul 12, 2024 • Filed to: Manage Device Data • Proven solutions
With the amazing cameras on Samsung phones and tablets, it's easy to build up a large collection of photos and videos that you'll want to transfer to your computer. There are many reasons to move your media from your Samsung device to a PC - you may want to back up your images so they're safe, free up space on your phone, or edit and print photos more easily on a bigger screen.
Whatever your motivation, transferring pictures from a Samsung to PC is simple. There are a few different ways to do it depending on your devices, network setup, and preferences.
In this guide, we'll cover several easy options to move your photos and videos off your Samsung mobile device and onto your desktop or laptop. Follow along to learn how to quickly transfer your pictures so you can view, edit, store, and manage your growing photo library on your powerful PC.
- Part 1: Transfer Photos From Samsung To PC Using USB Cable
- Part 2: Transfer Pictures From Samsung To PC Via Bluetooth
- Part 3: Transfer Pictures From Samsung To PC Using Google Drive
- Part 4: Transfer Images From Samsung To PC Using SD Card

- Part 5: Recommended: Transfer Photos From Samsung To PC In 1 Click Using Dr.Fone
- Part 6: Troubleshooting
- Conclusion
Part 1: Transfer Photos From Samsung To PC Using USB Cable
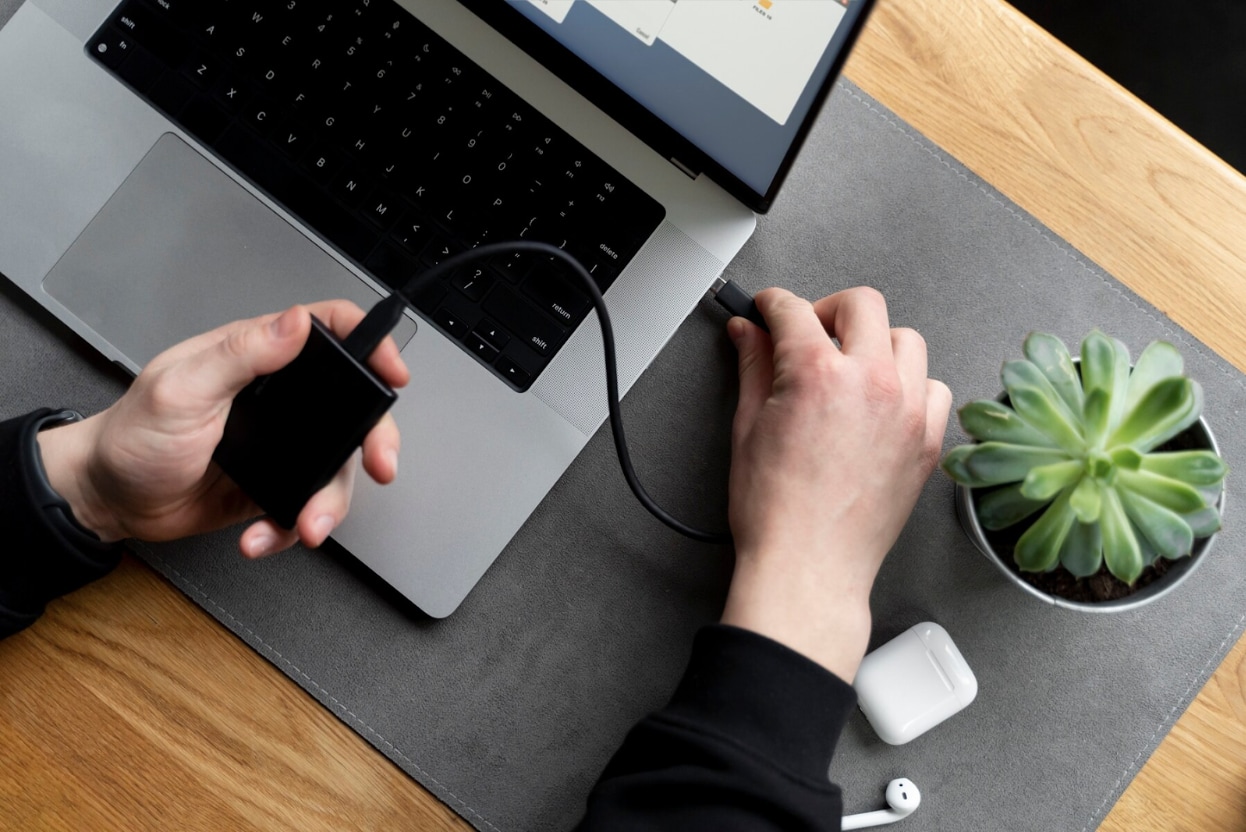
Transferring photos from your Samsung device to your computer is a breeze with a USB cable. Just follow these simple steps:
STEP 1: Grab your Samsung USB cable that came with your phone or tablet. Plug one end into your device and the other into any USB port on your computer. If you're using a USB-C to USB-C cable, you may need an adapter for your PC's USB port.
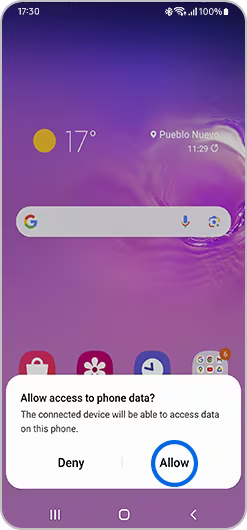
STEP 2: You may see a popup on your Samsung asking if you want to allow access to your data. Go ahead and tap Allow to enable the file transfer.
STEP 3: Once connected, swipe down from the top of your phone's screen to view notifications.
STEP 4: Tap the "USB for file transfer" notification that should be there from the Android System.
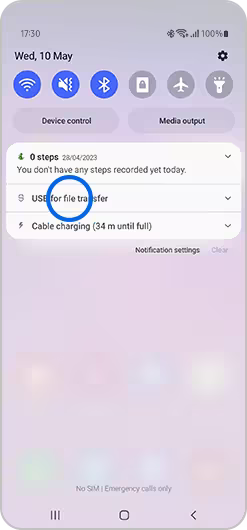
STEP 5: Tap on "Tap for other USB options."
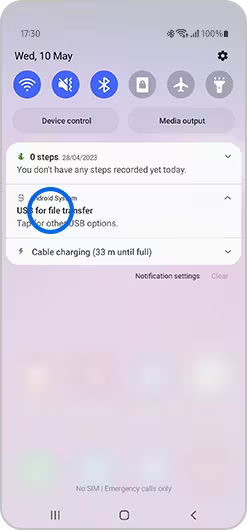
STEP 6: Select the option that says "Transferring files" or "Android Auto."
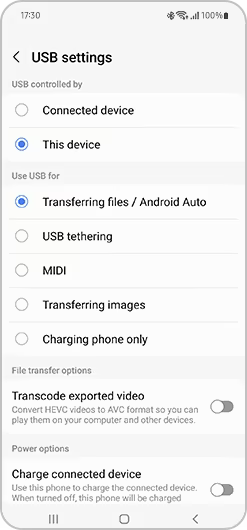
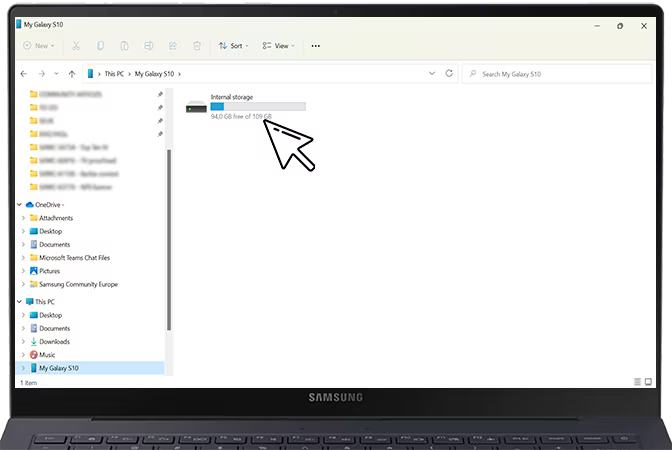
STEP 7: Your phone will now show up on your computer as an external drive. Open File Explorer on Windows or Finder on Mac and look under This PC or Devices to find it.
STEP 8: Double click your phone's name or icon to open it up.
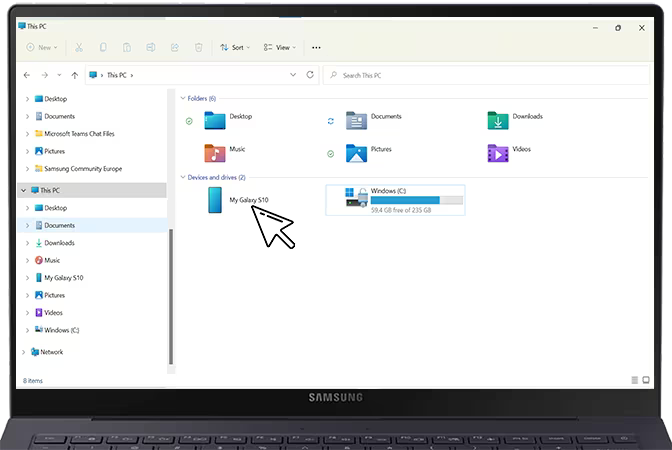
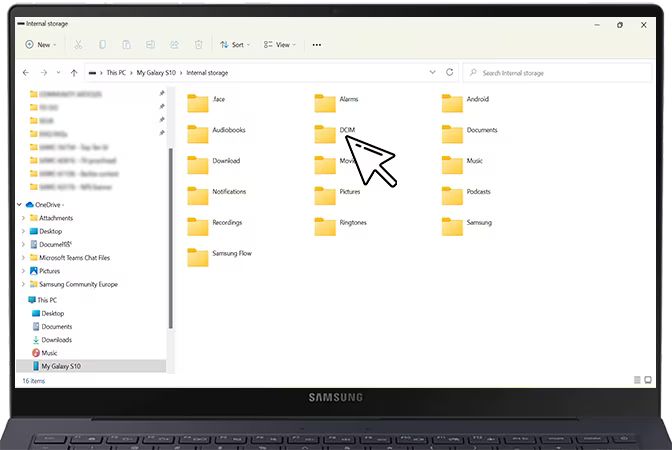
STEP 9: Open the folder for internal storage or SD card, whichever place your photos are.
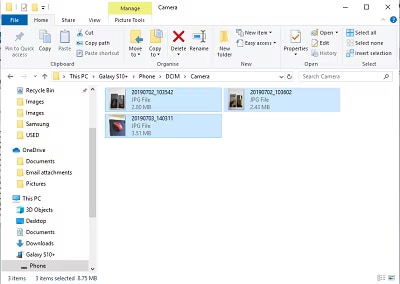
STEP 10: Find your pictures under the DCIM folder. If they're on your SD card, check that folder instead.
STEP 11: Finally, select the photos you want to move and drag them over to your computer. Transfer complete!
Part 2: Transfer Pictures From Samsung To PC Via Bluetooth
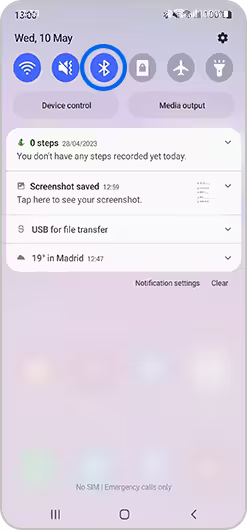
Step 1: On your Samsung, swipe down and make sure Bluetooth is turned on. Tap it if the icon is grayed out.
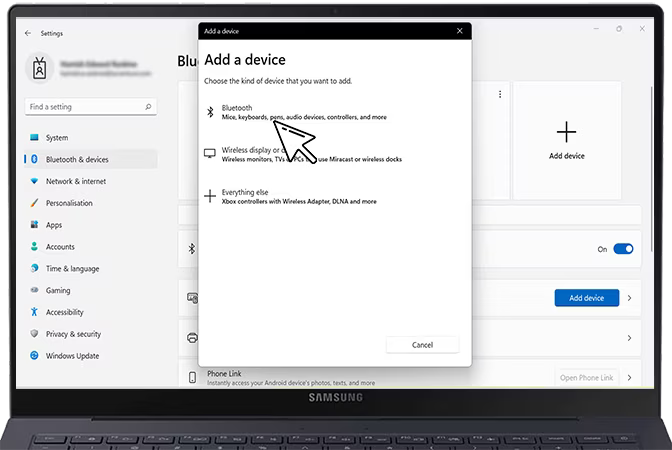
Step 2: On your PC, go to Settings > Bluetooth and toggle Bluetooth to On. Click "Add Device."
Step 3: Your PC should now show your Samsung as an available device. Select it to pair.
Step 4: Confirm pairing on both devices when prompted.
Step 5: On your PC, choose "Send or receive files via Bluetooth" and select Receive files.
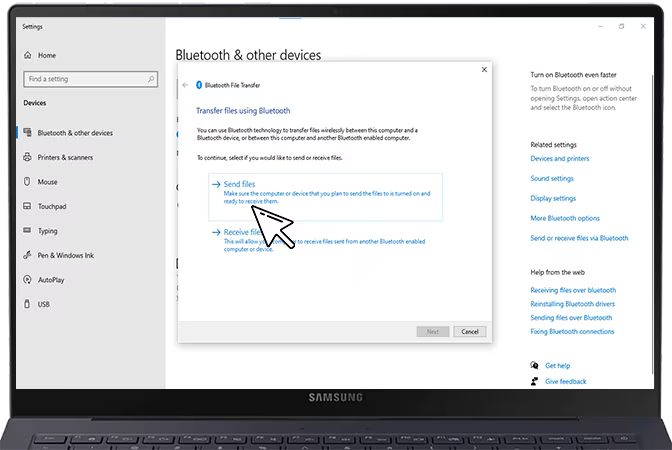
Step 6: Open Gallery on your Samsung and tap and hold photos to select them. Hit share.
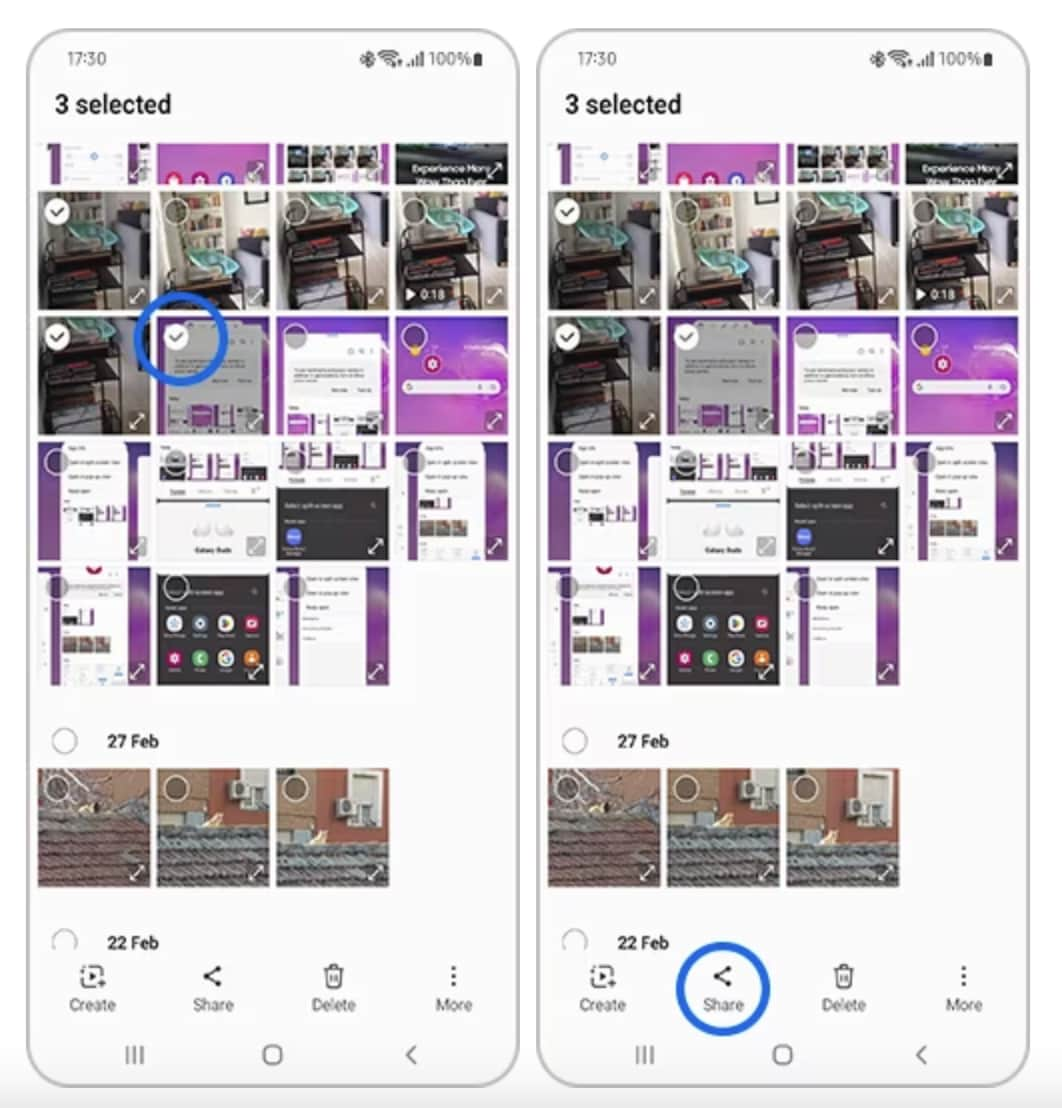
Step 7: Tap Bluetooth and choose your paired PC.
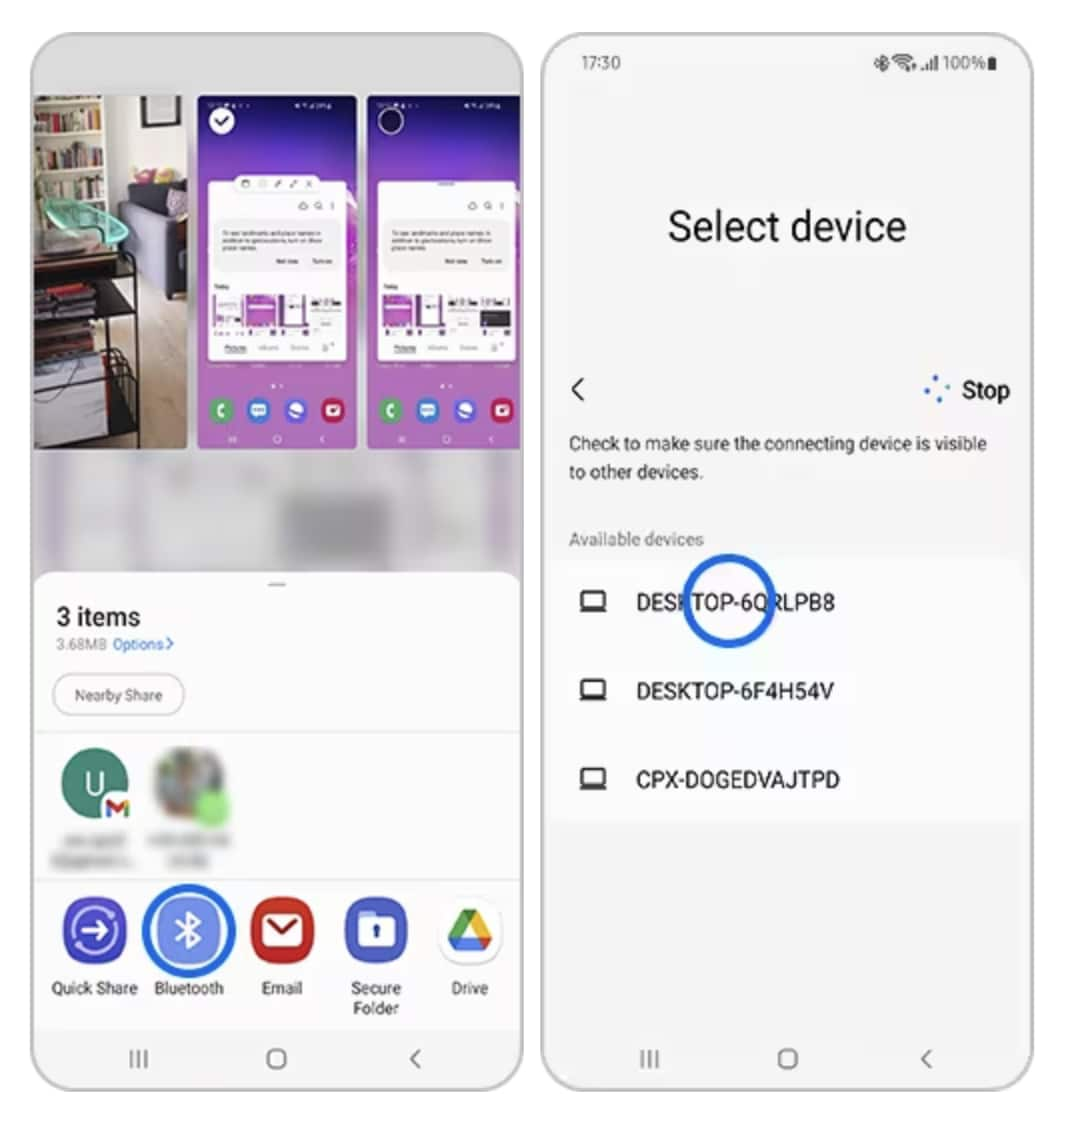
Step 8: Your PC will ask where to save the photos. Choose a location and hit OK.
Step 9: The photo transfer from your Samsung to your PC via Bluetooth will now start.
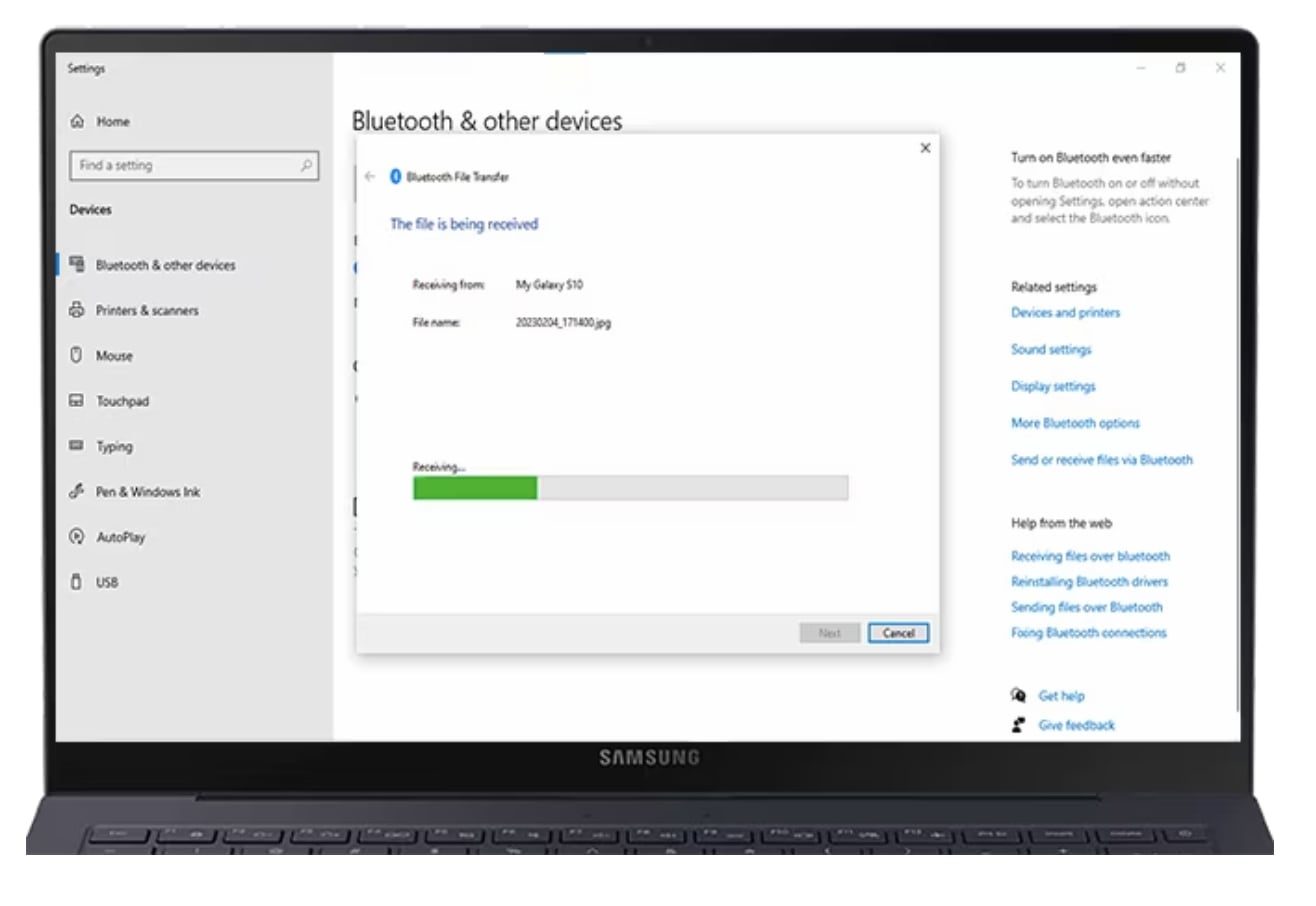
Step 10: When finished, the photos will be saved to the location you selected on your computer.
Part 3: Transfer Pictures From Samsung To PC Using Google Drive
Step 1: On your Samsung, open the Google Drive app and log into your Google account if prompted.
Step 2: Tap the big blue button that says "New" and select Upload.
Step 3: Choose the photos you want to transfer from your phone to Drive. You can browse your folders and select multiple photos.
Step 4: Hit upload and Google Drive will start uploading your selected photos to the cloud.
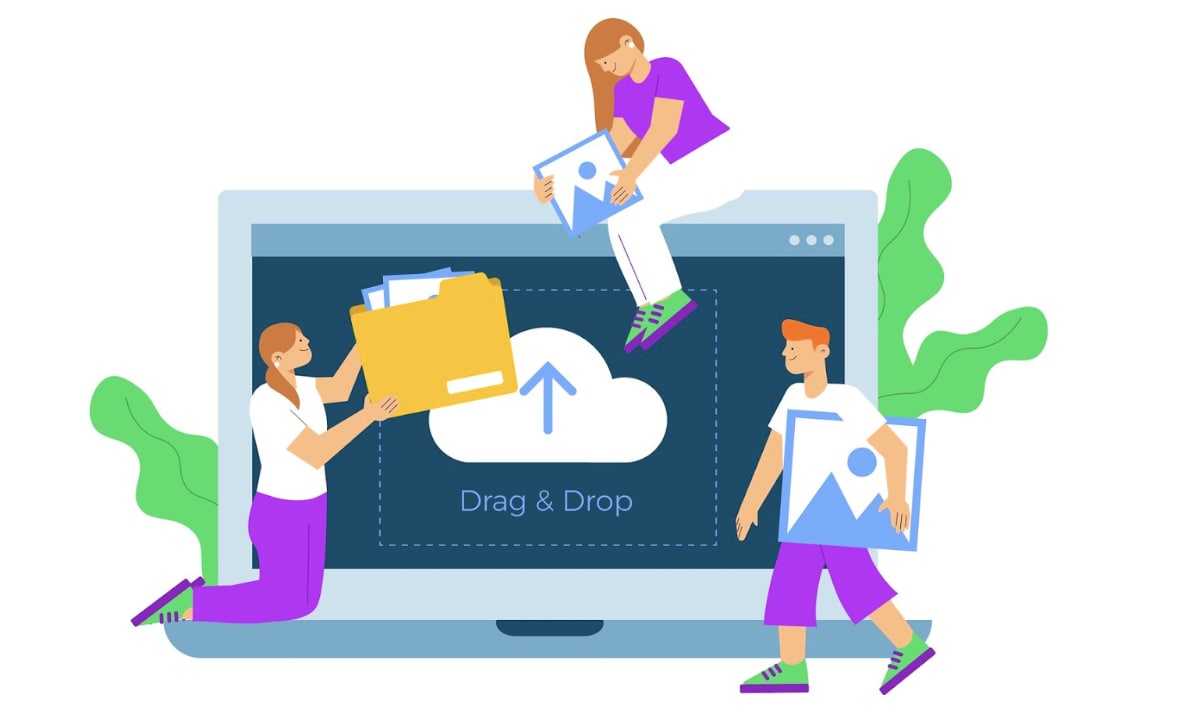
Step 5: Once uploaded, go to drive.google.com on your computer and log into the same Google account.
Step 6: Your uploaded photos from your phone will now be visible in Google Drive on your computer.
Step 7: Click on a photo, then in the top right hit the Download button to save the photo directly to your computer.
Step 8: Choose where to save the photos on your computer. I suggest creating a folder just for your transferred images.
Step 9: Repeat step 7 to download and save all the photos you transferred from your Samsung to your PC through Google Drive.
Part 4: Transfer Images From Samsung To PC Using SD Card
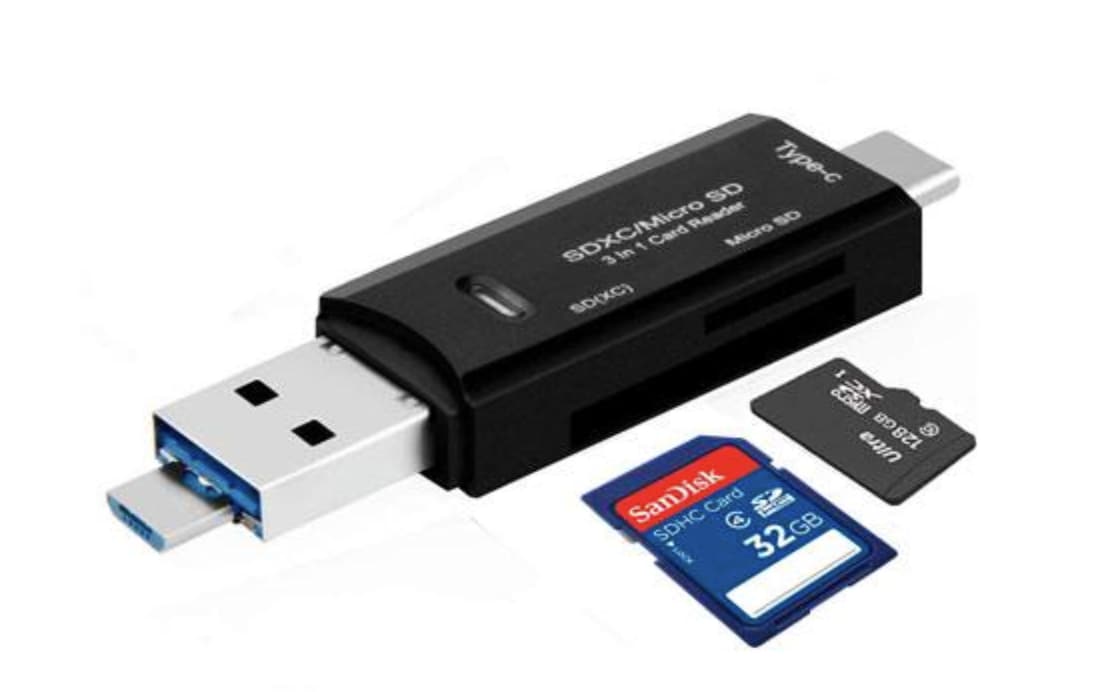
STEP 1: First, take the SD card out of your Samsung device - gently push it in to eject it, then carefully slide it out. Grab your SD card reader and plug it into your computer if it's not built in.
STEP 2: Now insert the SD card into the card reader slot. You should see it pop up as a new drive on your computer. Double click to open it up and view the files on your SD card.
STEP 3: Inside you'll find folders, including the DCIM folder where your photos from the Samsung live. Open it up and you'll see all your images.
STEP 4: Click to select the photos you want to transfer from the SD card over to your computer. With them highlighted, right click and choose Copy or Cut.
STEP 5: Then, on your computer, open up the location where you want to save the images, like your Pictures folder for example. Right click and select Paste to transfer the photos there.
Part 5: Recommended: Transfer Photos From Samsung To PC In 1 Click Using Dr.Fone
If you want the easiest way to get photos from your Samsung to your computer, I recommend using the Dr.Fone app. Here's how simple it is:

Dr.Fone - Basic
One - Stop Solution to Manage and Transfer Data&Files on Android Phone
- Transfer files between Android and computer, including contacts, photos, music, SMS, and more.
- Manage, export/import your music, photos, videos, contacts, SMS, Apps, etc.
- Transfer iTunes to Android (vice versa).
- Manage your Android device on the computer.
- Fully compatible with the newest Android system.
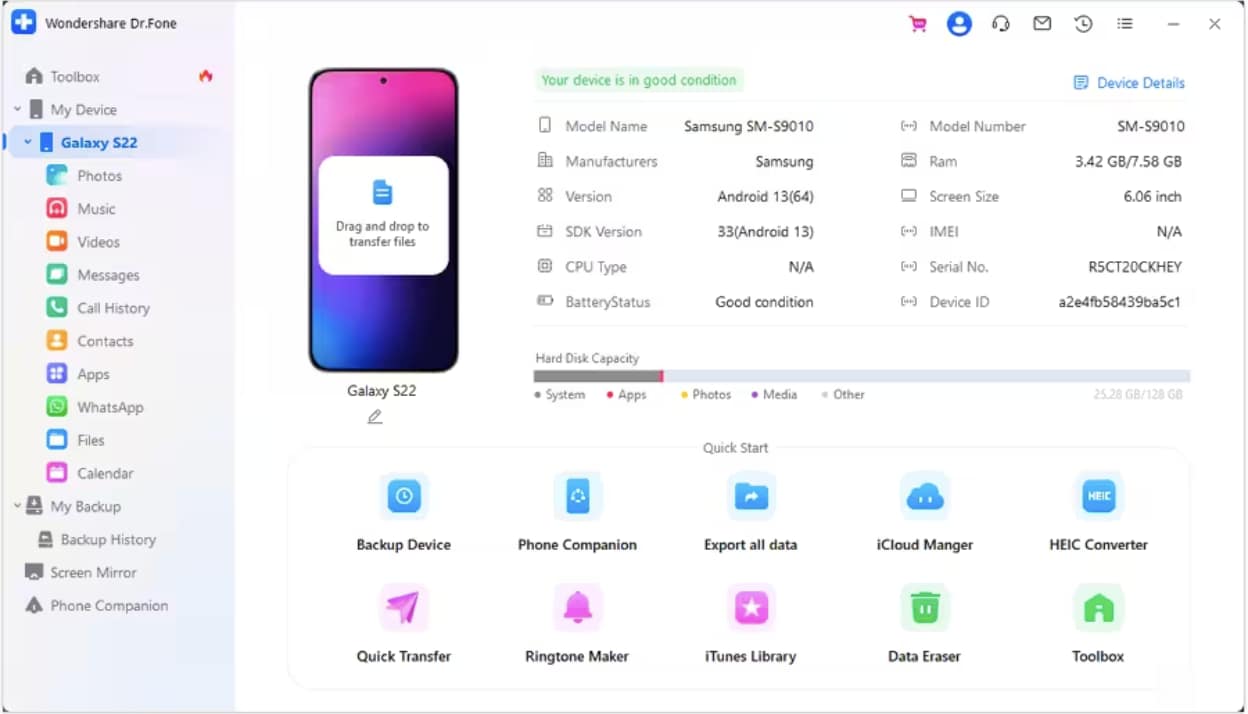
Step 1: Connect Android For Exporting Data
Connect your Android device using a USB cable and let it be detected on Dr.Fone. As it is detected, lead to select the Export all data option on the bottom of the home screen.
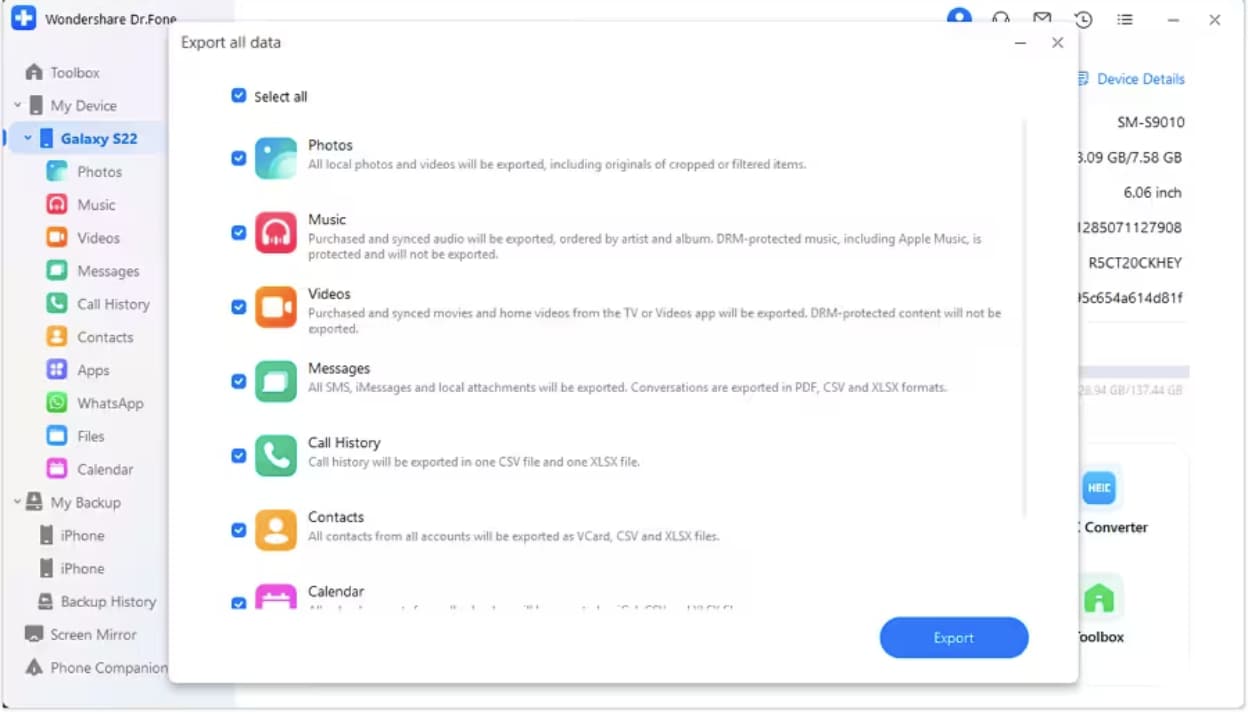
Step 2: Select File Types and Continue
Following this, you will have to select all the file types that you want to export in this operation. You can export your photos, music, videos, messages, call history, contacts, calendar, and application data. On specifying the data, click Export and set up a location for the exported data on the computer.
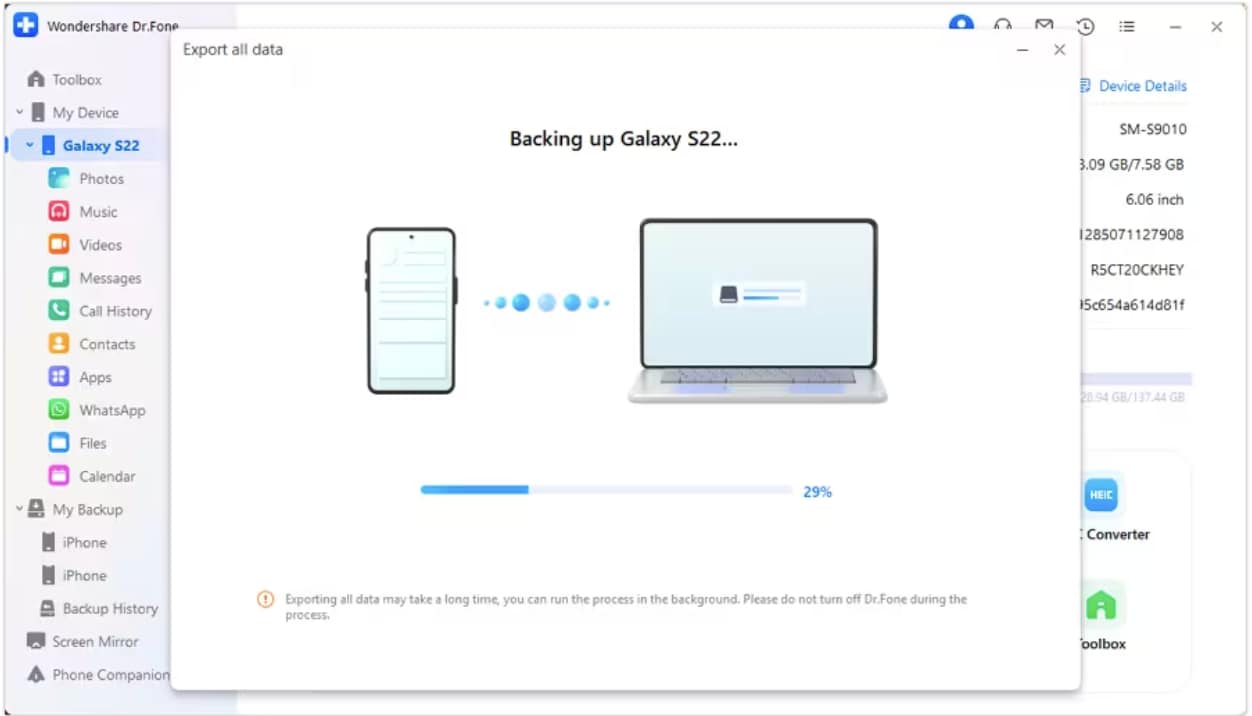
Step 3: Start Exporting Android Data
The process starts and can be viewed through the progress bar appearing on the computer’s screen.
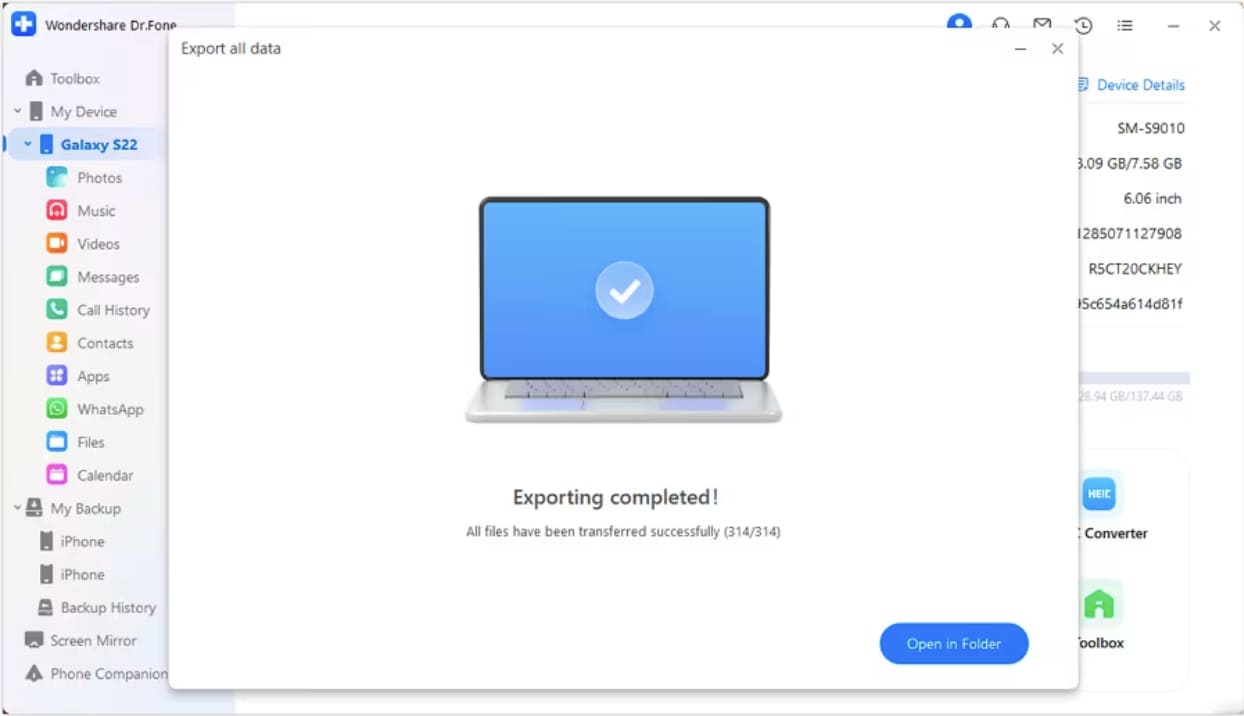
Step 4: Conclude Exporting Android Data
Once the data is exported, it is displayed on the computer screen. Click Open to view the location of the exported data from the Android device.
Part 6: Troubleshooting
Having trouble getting those photos from your Samsung to your PC? Don't worry, there are a few easy things we can try to fix it:
- First up, check the USB cable - some cheaper charging cables don't actually let you transfer data like photos. Swap it out for the original Samsung cable that came with your phone, or another high-quality one you know transfers data.
- While you're checking hardware, try plugging the cable into a different USB port on your computer too, just in case the original one is dusty or malfunctioning.
- Next, take a peek at your antivirus software. It's possible it's blocking your phone from connecting fully to protect your PC. Add your phone as a trusted device or temporarily disable antivirus to see if that helps.
- If your phone is only showing a charging notification when first plugged in, tap it to change the setting to "Connected as media device" or "File transfers." That should let the photo transfer work.
- Also, double check your phone's USB options to make sure you have Media Device (MTP) enabled so it can transfer files.
Conclusion
Transferring photos from your Samsung device to your computer is easy once you know the various options available. We've covered several methods in this guide, including direct USB transfer, wireless with Bluetooth or cloud drives, and SD card transfer.
Choose the option that best suits your specific needs and setup. With the simple step-by-step instructions provided, you'll be able to quickly and easily move your photos and images from Samsung phone or tablet over to your Windows or Mac computer.
The USB cable method typically offers the fastest speeds for large transfers. However, wireless options like Google Drive are more convenient if you want access to your photos on all your devices. And using your SD card lets you move photos without any cables at all. And the most recommended is using Dr.Fone Basic-phone transfer feature.
Now you can have your picture library in one organized place for safe backup, easier editing, sharing and managing your growing collection of precious memories and images.
Samsung Manage
- Samsung Data Manage
- 1. Best Samsung Manager
- 2. Manage Contacts on S9/S8
- 3. Manage Music on Samsung
- 4. Manage Music on Samsung S8
- 5. Transfer Photos to Samsung S8
- 6. Manage Photos on Samsung S9
- 7. Best Galaxy S9 Manager
- 8. Samsung Gear Manager
- 9. Samsung Task Manager
- 10. Remove Samsung Bloatware
- Samsung Erase
- 1. Tips for Selling Old Samsung
- 2. Wipe A Samsung Phone
- 3. Tips to Erase Data
- 4. Remove Samsung Apps
- 5. Uninstall Apps on Samsung
- Samsung Mirror
- 1. Share the Phone Screen
- 2. Screen mirror to Samsung TV
- 3. Use Allshare Cast To Mirror
- 4. Samsung Mirror Screen to PC
- Samsung Record
- 1. Screen Record on Samsung A50
- 2. Screen Record on Samsung S10
- 3. Screen Record on Samsung s9
- 4. Samsung S8 Screen Record
- 5. Top Samsung Screen Recorder
- Samsung Root
- 1. Root Samsung Galaxy S7
- 2. Jailbreak Samsung Phones
- 3. Root Samsung Galaxy S3
- 4. Root Samsung Galaxy S4
- 5. Root Samsung Galaxy S5
- 6. Root Samsung Galaxy J5
- 7. Samsung Root Apps Without PC
- 8. Top 6 Samsung Root Software
- 9. Used Apps to Root Samsung Note
- 10. Root Samsung Galaxy S3 mini
- 11. Root Galaxy Tab 2 7.0
- 12. Unroot Android Devices
- Samsung to Mac
- 1. Transfer Photos to Mac
- 2. Samsung File Transfer for Mac
- 3. Transfer Photos from Samsung
- 4. Transfer Pictures to Mac
- 5. Transfer Pictures from Samsung
- 6. Transfer Files to Macbook
- Samsung to PC
- 1. Transfer Contact from Samsung
- 2. Transfer Photos to PC
- 3. Transfer Photos to Laptop
- 4. Transfer Photos from Samsung
- 5. Transfer Files to PC
- 6. Transfer Photos From Note 8 to PC
- USB Debugging
- Samsung Tips
- ● Manage/transfer/recover data
- ● Unlock screen/activate/FRP lock
- ● Fix most iOS and Android issues
- Manage Now Manage Now Manage Now


Alice MJ
staff Editor