How to Screen Record on Samsung S10 and S10 Plus
Jul 12, 2024 • Filed to: Mirror Phone Solutions • Proven solutions
Screen recording can get quite significant at places where you need to save something important to watch or to keep a record of. This service has allowed users to be more vigilant in saving significant moments that they part with within their lives. Many Android phones have been created and introduced into the market, where they featured different tools. However, tools such as screen recorders have not been a part of many Android devices available in the market. Developers such as Samsung have introduced this feature in their latest smartphones where users can efficiently create videos of important moments to save them for future needs. Samsung Galaxy S10 and S10 Plus are two distinct and state-of-the-art phones that can provide an environment to its users for prolific recording, yet there are certain pointers that are to be kept in mind while seeking a platform to consume the service. This article introduces you to the variety of tools that are available for screen recording with a guide defining how to screen record on Samsung S10.
Part 1. Use 'Screen recorder' built-in Samsung Galaxy phones (S9 and later)
Before screen recording was introduced in the market, there was no concept of taking a high-quality video of the screen for saving an instant in the event that has been occurring across the device. As screen recording was introduced among users, many found it quite effective in consuming and looked forward to impressive platforms that offered such services. Different developers tried to bring up solutions, where many produced good applications successfully, and many failed. Over a period of time, it was realized by the brand developers that the service was requested across multiple platforms by millions of users, which led to the creation of built-in screen recording tools. Samsung introduced their own 'Screen Recorder' over the release of Galaxy S9, which was taken ahead by their next iteration, the Samsung Galaxy S10. The tool developed across this model was more intuitive and cognitive in utility and execution, although the procedure of utilizing them was quite similar. When discovering the appropriate method to use the Screen Recorder across your Galaxy S10, you should always look forward to utilizing its own built-in service. Thus, there is a need to devise a proper step-by-step guide explaining its use. To effectively utilize Samsung's Screen Recorder for developing high-quality recorded videos, you need to follow the guidelines as follows.
Step 1: You need to scroll down your Galaxy's screen to access the Quick Access Panel. Observe the list of buttons appearing on the screen and try to locate the 'Screen Recording' icon. If you fail to find the icon there, you need to tap on the 'Three-dotted' icon present on the top-right of these buttons.
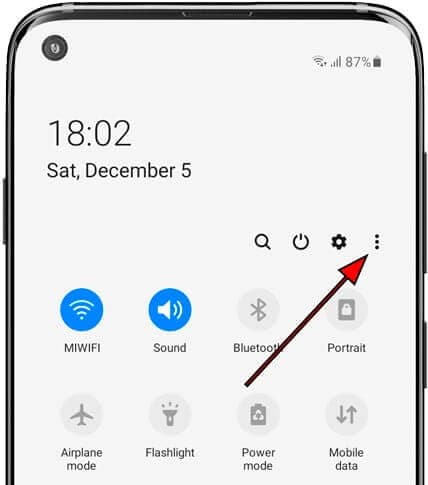
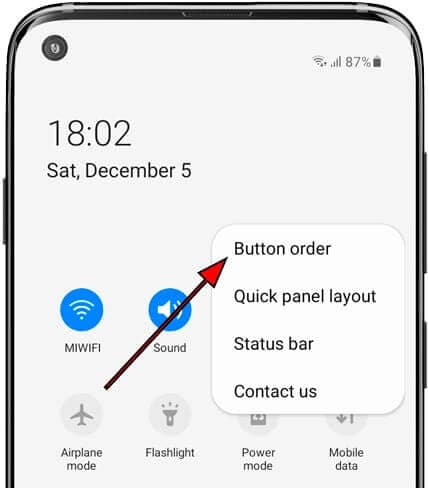
Step 2: This will lead you to a new screen after you tap on the option of ‘Button Order’ from the drop-down menu. Over the screen, you will observe a list of different buttons.
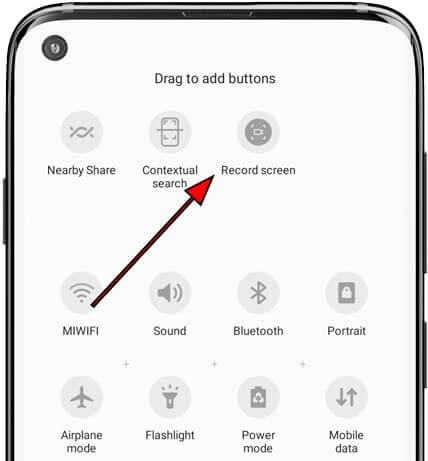
Step 3: The top side of the screen will display the buttons that can be added to the panel. The bottom side shows the buttons that are already present across the panel before. Drag and drop the 'Screen Recording' icon from the available buttons to add it into the Quick Panel.
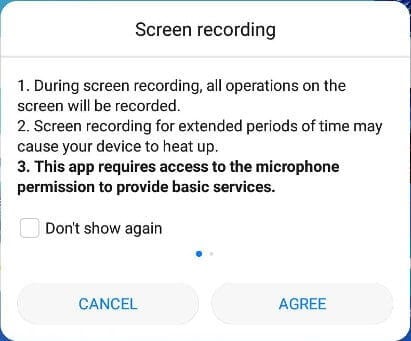
Step 4: Revert to the home screen and scroll down the S10’s screen to open its panel. Select the ‘Screen Recording’ button from the screen and set up the quality of the output video to proceed.
Step 5: Over confirmation, a three-second countdown initiates the screen recording. Once you are done with the recording, you can simply tap on the ‘Stop’ button from the top-left corner of your screen.
There are several advantages and downsides involved in using this service, which is provided as follows.
Pros:
- Records high-quality content without any downloads.
- Allows you to record any screen within the device.
Cons:
- Only offered across a few Samsung models.
- Operates across Android 10.0 or greater.
Part 2. How to use MirrorGo to screen record Samsung S10? (Android 6.0 and higher)
In such cases where you are not acquiring the best from the built-in features of your Samsung S10, or you are entangled in a situation where your screen recorder is not in operation, you can always go for a better and resilient option in the market. In this case, you can seek to use Wondershare Dr.Fone as your getaway software with the option of having a better experience in using and operating your device during screen recording.

Wondershare Dr.Fone
Record your android device on your computer!
- Record on the big screen of the PC with MirrorGo.
- Takescreenshots and save them to the PC.
- View multiple notifications simultaneously without picking up your phone.
- Use android apps on your PC for a full-screen experience.
To understand the operation of MirrorGo and the process that makes it the best choice in the market for your Samsung S10, you need to consider the steps that are offered below.
Step 1: Launch Software
You need to download and install the latest iteration of MirrorGo on your computer and proceed with launching it.
Step 2: Connect Devices and Mirror
Following this, you need to establish a connection of your device with the computer. Connect your Samsung with the computer through a USB cable and tap ‘Connect’ to allow the contents of the smartphone to be displayed across the screen of the computer.
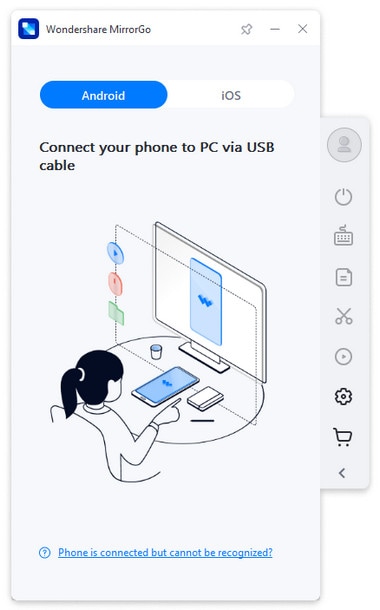
Step 3: Record Screen
Once the screen of your mobile appears on the computer, you need to tap on the ‘Record’ button on the right-hand panel to initiate recording. However, when you are done recording your Samsung S10, simply tap the ‘Stop’ button across the same panel and lead into the folder where the recording has been saved in the computer.

MirrorGo is a very efficient solution when it comes to using your Samsung S10 across the computer and record its screen with ease. There are several points of dominance when it comes to using MirrorGo as your screen recorder, which is provided as:
Pros:
- Record, capture, or mirror your Samsung across a PC or an HDTV.
- Easily record your screen without rooting the device.
- Allows you to use your mouse to operate your phone’s screen.
Cons:
- Do not offer a Mac version.
Part 3. Tip: How to screen record games with 'Game Launcher'(most Samsung Galaxy phones)
Samsung users can always go for another built-in getaway option for screen recording if they are not having an operating Screen Recorder on their devices. Samsung's 'Game Launcher' is a very effective choice for screen recording for gamers, where they can easily record their gaming experience with this platform. This application, however, is restricted to operate and record across different applications only. To easily utilize the services of Game Launcher across your Samsung S10 to record any game or an application to share it across different platforms, you need to focus on the steps provided below.
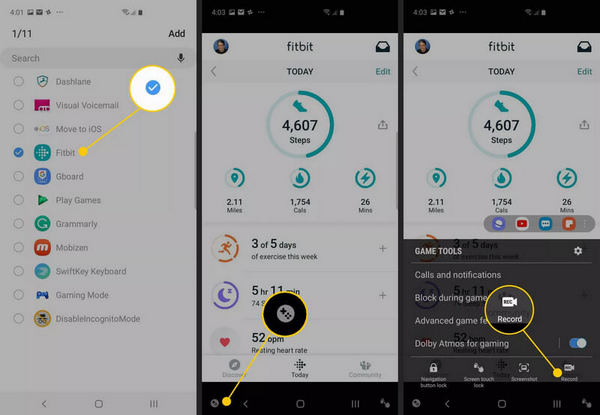
Step 1: Open your Game Launcher and swipe up the screen to access the ‘Library’ window. Over the window, you need to tap on the three-dotted icon present on the top of the Library.
Step 2: Select the option of ‘Add Apps’ to open the list of all applications available across your smartphone. Select the application you wish to record and tap ‘Add’ to add it in the library of your Game Launcher.
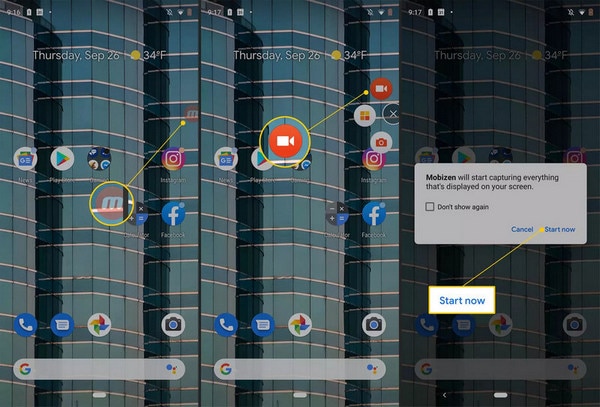
Step 3: Once added to the Library, you need to tap on the specific application by accessing there and let the application start. Once it is started, tap on the 'Game Tools' icon present on the lower-left corner of your navigation bar.
Step 4: With the list of different options available, tap on ‘Record’ on the lower-right corner of the screen to begin recording. Once you are done, simply tap ‘Stop’ on the lower-right corner of your screen.
Part 4. Frequently asked questions
4.1 How long of a video can I record on my phone?
Videos with a high-resolution setting usually stop recording after 10 minutes of recording time. However, choosing a lower resolution setting may extend the time period.
4.2 How much space does a screen recording take?
The size of the screen recording file ranges from 3 MB to 18 MB for 15 minutes of recording time. The size is effectively proportional to the resolution settings.
4.3 How do you transfer video from phone to computer?
If you are using MirrorGo for this case, you need to simply set up a save path and lead there to find all your recorded videos saved at that path.
Conclusion
The article has particularly featured the most appropriate methods that are available in the market to provide the Samsung S10 users with procedures to record their screens efficiently. You need to go through the article to get to know more about the methods discussed.
Other Popular Articles From Wondershare
Samsung Manage
- Samsung Data Manage
- 1. Best Samsung Manager
- 2. Manage Contacts on S9/S8
- 3. Manage Music on Samsung
- 4. Manage Music on Samsung S8
- 5. Transfer Photos to Samsung S8
- 6. Manage Photos on Samsung S9
- 7. Best Galaxy S9 Manager
- 8. Samsung Gear Manager
- 9. Samsung Task Manager
- 10. Remove Samsung Bloatware
- Samsung Erase
- 1. Tips for Selling Old Samsung
- 2. Wipe A Samsung Phone
- 3. Tips to Erase Data
- 4. Remove Samsung Apps
- 5. Uninstall Apps on Samsung
- Samsung Mirror
- 1. Share the Phone Screen
- 2. Screen mirror to Samsung TV
- 3. Use Allshare Cast To Mirror
- 4. Samsung Mirror Screen to PC
- Samsung Record
- 1. Screen Record on Samsung A50
- 2. Screen Record on Samsung S10
- 3. Screen Record on Samsung s9
- 4. Samsung S8 Screen Record
- 5. Top Samsung Screen Recorder
- Samsung Root
- 1. Root Samsung Galaxy S7
- 2. Jailbreak Samsung Phones
- 3. Root Samsung Galaxy S3
- 4. Root Samsung Galaxy S4
- 5. Root Samsung Galaxy S5
- 6. Root Samsung Galaxy J5
- 7. Samsung Root Apps Without PC
- 8. Top 6 Samsung Root Software
- 9. Used Apps to Root Samsung Note
- 10. Root Samsung Galaxy S3 mini
- 11. Root Galaxy Tab 2 7.0
- 12. Unroot Android Devices
- Samsung to Mac
- 1. Transfer Photos to Mac
- 2. Samsung File Transfer for Mac
- 3. Transfer Photos from Samsung
- 4. Transfer Pictures to Mac
- 5. Transfer Pictures from Samsung
- 6. Transfer Files to Macbook
- Samsung to PC
- 1. Transfer Contact from Samsung
- 2. Transfer Photos to PC
- 3. Transfer Photos to Laptop
- 4. Transfer Photos from Samsung
- 5. Transfer Files to PC
- 6. Transfer Photos From Note 8 to PC
- USB Debugging
- Samsung Tips
- ● Manage/transfer/recover data
- ● Unlock screen/activate/FRP lock
- ● Fix most iOS and Android issues
- Manage Now Manage Now Manage Now


James Davis
staff Editor